


17
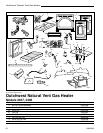
Dutchwest Natural Vent Gas Heater
30002008
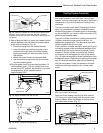
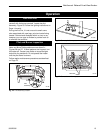
Pilot Hood
Pilot
Bracket
CO105a
Fig. 31 Remove pilot hood.
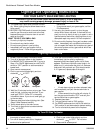
Index Tab
Snap Ring
Allen Wrench
CO106a
Fig. 32 Remove pilot orifice.
• Remove pilot orifice with allen wrench. (Fig. 32)
• Install the conversion orifice.
• Reinstall pilot hood. Be sure to align hood with
index tab.
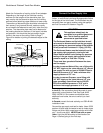
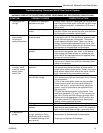
16. Adjust air shutter on the burner. The air shutter is
located on the bottom of the burner on the left. (Fig.
46) Loosen the two nuts holding the shutter in place.
On natural gas units, the shutter is shipped fully
closed. To convert to LP, reset the shutter as speci-
fied in Table 2. (Fig. 34) On propane unit the shutter
is set at 1/8” or 3/8” opening depending on rating
plate serial number. To convert to natural gas, the
shutter should set to fully closed. Refasten the two
nuts.
Front Injector Air Inlet
Air Shutter
Burner
Air Shutter
Rear
Injector Air
Inlet -
Covered
Configuration for
Stove with Serial
#’s up to #5250
Configuration for Stoves with
Serial #’s Starting at 5251
ST718
Fig. 33 Natural gas air shutter setting.
1/8"
3/8"
Air Shutter
(LP Position)
Air Shutter
(LP Position)
Configuration for
Stove with Serial #’s
up to #5483
Configuration for Stoves with
Serial #’s Starting at #5484
ST726
Fig. 34 LP air shutter settings.
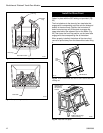
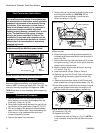
Fig. 35 Remove and replace injector orifices.
90¡
Left Burner Leg
Injector Orifices
ST353a
NOTE: Be sure burner leg remains at a 90° angle to
firebox base after conversion.
17. Replace burner. Slide the burner in at an angle with
left side lower than the right side. Slide the left side
onto the injectors, making sure the burner leg
remains at a 90° angle to the base. Lower the right
hand side down in to place. Make sure the burner is
as far left as possible and the injector shoulders are
inside the burner.
NOTE: It is very critical to keep the left burner leg,
which holds the injectors, at a 90° angel to the base.
(Fig. 35) This keeps the orifices aligned with the
tubes inside burner. Failure to do so could affect the
flame appearance and performance of the unit.
18. Place conversion label on valve.
19. Reinstall the right and left log bracket assembly.
20. Replace logs.
21. Replace glass and stove front.
22. Check manifold pressure.
Conversion is complete.