


Page 14 CLARKE TECHNOLOGY Model SPS-28 Space Sweeper Operator's Manual
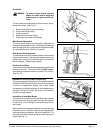
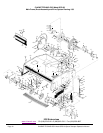
Installation of New Main Brush (cont)
Remove the three screws and washers and the bristle
strip retained by them. Install the new strip and assemble
the retaining screws and washers. Be sure to install the
"V" of each strip in the same relation to the core as its
companion strips. (See Fig. 11, page 11)
CAUTION: The strips must be carefully centered
on the core before they are firmly
locked into position. Rotate the broom
by hand through a full revolution to
check for possible interference with
the shaft carriers at each end. Failure
to check this area could result in
damage to the drive mechanism.
Continue to replace one strip at a time, checking end
clearance on each end, until all strips have been re-
placed with new fillers.
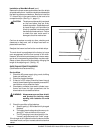
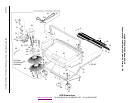
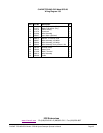
Readjust the broom to allow for the new bristle strips.
The main brush is preadjusted at the factory to insure
even engagement with the floor across its full width.
However, should the brush show signs of uneven wear,
end to end, compensating adjustments may be made.
Raise or lower either end as required by changing the
length of the adjusting rod. (See fig. 12)
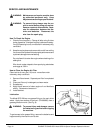
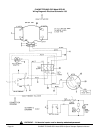
SHOP EVALUATION OF CHARGERS
(Qualified Service Personnel Only)
Service Hints
1. Check the AC power supply (plug, cords, building
fuses and switched, etc.)
2. Check for physical damage.
3. If there is no DC output, check for blown internal
fuse(s); blown fuses may be caused by reversed DC
connections or by a defective diode.
4. Check parts - ammeter, timer-switch, diodes, trans-
former and fuses for tight connections and for
discoloration due to electrical failure.
WARNING: Always wear eye and face shield,
and protective clothing when
working with batteries to avoid
injury.
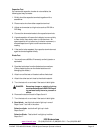
5. Check the condition of the batteries.
a. Specific gravity (1.280 is ideal for fully charged
batteries.
b. The battery bank voltage should come up to
about 30.7 volts at the end of the cycle.
c. The DC charging current should start in the
"normal" range and end in the "finish" range.
If the charger is still inoperative after the above checks
have been made, call your nearest authorized service
center.
Fig. 12