MOUNTING
Note: All wiring should be done in accordance with local codes
and the National Electrical Code by a qualified person.
WARNING: Hazard of Electric Shock. Any installa-
tion involving electric heaters must be effectively
grounded in accordance with the National
Electrical Code to eliminate shock hazard.
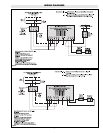
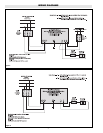
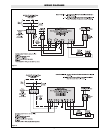
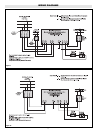
1. Connect heater according to the voltage and frequency speci-
fied on the nameplate and using the appropriate wiring diagram
(Figures 3 thru 14).
Note: Be sure to check the voltage rating of the fan motor since
it is not necessarily the same as the heater circuit.
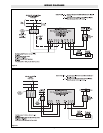
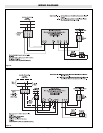
2. If an external transformer is used to step down the voltage for
operating the fan motor, use appropriate wiring diagram (Figures
7 thru 14).
3. Heaters are not provided with a control switch and should be
controlled by externally mounted disconnect switches and/or
separately mounted thermostat and control switch as recom-
mended in appropriate wiring diagrams (Figures 3 thru 14).
Key to proper wiring diagram is the part number (P/N) of inter-
nal wiring diagram located on inside of the hinged cover of the
terminal box.
4. Protection against overheating is provided by an internal auto-
matic thermal cutout which opens the electric circuit if the nor-
mal air-flow is restricted or stopped. Cutout automatically
energizes heater on removal of the obstruction.
WARNING: Hazard of Electric Shock. Disconnect all
power before installing heater.
WARNING: These heaters are designed for wall or ceiling mount-
ing only. Other modes of mounting voids factory warranty.
1. Height above floor
A. In areas where ceiling height is more than 12 feet, recom-
mended mounting height is approximately 10 feet to under-
side of heater.
B. For ceiling heights of 12 feet or less, maximum mounting
height is determined by use of ceiling mounting brackets
offered with these heaters. Minimum spacing to ceiling is
14-1/4”.
C. In either case the minimum mounting height is 7 feet from
floor to bottom of heater. (See Figures 1 and 2.)
2. Spacing to adjacent walls
A. Rear of case to back wall 11” minimum.
B. Side of case to side wall 12” minimum.
3. If two or more units are operated in the same enclosed space,
their discharges should be directed to aid in development of
mass air movement for uniform heat dispersal.
4. Controlling thermostats to individual heaters should be mount-
ed at shoulder height on inside walls or columns.
IMPORTANT
WIRING
Do not mount mercury type thermostat directly on unit. Vibration
could cause heater to malfunction.
The heater must be mounted at least 7’ above the floor to prevent
accidental contact with the heating elements or fan blade which
could cause injury.
Keep at least 5’ clearance in front of the heater. Refer to Figures 1
and 2 for side, top, and back clearance requirements.
The wall or ceiling mounting structure and the anchoring provision
must be of sufficient strength to support the combined weight of
the heater and mounting bracket. (Refer to Table A for weights of
heater and bracket).
Fan blade rotation must be checked. If airflow is not moving out
through the louvers, interchange any two of the three customer
power leads on three-phase units only.
2


