


Installation Instructions RPMA1, -B1, -C1
5
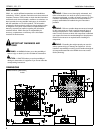
ASSEMBLY AND INSTALLATION
Installing Ceiling Plate and Disassembling
RPMA1
WARNING: IMPROPER INSTALLATION CAN RESULT IN
SERIOUS PERSONAL INJURY OR DAMAGE TO
EQUIPMENT! Structural members MUST be capable of
supporting five times the combined weight of all equipment
being mounted.
1. Install ceiling plate and extension accessories following
installation instruction provided by manufacturer.
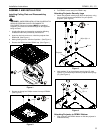
2. Insert key into lock and turn to unlock the projector from
RPM head. (See Figure 1)
3. Moving locking lever to "Unlocked" position. (See Figure 1)
4. Remove the RPM head from RPMA1 top. (See Figure 1)
Figure 1
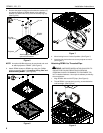
5. Remove and keep four Phillips screws from top of RPMA1.
(See Figure 2)
Figure 2
6. Pull RPMA1 bottom away from RPMA1 top.
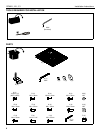
Attaching Projector Security Legs
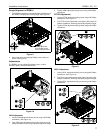
1. Attach the projector security legs (R) to the projector, using
the correct size screws and washers for your specific
projector. (See Figure 3)
Figure 3
2. Add washers (U) to the projector security legs (R). Add
spacers (T) as necessary to level the projector security legs
(R). (See Figure 4)
Figure 4
Attaching Projector to RPMA1 Bottom
1. Align projector and RPMA1 bottom so that the projector is
oriented correctly.
x
2
3
4
x 4
5
x 4
(M) or (N) x 4
(R) x 4
Projector
(U) x 4
(T) x 4
2