


Should the stove burner cut out for any reason you
should not try to re-light it for at least 5 minutes. If you
are then unable to re-light the pilot as described earlier
you should contact your stove supplier or engineer.
During normal operation, for example in the winter
months when the stove will be in regular use, we advise
that the pilot is left running continuously as this will allow
for quick and easy lighting, while at the same time helping
to prevent condensation. When the stove is not being used
for long periods, i.e. in the summer then we advise that the
gas supply is turned off at the isolation tap.
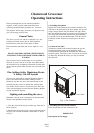
PLEASE NOTE: When the stove is first operated it
should be run at its maximum setting for several hours to
help the painted coating to cure. However, if you are able
to run the stove for a minimum of four hours then the full
curing process will be completed.
While the paint is curing there may be a little smoke given
off the surface of the stove accompanied by a slight smell
and traces of vapour. This is perfectly normal and quite
harmless. However, for your own comfort keep the room
well ventilated until the curing process is completed. The
slight smell may linger for the first week or so of
operation.
Customer Reminder
IT IS A LEGAL REQUIREMENT THAT THE
COMPLETE ASSEMBLY, INSTALLATION AND
COMMISSIONING OF GAS FIRED STOVES IS
CARRIED OUT BY A PROFESSIONALLY QUALIFIED
AND ACCREDITED GAS FITTER. YOU MUST NOT
ATTEMPT THIS YOURSELF.
MAINTENANCE & SERVICING
PROCEDURES.
Stove Cleaning
The stove surfaces are treated with an extremely durable
high temperature resistant paint cleaned by brushing down
with a clean shoe brush. If any of the black paint should
need retouching you can obtain the correct paint from your
stove supplier. Don't wash the stove or let water remain on
any surface when it is cold as this may cause rusting.
Glass Cleaning
Under normal use the glass should remain clean. However,
if the glass needs cleaning, this can easily be done with a
suitable glass cleaner available from your stove supplier.
To The Customer
PLEASE READ THE FOLLOWING PROCEDURES AND
SERVICE CHECKS BUT PLEASE NOTE THEY MUST
ALL BE CARRIED OUT BY A QUALIFIED INSTALLA-
TION ENGINEER. IF THE DOOR GLASS BECOMES
DAMAGED OR BROKEN-DO NOT USE THE STOVE.
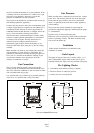
Glass Replacement
1. Before carrying out the glass replacement we suggest
that, for safety reasons, the gas supply is turned off at the
isolation tap.
2. When the stove is cold remove door: See stove assembly
instructions.
3. Protect the working surface by laying the door on plenty
of newspaper or cardboard.
4. Remove all glass securing clips and all the broken glass.
5. Fit the new glass, ordered from your stove supplier,
ensuring that the sealing cord is correctly positioned
between the glass and the cast iron door frame. If this
sealing cord is damaged in any way a replacement can be
obtained from your stove supplier.
6. Re-secure the clips and nuts. Do not over-tighten as this
could crack the glass. We suggest hand tight, just enough
to ensure a good seal.
7. Re-fit the door making sure it is securely closed, before
re-establishing the pilot light as described above.
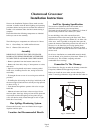
Fume Spillage Check
This test must be carried out by the installation engineer
when the stove is first commissioned and then we suggest
every 12 months to ensure that the products of combustion
are not spilling into the room. The test is carried out by
running the stove for ten minutes and then holding a
smoke match close to the diverter box to make sure the
smoke is drawn up the into the flue way. Do not use a
lighted match or a naked flame. The air flow must be
drawn to the chimney with sufficient draught. If the smoke
is disturbed then repeat the test a few minutes later. If the
smoke is still disturbed by escaping products of combustion
turn the stove off and contact your installation engineer
Regular Servicing For Safety And
Efficient Operation.
Servicing should be carried out annually by a qualified
installation engineer when the stove is cold and the gas
supply turned off at the isolation tap. The following points
should checked:
1. Remove all the coals and clean any dust and debris from
Page 4
SV 2/00