


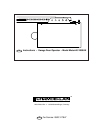
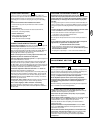
COMPLETED INSTALLATION –
As you proceed with the assembly, installation and adjustment
proceedures in this manual, you may find it helpful to refer back
to this illustration of a completed installation.
4
FASTEN T-RAIL TO THE OPENER –
Place packing material under the opener to protect the opener cover.
For convenience, place a support under the cable pulley bracket end
of rail.
Remove the (2) washered screws (1) from the top of the opener. Align
holes in back end of the T-rail with holes in opener (2).
Fasten the rail to the opener with the same washered screws and
tighten securely.
Caution: Use only those screws!
Use of any other
screws will cause serious damage to the door opener.
Insert a hex screw (3) into trolley stop hole in T-rail (4). Tighten
securely with a lock washer (5) and nut (6).
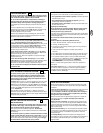
INSTALL THE CHAIN/CABLE & ATTACH THE
SPROCKET COVER –
Do not remove chain/cable from carton.
Dispense a few inches of cable from carton and fasten to trolley
with a master link.
Master Link Procedure: Push pins of master link bar (5) through
cable loop (6) and hole in front end of trolley (7). Push cap (2) over
pins (8) and onto notches. Slide clip-on spring (1) over cap and onto
pin notches until both pins are securely locked in place.
Caution: Keep chain taut during installation to help prevent
kinking.
With the trolley against screwdriver, dispense chain/cable around
pulley (4). Proceed back around the opener sprocket (9). The opener
sprocket teeth must engage the chain. Continue forward to the trolley
threaded shaft.
Use the second master link to connect the chain to the flat end of the
threaded shaft (3).
Check to make sure the chain is not twisted.
Remove the screwdriver.
To attach the sprocket cover (10), insert the front tab (12) in the
opener slot. Using needle nose pliers, push together the two halves of
the back tab (11) inserting them on the mounting plate (13). Use
reverse procedure to remove.
TIGHTEN THE CHAIN/CABLE –
Spin inner nut (3) and lock washer (2) down threaded shaft (4).
Check to make sure chain is not twisted.
To tighten the chain, turn outer nut (1) in the direction shown. As you
turn the nut, keep the chain from twisting.
When chain is approximately 13mm (1/2") above the base of the
T-rail (5) at midpoint, re-tighten inner nut.
Sprocket noise can result if chain is either too loose or too tight.
When installation is complete, you may notice some chain droop with
the door closed. This is normal. The chain returns to the position
described above when the door is open,
do not re-adjust the chain.
During future maintenance
, ALWAYS
pull the manual release
handle to disconnect trolley before adjusting chain.
10
9
8
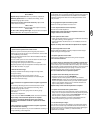
ASSEMBLY SECTION –
105
Important: If you have a canopy or dual-track door, you need to
use the instructions packed with The Chamberlain Arm™
Accessory in conjunction with this Owner's Manual when
assembling the T-rail.
ASSEMBLE THE T-RAIL –
Place rail pieces on a flat surface for assembly. The center sections
with tapered ends (5) are interchangeable. So are the end sections
(4). Connect the braces (3) and lock nuts (2) from one side of the rails
and insert the carriage bolts (6) from the opposite side. Then the
trolley will not hit the lock nuts when it is installed.
The square necks on the carriage bolts must be seated in square
holes in rail sections (1).
For canopy and dual-track doors, continue with the instructions
in this manual until Step 12.
INSTALL THE CABLE PULLEY BRACKET –
Position cable pulley bracket (2) on the front section of T-rail (6).
Fasten securely with: screws (1); lock washers (3) and nuts (4).
When tightening the screws, be sure to keep bracket parallel to
rail (5). Otherwise, rail may bow when opener is operated.
INSTALL THE TROLLEY –
Insert a screwdriver into trolley "stop" hole in the front end of T-rail (6).
Attach trolley threaded shaft (4) to the trolley with: lock washer (2),
and nuts (1 & 3). Slide trolley (5) along rail to the "stop".
Note: If the trolley hits any nuts on T-rail, review rail assembly
and reposition hardware.
7
6
5
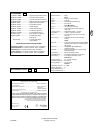
(1) Cable Pulley Bracket
(2) Trolley
(3) Chain & Cable
(4) T-rail
(5) Hanging Bracket
(6) Power Cord
(7) Opener
(8) Manual Release
Rope & Handle
(9) Curved Door Arm
(10) Straight Door Arm
(11) Door Bracket
(12) Header Bracket
(13) Trolley Release Arm
ASSEMBLY OF YOUR OPENER IS NOW COMPLETE.
BEFORE YOU BEGIN:
1. Look at the wall or ceiling above the garage door. The header
bracket
must
be securely fastened to structural supports.
2. Do you have a finished ceiling in your garage? If so, a support bracket
and additional fastening hardware (not supplied) may be required.
3. Depending on your door's construction, you might need a special
door arm. See your dealer.
4. Do you have an access door in addition to the garage door? If not,
Model 1702EML Outside Quick Release Accessory is required.
2-GB