


© 2007, The Chamberlain Group, Inc.
114A3105D All Rights Reserved
Craftsman
®
is a Registered Trademark of Sears, Roebuck and Co.
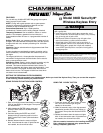
INSTALLATION
Choose a convenient
location for installation.
Install out of reach of
children at a minimum
height of 5' (1.5 m),
away from all moving
parts of door.
For a one-piece door,
choose the optional
location shown in the
illustration to avoid
injury as the door
swings up and out.
Test the reception of the Keyless
Entry by operating your opener
from the selected location.
Change the location if necessary.
Remove the battery compartment
cover to access the bottom
mounting hole:
• Insert a small phillips screw
driver into the small hole at the
bottom of the cover and gently
pull outward to loosen.
• Slide the cover down to remove.
Center the keypad at eye level against the selected location.
Mark 4-1/4" (10.6 cm) up the centerline from the bottom and drill
a 1/8" pilot hole. Install top mounting screw, allowing 1/8"
(3 mm) to protrude above surface. Position keypad on screw
head and adjust for snug fit.
With cover open so bottom mounting hole is visible, use a
punch to mark hole. Remove keypad and drill 1/8" pilot hole.
Replace keypad and complete installation with bottom screw,
using care to avoid cracking plastic housing. Do not overtighten.
To replace the battery cover, insert the lip at the top and snap in
place.
THE KEYLESS ENTRY BATTERY
The 9 volt battery should produce
power for at least one year. Replace
when the keypad illumination
becomes dim.
Dispose of old batteries properly.
Door Jamb Edge
(Optional)
Keyless
Entry
Door Jamb Face
(SECTIONAL DOOR ONLY)
KEYLESS ENTRY MUST BE
INSTALLED WITHIN
SIGHT OF THE DOOR
Exterior Front Wall
1-Piece or
Sectional Door
Typical
Installation
Bottom
Mounting Hole
Top Cover
Battery Cover
9V Battery
TO CHANGE AN EXISTING, KNOWN PIN
If the existing PIN is known, it may be changed by one
person without using a ladder.
1. Press the four buttons for the present PIN, then press and
hold the # button.
The opener light will blink twice. Release the # button.
2. Press the new 4-digit PIN you have chosen, then
press ENTER.
The motor unit lights will blink once when the PIN has been
learned.
Test by pressing the new PIN, then press ENTER. The door
should move.
TO SET A TEMPORARY PIN
You may authorize access by visitors or service people with a
temporary 4-digit PIN. After a programmed number of hours or
number of accesses, this temporary PIN expires and will no
longer open the door. It can be used to close the door even
after it has expired. To set a temporary PIN:
1. Press the four buttons for your personal entry PIN (not the
last temporary PIN), then press and hold the ✽ button.
The opener light will blink three times. Release the
button.
2. Press the temporary 4-digit PIN you have chosen, then press
ENTER.
The opener light will blink four times.
3. To set the number of hours this temporary PIN will work,
press the number of hours (up to 255), then press ✽.
OR
To set the number of times this temporary PIN will work,
press the number of times (up to 255), then press #.
The opener light will blink once when the temporary PIN has
been learned.
Test by pressing the four buttons for the temporary PIN, then
press Enter. The door should move. If the temporary PIN was
set to a certain number of openings, remember that the test
has used up one opening.To clear the temporary password,
repeat steps 1-3, setting the number of hours or times to 0 in
step 3.
SPECIAL NOTE: The temporary password can ONLY be
programmed to keypads working on a Chamberlain, Craftsman
®
or LiftMaster Garage Door Opener. It WILL NOT work on
keypads programmed to an external receiver.
The temporary password will continue to CLOSE the door even
after the time has expired.
To eliminate this, program a new temporary password into the
keypad.
FOR SERVICE DIAL OUR TOLL FREE NUMBER:
1-800-528-9131
To prevent possible SERIOUS INJURY or DEATH:
• NEVER allow small children near batteries.
• If battery is swallowed, immediately notify doctor.