


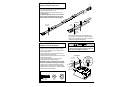
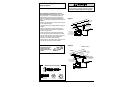

Assembly Step 4
Install the Belt & Set the Belt Tension
Serious injury can result if fingers become
entangled in moving opener sprocket. Attach
belt cap retainer securely. Never operate
opener while your hand is near the opener
sprocket.
The Chamberlain Group, Inc.
Liftmaster Synchro Drive
Spring Trolley Nut Assembly
3/5/92 - 5/16 /92 - 5/21/92 - 6/2/92
6/11/92
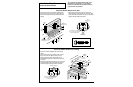
Nut
Ring
Trolley
Threaded
Shaft
Nut Ring
Slots
Trolley
Square End
The Chamberlain Group, Inc.
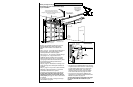
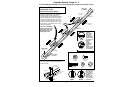
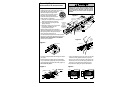
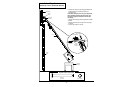
Attach Tee Rail To Opener Chassis
Liftmaster Synchro Drive GDO (Belt)
3/13/92 - 6/2/92 - 6/3/92
Opener
Sprocket
Hex Screws
8x3/8"
Belt Cap
Retainer
Opener Sprocket
Mounting Plate
Belt
Hex Screw
8x3/8"
Opener Sprocket
10
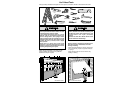
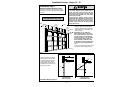
• Drop the notched side of the trolley clip into the
retaining slot on top of the trolley (see Figure 1).
• Grasp the clip connector at the end of
the belt and slip it through the belt
pulley bracket from behind, around
the pulley and toward the trolley.
• Fasten the belt clip connector to the
trolley clip with a master link:
a. Push pins of master link bar through holes in
trolley clip and belt clip connector.
b. Push master link cap over pins and
past pin notches.
c. Slide clip-on spring over cap and onto
pin notches until both pins are
securely locked in place.
• With the trolley against the screwdriver,
dispense the belt along the rail and around
the opener sprocket. The sprocket teeth
must engage the belt (Figure 2).
• Use the second master link to connect the belt to
the flat end of the trolley threaded shaft (Figure 1).
Check to make sure the belt is not twisted.
• Remove the screwdriver.
Belt
Pulley
Slip Belt Clip
Connector
through
Pulley Bracket
from this direction
and attach
to trolley clip
Trolley
Clip
Master Link
Clip-On Spring
Master
Link Cap
Trolley
Threaded Shaft
Master
Link Bar
Pin
Notch
Pin
Notch
Belt
Clip Connector
Figure 2
Figure 1
Figure 4
WARNING
CAUTION
WARNING
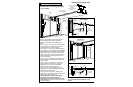
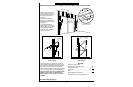
• Insert a screwdriver tip into one of the nut ring slots
and brace it firmly against the trolley. (Figure 4)
• Place a 7/16" open end wrench on the square end.
Rotate about 1/4 turn until the spring releases and
snaps the nut ring against the trolley (Figure 5).
This extends the spring for optimum belt tension.
• Insert the trolley threaded shaft through the hole in
the trolley.
• Hold the belt at the trolley shaft to avoid twisting
as you thread the spring/trolley nut by hand on the
shaft until finger tight against the trolley (Figure 3).
Do not use any tools.
Belt Clip
Connector
Belt Clip
Connector
The Chamberlain Group, Inc.
Liftmaster Synchro Drive
Spring Trolley Nut Assembly
3/5/92 - 5/16 /92 - 5/21/92 - 6/2/92
6/11/92
Trolley
Threaded
Shaft
Spring
Trolley Nut
Trolley
The Chamberlain Group, Inc.
Spring Trolley Nut
1/25/96
Nut Ring Trolley
Nut Ring
Trolley
1" 1-1/4"
BEFORE AFTER RELEASE
Figure 5Figure 3