


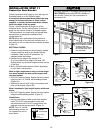
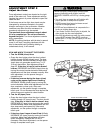
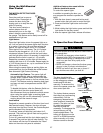

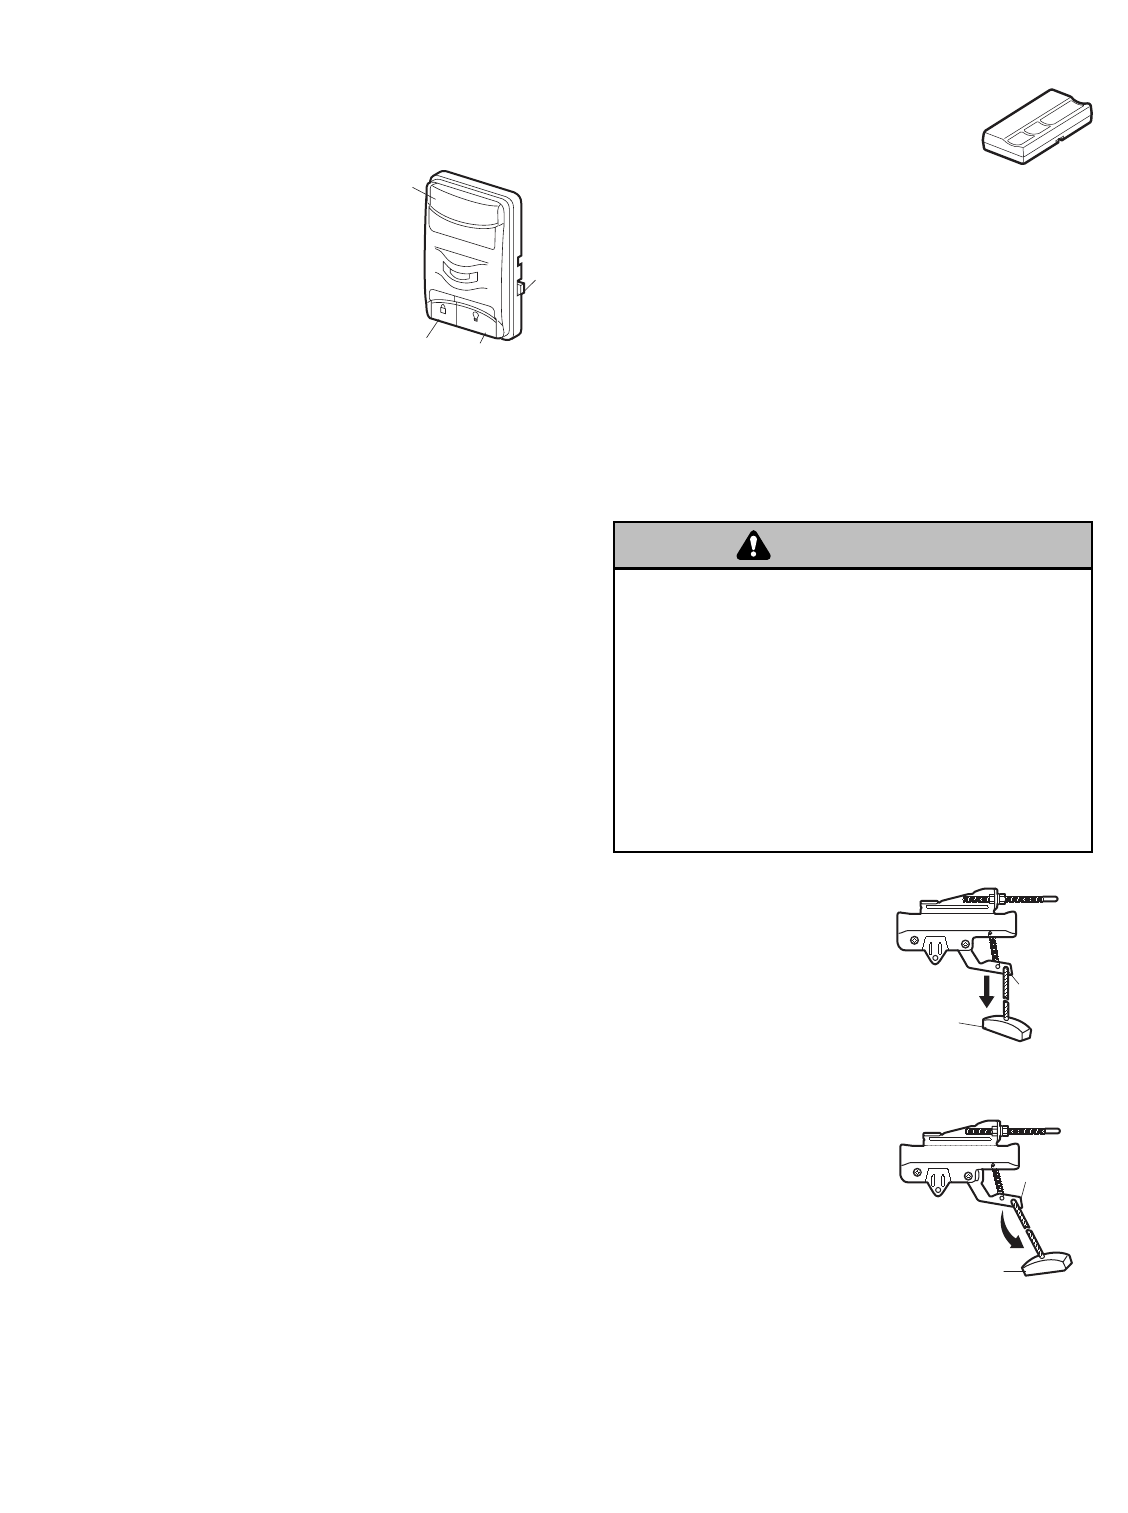
To Open the Door Manually
The door should be fully
closed if possible. Pull down
on the emergency release
handle and lift the door
manually. To reconnect the
door to the opener, press the
door control push bar.
The lockout feature prevents
the trolley from reconnecting
automatically. Pull the
emergency release handle
down and back (toward the
opener). The door can then
be raised and lowered
manually as often as
necessary. To disengage the
lockout feature, pull the
handle straight down. The
trolley will reconnect on the
next UP or DOWN operation,
either manually or by using
the door control or remote.
To prevent possible SERIOUS INJURY or DEATH from a
falling garage door:
• If possible, use emergency release handle to
disengage trolley ONLY when garage door is CLOSED.
Weak or broken springs or unbalanced door could
result in an open door falling rapidly and/or
unexpectedly.
• NEVER use emergency release handle unless garage
doorway is clear of persons and obstructions.
• NEVER use handle to pull door open or closed. If
rope knot becomes untied, you could fall.
27
Trolley
Release
Arm
N
O
T
IC
E
Emergency
Release
Handle
(Pull Down)
Trolley
Release
Arm
N
O
T
IC
E
Emergency
Release Handle
(Down and Back)
WARNING
CAUTION
WARNING
WARNING
LOCKOUT POSITION
MANUAL DISCONNECT
POSITION
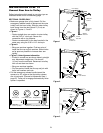
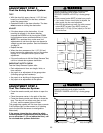
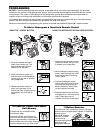
Using the Wall-Mounted
Door Control
THE MOTION DETECTING DOOR
CONTROL
Press the push bar to open or
close the door. Press again to
reverse the door during the
closing cycle or to stop the door
while it's opening.
This door control contains a
motion detector that will
automatically turn on the light
when it detects a person entering
the garage. This feature can be easily turned off for
extended work light use.
Light feature
Press the Light button to turn the opener light on or
off. It will not control the opener lights when the door
is in motion. If you turn it on and then activate the
opener, the light will remain on for 4-1/2 minutes.
Press again to turn it off sooner. The 4-1/2 minute
interval can be changed to 1-1/2, 2-1/2, or 3-1/2
minutes as follows: Press and hold the Lock button
until the light blinks (about 10 seconds). A single blink
indicates that the timer is reset to 1-1/2 minutes.
Repeat the procedure and the light will blink twice,
resetting the timer to 2-1/2 minutes. Repeat again for
a 3-1/2 minute interval, etc., up to a maximum of four
blinks and 4-1/2 minutes.
When using the opener lights as working lights, we
recommend that you first disable the motion sensor
See Automatic Light Feature, following.
Automatic Light Feature: The opener light will
turn on automatically when a person enters the
garage. When a person walks in front of the door
control, the light will come on for five minutes, then
shut off. This feature works by detecting body heat
and may not work in temperatures around 100˚F
(37.7˚C).
To disable this feature, slide the Detector Switch on
the right side of the door control down (off).
We recommend that you disable the motion sensor
when using the opener lights as working lights.
Otherwise, they will turn off automatically if you are
working beyond the sensor’s range.
Lock feature
Designed to prevent operation of the door from hand-
held remote controls. However, the door will open
and close from the Door Control, the Outside Keylock
and the Keyless Entry Accessories.
To activate, press and hold the Lock button for 2
seconds. The push bar light will flash as long as the
Lock feature is on.
To turn off, press and hold the Lock button again for
2 seconds.The push bar light will stop flashing. The
Lock feature will also turn off whenever the “Learn”
button on the motor unit panel is activated.
L
O
C
K
L
IG
H
T
Push
Bar
Lock
Button
Light
Button
Detector
Switch
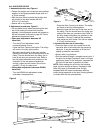
Additional feature when used with the
3-Button hand-held remote
To control the opener lights:
In addition to operating the door, you
may program the remote to operate the
lights.
1. With the door closed, press and hold a small
remote button that you want to control the light.
2. Press and hold the Light button on the door
control.
3. While holding the Light button, press and hold the
Lock button on the door control.
4. After the opener lights flash, release all buttons.