


9
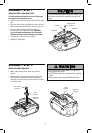
INSTALLATION STEP 2
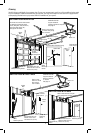
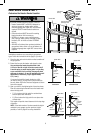
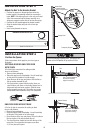
Install the Header Bracket
You can attach the header bracket either to the wall above
the garage door, or to the ceiling. Follow the instructions
which will work best for your particular requirements. Do
not install the header bracket over drywall. If installing
into masonry, use concrete anchors (not provided).
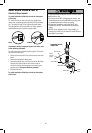
WALL HEADER BRACKET INSTALLATION
• Center the bracket on the vertical centerline with the
bottom edge of the bracket on the horizontal line as
shown (with the arrow pointing toward the ceiling).
• Mark the vertical set of bracket holes (do not use the
holes designated for ceiling mount). Drill 3/16" pilot
holes and fasten the bracket securely to a structural
support with the hardware provided.
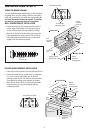
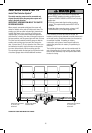
CEILING HEADER BRACKET INSTALLATION
• Extend the vertical centerline onto the ceiling as shown.
• Center the bracket on the vertical mark, no more than
6" (15 cm) from the wall. Make sure the arrow is
pointing toward the wall. The bracket can be mounted
fl ush against the ceiling when clearance is minimal.
• Mark the side holes. Drill 3/16" pilot holes and fasten
bracket securely to a structural support with the
hardware provided.
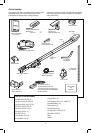
HARDWARE SHOWN ACTUAL SIZE
Lag Screw
5/16"-9x1-5/8"
Vertical
Centerline
of Garage
Door
Vertical
Centerline
of Garage Door
Optional Wall
Mounting Holes
Lag
Screws
5/16"-9
x1-5/8"
2x4
Structural
Support
Horizontal
Line
Wall Mounting Holes
Header
Bracket
Door Spring
Highest Point of
Garage Door Travel
Garage Door
Header Wall
6" (15 cm)
Maximum
Vertical
Centerline
of Garage Door
Lag Screws
5/16"-9x1-5/8"
Header
Bracket
Door
Spring
Finished Ceiling
Header Wall
Ceiling Mounting Holes
Vertical
Centerline
of Garage
Door
Garage Door