


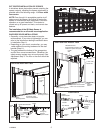


8
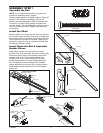
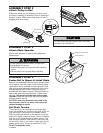
ASSEMBLY STEP 1
Assemble the Rail
NOTE: If your opener came with a one piece rail,
proceed to Assembly step 2, page 9.
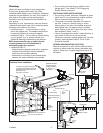
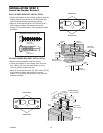
Grease inside edges of rail brace sections. Place rail
pieces on flat surface for assembly. All four rail
sections are interchangeable. Slide rail braces onto
rail section. Connect rail by sliding rail brace onto
next rail section. Tap rail assembly on piece of wood
until rail sections are flush. Repeat with remaining
rail sections.
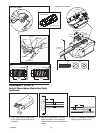
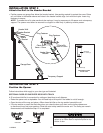
Install the Chain
Remove chain from carton and lay chain out on floor
(do not allow chain to twist). Push pins of master link
bar through chain link and hole in back end of trolley.
Push cap over pins and onto notches. Slide clip-on
spring over cap and onto pin notches until both pins
are securely locked in place.
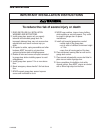
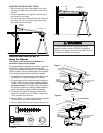
Insert Chain into Rail & Assemble
Header Sleeve
Slide pulley bracket and inner trolley into back
(opener end) of rail assembly, be sure to insert pulley
bracket as shown with arrow pointing toward front
(header end) of rail. Push bracket toward front
(header end) of rail. Insert carriage bolt through
header sleeve bracket. Loosely thread spring nut
onto carriage bolt. Insert carriage bolt of header
sleeve assembly into bold cut out in pulley bracket.
Slide header sleeve assembly on to front (header
end) of rail.
Spring Trolley Nut
Carriage Bolt
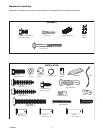
HARDWARE SHOWN ACTUAL SIZE
Rail Piece
Rail Brace
Rail assembly
Piece of Wood
Rail
Piece
Grease
Pulley
Bracket
Carriage Bolt
Header Sleeve
Bracket
Front (Header End)
of Rail
Back
(Opener End)
of Rail
Assembly
Pulley
Bracket
Inner
Trolley
A
rro
w
RAIL
ASSEMBLY
Spring
Cap
Back End of Trolley
Master Link Bar
Chain Link
INSTALLING THE CHAIN
Spring Nut
Header Sleeve
Bracket
Carriage Bolt
114A2845