


2
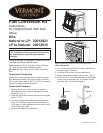
20012973
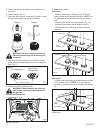
5. Check that the screw is clean and if necessary re-
move dirt.
6. Flip the screw. (Fig. 5)
7. Using the Allen wrench as shown in Figure 6, rotate
the screw clockwise and tighten until snug.
Figure 5
Figure 6
WARNING: Do not overtighten the screw.
Recommended to grip the wrench by the
short side.
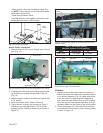
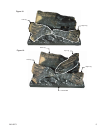
8. Verify that if the conversion is from NG to LP, the
screw must be reassembled with the red o-ring vis-
ible. (Fig. 7)
LP Configuration
Natural Gas
Configuration
CO141
O-ring configuration
6/07
Red O-ring Visible
Red O-ring NOT Visible
CO141
Figure 7
9. Replace the black protection cap.
WARNING: Check that also the pilot and
main burner injectors are appropriate for
the gas type.
Pilot Orifice Conversion
1. Locate pilot. (Fig. 8)
ST935
SDDVT
pilot location
6/07
ST935
Fig. 8 Locate pilot.
CO105a
gas conversion
Pilot
1/28/00 djt
Pilot Hood
Pilot
Bracket
CO105a
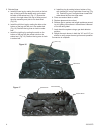
Fig. 9 Remove pilot hood.
CO106a
DV360/580
Gas Conversion
Pilot2
1/28/00 djt
Index Tab
Snap Ring
Allen Wrench
CO106a
Fig. 10 Remove pilot orifice.
2. Replace pilot orifice.
Pilot Type 1
• Remove pilot hood by lifting up. (Fig. 9) Do not
remove snap ring to remove pilot hood. NOTE: It is
not necessary to remove the pilot tube for conver-
sion.
• Remove pilot orifice with Allen wrench. (Fig. 10)
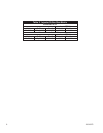
• Install the conversion orifice. Refer to Table 2.
• Reinstall pilot hood. Be sure to align hood with
index tab.
Pilot type 2
• Loosen pilot hood turning counterclockwise using a
7/16” wrench. (Fig. 11)
NOTE: You may use pen-
etrating oil to prevent pilot hood threads from seizing
up.
CO142
Rf pilot Conversion
6/07 djt
Pilot Hood
Index
Marks
Pilot Bracket
CO143
Fig. 11 Remove pilot hood. (Your pilot may have a different
appearance.)