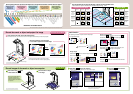
How to put document or object on the stage, and how to select suitable mode
Place document or object in the center of the document stage covering [ ] mark
Click suitable buttons as per size of document or object
Click suitable buttons as per size of document or object
Small
document like
business card
3D object
Small
document like
business card
3D object
Trapezoid
Correction
Small
Document
3D Object
Small
Document
3D Object
Document like
letter size
Large
document like
newspaper
Document like
letter size
Large
document like
newspaper
ON OFF OFF
ON ON OFF
ONOFF
OFF OFF
ON OFF
ONOFF
Document Camera Mode Scanner Mode
Place document like letter size on the document stage
Never touch YC-400 while the
automatic camera position
adjustment operation is being
performed because Auto Sensor
is in process.
Provide enough illumination for document or object
Dark shadow will affect the sensor to capture properly
Change images
Zoom-in, zoom-out image
Click Forward button to forward image, click Back
button to previous image
Click Rotate Left to rotate left for 90 degrees, click
Rotate Right to rotate right for 90 degrees
Click Save button, and indicate folder and file name
to store image
Click Zoom-In for close-up, click Zoom-Out for
normal size, click Scroll to move the image around
AUTO
Store image
Rotate image
Document Camera Mode
Scanner Mode
1
1
2
3 4
Q
u
it
S
h
u
t
te
r
3
D
O
b
je
c
t
S
m
a
ll D
o
c
u
m
e
n
t
T
r
a
p
e
z
o
id
C
o
r
r
e
c
tio
n
Full Screen/Full Screen Off*
F
o
r
w
a
r
d
B
a
c
k
C
o
r
r
e
c
t B
r
ig
h
t
n
e
s
s
S
p
e
c
ify
C
o
n
t
o
u
r
R
o
ta
te
L
e
ft
R
o
ta
te
R
ig
h
t
F
it Im
a
g
e
S
c
r
o
ll
Z
o
o
m
O
u
t
Z
o
o
m
I
n
S
a
v
e
P
r
e
s
e
n
t
a
tio
n
S
c
a
n
n
e
r
C
a
m
e
r
a
Im
a
g
e
P
C
Im
a
g
e
D
o
c
u
m
e
n
t
C
a
m
e
r
a
B
o
a
r
d
A
r
e
a
C
a
p
t
u
r
e
P
r
o
je
c
t
i
o
n
A
r
e
a
C
a
p
t
u
r
e
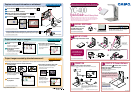
Reference of Toolbar button
Capture and record
information on
whiteboard area
Record document or
object and project
its image
Conduct presentation
using images stored
on computer
Conduct presentation
using images stored
on camera memory
Record document or
object as graphic data
on computer
By moving mouse pointer to the top center of the computer screen, the operation bar combines a menu bar and tool bar appears
before correction after correction
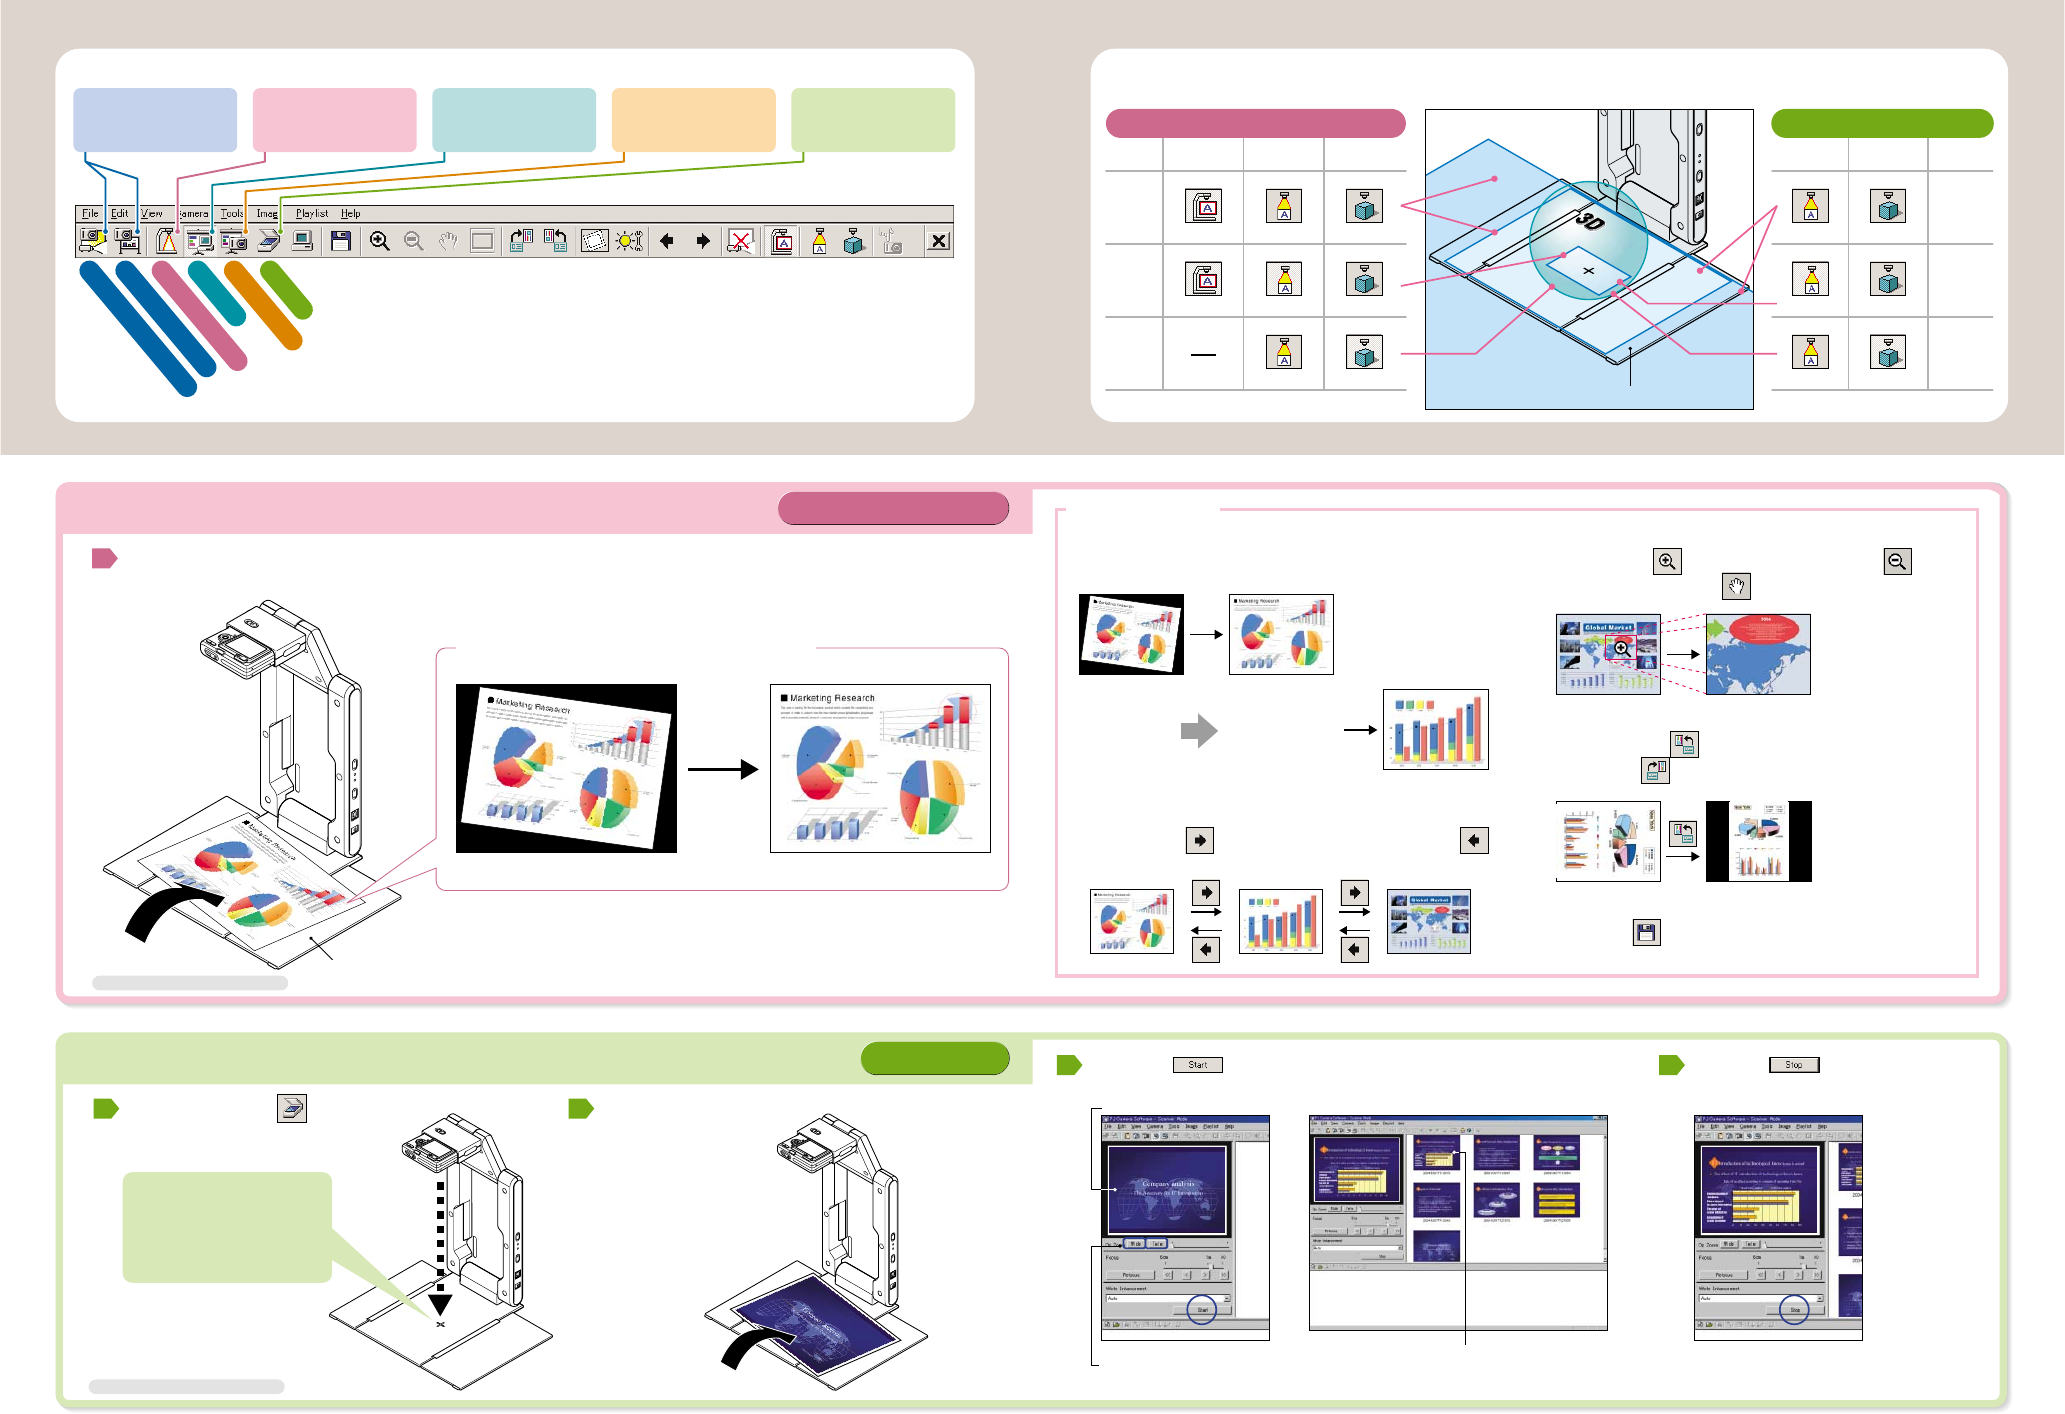
Record document or object and project its image
Record images of document or object on computer
Click Scanner Mode button
to enter Scanner Mode
Place document or object
on the stage
Press start button to start scanning
Scan item automatically by replacing a new documents or object
Click stop button to finish
auto scanning
Inclination, distortion, color and tones of document and object are automatically corrected and projected
Even when document is placed roughly,
it is recorded as proper full-resolution image
Useful function
Document stage
N
e
w
s
p
a
p
e
r
s
i
z
e
L
e
t
t
e
r
s
i
z
e
N
e
w
s
p
a
p
e
r
s
i
z
e
L
e
t
t
e
r
s
i
z
e
Bu
sin
ess
C
a
r
d
s
i
z
e
Document stage
*For more information, see Software User's Guide
*For more information, see Software User's Guide
(Once scanning is completed, its image is
listed as first on preview list area)
Scanning Window
Adjust frame size according
to scanning object
Thumbnail of recorded images
after correction
before correction after correction
AUTO
AUTO
Replace document
By replacing document or object, record it and project
its image automatically
*When “Document Camera Mode” is selected, “Show Document Monitor” button appears instead of “Full Screen/Full Screen Off” button.