


4
SHUTDOWN PROCEDURES
To shut down your humidifier, close the saddle valve on the wa-
ter line. Then turn off the humidistat. When set to the OFF posi-
tion, the humidistat shuts off the electrical power to the solenoid
valve on the humidifier.
NOTE:
If your home comfort system includes cooling, be sure
the water supply to your humidifier is
turned off
during the cool-
ing season. Close the damper located in the bypass duct if one
is installed. If your humidifier is a Model HUMCCWTR, drain
and clean the water pan as described in cleaning procedures.
PERFORMING ROUTINE MAINTENANCE
With the proper maintenance and care, your humidifier will op-
erate economically and dependably. Maintenance can be accom-
plished easily by referring to the following directions. However,
before performing any maintenance, consider these important
safety precautions:
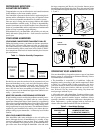
•
DISCONNECT ALL ELECTRICAL POWER TO THE
HUMIDIFIER AND FURNACE BEFORE PERFORMING
ANY SERVICE OR MAINTENANCE TO AVOID PER-
SONAL INJURY.
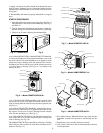
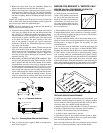
Fig. 10 — Model HUMCCWTR2019-A--
NOTE:
THERE MAY BE MORE THAN 1 ELECTRICAL
DISCONNECT SWITCH.
•
ALTHOUGH SPECIAL CARE HAS BEEN TAKEN TO
MINIMIZE SHARP EDGES IN THE CONSTRUCTION OF
YOUR HUMIDIFIER, BE EXTREMELY CAREFUL WHEN
HANDLING PARTS OR REACHING INTO THE UNIT TO
AVOID PERSONAL INJURY.
Your humidifier has been designed for easy disassembly to sim-
plify cleaning and servicing. Your unit must be kept clean to
maintain its efficiency.
Regular inspection allows you to determine the cleaning sched-
ule best suited to your humidifier’s operating conditions. The
frequency for required maintenance will depend most upon the
available water supply. In areas where hard water and high min-
eral content are prevalent, more frequent cleaning and servicing
may be required.
At minimum, the humidifier will need to be cleaned at the be-
ginning of every heating season.
CLEANING PROCEDURES
Models HUMCCLBP, HUMCCSBP, HUMCCLFP, and
HUMCCSFP
1. Turn off all electrical power to the humidifier and furnace
or fan coil.
2. Turn off the humidifier’s water supply. (See Fig. 4.)
3. Disassemble the humidifier.
•
To disassemble a Model HUMCCSBP humidifier, gently pull
the latch that secures the access panel. Remove the door and
slide the evaporator pad assembly out of the unit. (See Fig. 8.)
•
To disassemble either a Model HUMCCLBP or Model
HUMCCLFP humidifier, first remove the water supply con-
nection to the solenoid valve. Next, remove the screw that
holds the distributor cover to the cabinet, and lift off the cover.
Disconnect the drain line from the sump and loosen the
thumbscrew(s) holding the sump to the cabinet. Remove the
sump. Remove evaporator pad assembly. (See Fig. 6 or 7,
according to the model you own.)
•
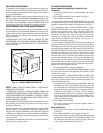
To disassemble a Model HUMCCSFP, the pad assembly can
be removed from the side access door or the front cover. When
removing the side door, lift the pad assembly up by holding the
tabs and slide the assembly out. When removing the front cover
on Model HUMCCSFP, disconnect the quick connects to the
solenoid valve, unscrew the 4 screws to the front cover, snap
loose the top and bottom catches, and lay the front cover aside.
Once the front cover is off, lift the pad assembly up and twist it
out. The pad assembly consists of 4 parts; the distributor pan,
frame, sump, and the evaporator pad. Pull the distributor pan
apart from the frame and the evaporator pad can be removed. Do
not force the evaporator pad in or out without removing the dis-
tributor pan as this will distort the pad.
4. Clean the humidifier’s external components.
•
If your humidifier is a Model HUMCCSBP humidifier, wash
the access door and outlet drain portion of the cabinet. Make
sure the drain is open.
•
If your humidifier is a Model HUMCCLBP or HUMCCLFP,
wash the distributor cover, sump cover, and cabinet. Be sure the
inlet ports are open and clean. Then, clean the sump with a solu-
tion of detergent and water.
5. Clean the internal components of your humidifier. Wash the
distributor pan with a mild detergent and warm water. Be
sure holes and slots in the pan are clean and unobstructed.
Wash the evaporator pad assembly in a detergent solution.
If there are scale deposits on the pad, soak it in ordinary
household vinegar. If the pad is covered by a heavy deposit
of scale, or if the local water supply has high sulfate or cal-
cium content, replace the pad with a new one. Contact your
dealer for replacement part.
6. Reassemble your humidifier.
7. Turn on the electrical power and water supplies. Refer to
the startup procedures.
Model HUMCCWTR
1. Turn off all electrical power to the humidifier and furnace
or fan coil.
2. Turn off the humidifier’s water supply. (See Fig. 4.)
3. Drain water from the unit. Place a pail underneath the drain
plug located on the bottom of the humidifier cabinet. Lift
the tab on the drain plug and remove the plug. Allow all
water to drain from the unit. (See Fig. 12.)
BEARING RETAINER
CABINET
PAD
PAN