


3
•
Supply- and return-air grilles should not be blocked by items
such as drapes, furniture, and toys. Restricted airflow reduces
the efficiency of the humidifier, as well as that of the whole com-
fort system.
•
The humidifier unit must be properly maintained on a regular
basis.
STARTUP PROCEDURES
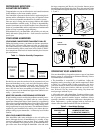
1. Open the saddle valve on the water supply line. (See Fig. 4.)
Set humidistat to the desired relative humidity. (See Fig. 5
and Table 2.)
2. Turn the furnace on and adjust the thermostat to a high tem-
perature setting. Be sure that the furnace blower is operating.
3. Check to see if water is flowing into the humidifier.
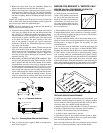
Fig. 4 — Saddle Valve Fig. 5
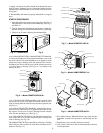
•
On a Model HUMCCLBP or Model HUMCCLFP humidifi-
er, loosen the thumbscrew that holds the distributor cover to the
top of the cabinet. Lift up the distributor cover slightly to make
certain that water is flowing from the solenoid valve into the
distributor pan. Do not lift the cover off the cabinet more than
1 in. when water is flowing. (See Fig. 6 or 7 according to the
model you own.)
Fig. 6 — Model HUMCCLBP2018-A--
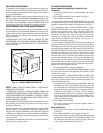
•
On a Model HUMCCSBP humidifier, gently pull the latch
that secures the access door. Remove the door. Check to see if
water is flowing from the solenoid valve into the evaporator pad.
(See Fig. 8.)
•
On a Model HUMCCSFP humidifier, open the side door or
the front cover. If the front cover is opened, hold the pad assem-
bly in place. Check to see if water is flowing from the solenoid
valve into the distributor pan. (See Fig. 9.)
•
On a Model HUMCCWTR unit, look through the window on
front of the unit to see that the evaporator pad is rotating and
water is flowing. (See Fig. 10.)
The Model HUMCCWTR is controlled by a float valve. Turning
off the furnace will not affect the water flow until float level is
achieved. (See Fig. 11.)
Fig. 7 — Model HUMCCLP1025-A--
Fig. 8 — Model HUMCCSBP2017-A--
Fig. 9 — Model HUMCCSFP1016-A--
4. Turn off the furnace. When the blower stops, look into the
humidifier to make sure the water is not flowing into the
unit.
5. Replace the cover assembly and fasten securely.
6. Now, turn the furnace on and set the thermostat for desired
room temperature.
HUMIDISTAT
SOLENOID VALVE
DISTRIBUTOR COVER
DISTRIBUTOR PAN
EVAPORATOR PAD
CABINET
BOTTOM ACCESS
PANEL
SOLENOID VALVE
DISTRIBUTOR COVER
DISTRIBUTOR PAN
EVAPORATOR PAD
CABINET
BOTTOM ACCESS PANEL
INLET
CABINET
DUCT HOUSING
RECTIFIER
DRAIN
SIDE ACCESS DOOR
EVAPORATOR PAD
DISTRIBUTOR PAN
SOLENOID VALVE
CABINET
FRONT COVER
SCREWS (4)
PAD ASSEMBLY
SIDE ACCESS DOOR