4. If the image of your eye is centered in the reflection of the secondary mirror, your secondary
mirror is collimated. If it is off to one side, then secondary mirror adjustment will be
required. By removing the plastic cap on the secondary mirror base at the end of the
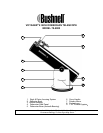
telescope tube nearest the Rack and Pinion Focusing Mechanism (1), you will see three screw
heads. They are positioned 120 degrees apart. By adjusting these three screws very slowly
and carefully, the secondary mirror will reflect an image of your eye that is perfectly centered
in the reflection of the secondary mirror. Once this is accomplished replace the plastic cap.
Your secondary mirror is now collimated.
5. Once secondary mirror collimation is confirmed, you will need to verify Primary Mirror (7)
collimation. If the image of the secondary mirror is centered in the reflection of the primary
mirror, then your primary mirror is collimated. If it is off to one side, then Primary Mirror (7)
adjustment will be required. By locating the Primary Mirror (7) you will see three screw
heads on the bottom end of the telescope furthest from the Rack and Pinion Focusing
Mechanism (1). They are alsopositioned 120 degrees apart. By adjusting these three screws
very slowly and carefully, the Primary Mirror (7) will reflect an image of the secondary
mirror that is perfectly centered in the reflection of the Primary Mirror (7). Once this is
accomplished your Primary Mirror (7) is now collimated.
6. Your telescope is now ready to deliver the best images possible.
Enjoying Your New Telescope
1. First determine your targeted object. Any bright object in the night sky is a good starting
point. One of the favorite starting points in astronomy is the moon. This is an object sure to
please any budding astronomer or experienced veteran. When you have developed
proficiency at this level, other objects become good targets. Saturn, Mars, Jupiter, and Venus
are good second steps to take.
2. The first thing you need to do after assembling the telescope as planned is center the desired
object in the finderscope's cross hairs. Provided you did a reasonable job aligning the
finderscope, a quick look through the main telescope tube at low power should reveal the
same image. With the lowest power eyepiece (the one with the largest number printed on it)
you should be able to focus the same image that you saw through the finderscope. Avoid the
temptation to move directly to the highest power. The low power eyepiece will give you a
wider field of view, and brighter image--thus making it very easy to find your target object.
At this point with a focused image in both scopes, you've passed the first obstacle. If you
don't see an image after attempting to focus it in, you might consider aligning your
finderscope again. Once you pass this step, you'll will enjoy the time spent ensuring a good
alignment. Every object you center in the finderscope will be easily found in the main
telescope tube, which is important for continuing your exploration of the night sky.
3. The low power eyepieces are perfect for viewing the full moon, planets, star clusters, nebulae,
and even constellations. These should build your foundation. However, for more detail, try
bumping up in magnification to higher power eyepieces on some of these objects. During
calm and crisp nights, the light/dark separation line on the moon (called the "Terminator") is
marvelous at high power. You can see mountains, ridges and craters jump out at you due to
the highlights. Similarly, you can move up to higher magnifications on the planets and
nebulae. Star clusters and stars are best viewed through the low power no matter what.


