


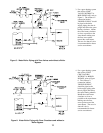


17
VI. Service Instructions
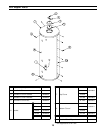
A. The Alliance™ is intended to provide a service life of
many years. Components that require service,
however, may be subject to failure. Failure to use the
correct procedures or parts in these circumstances may
make the water heater unsafe.
The owner should arrange to have the following
inspections and simple maintenance procedures
performed by qualified service personnel at the
frequencies suggested.
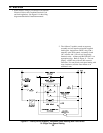
1. Boiler and Domestic Water Piping (Annual)
Check all piping for signs of leakage at joints,
unions, and shut-off valves. Repair as needed.
2. Temperature-Pressure Relief Valve (Annual)
Follow instructions packed with valve.
3. Sediment (Annual, but harsh water quality may
dictate more frequent service)
Depending on water conditions, a varying amount
of sediment may collect in the tank. Levels
requiring service are indicated by a small
temperature difference in the supply and return
lines. (See also "Scale" below.) Repeated flushing
usually clears such material. As a preventive
measure, water should be drawn from the tank at
the drain valve until it runs clear.
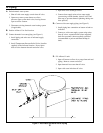
4. Scale (Annual)
Hard water may cause scale to build-up on the
outside of the heat exchanger coil. A water softener
will prevent this problem. (See also "Sediment"
above.) Symptoms would be reduced recovery
capacity or reduced temperature differential
between boiler supply and return lines. Repeated
flushing should resolve the problem. If not,
proceed to B.
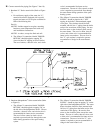
B. Chemical cleaning of heat exchanger coil
1. To avoid water damage to nearby areas in
subsequent steps, shut off the cold water supply to
the water heater.
2. Make a note of the temperature control setting on
the water heater, then turn the unit off.
3. Relieve the water pressure in the tank by opening a
hot water faucet. This will reduce the risk of scald
injury.
4. Remove the relief valve from the water heater
taking care to avoid contact with the hot water
which may drain out of the lines leading to the
domestic uses.
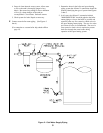
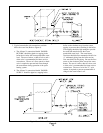
5. Drain the water heater until the water within the
tank is even with the top of the heat exchanger coil.
The water heater cover plate should be removed
from the tank to view the inside of the tank and
assure the coil is just covered with water.
6. Using a funnel, pour one gallon of commercial ice
maker cleaning solution into the tank through the
cover plate opening. Follow solution
manufacturer's instructions, cautions and warnings.
7. Set the water heater's temperature control to its
highest setting and operate the system until the
control is satisfied. Boiler may cycle on its high
limit several times during this period. If the tank
temperature setting has not been satisfied after 45
minutes of boiler operation, turn aquastat to the
lowest setting to stop boiler operation.
8. Allow heated solution to set in tank for 30 minutes.
9. Drain tank completely using fittings and hose, as
required, to reach a floor drain.
10. Fill the water heater's tank with fresh, cold,
conditioned water and drain completely at least two
(2) times to flush all cleaning solution from the
tank.
11. Reinstall the relief valve, cover plate, and piping.
12. Open the cold water supply and fill the tank with
water. Then purge air from lines and tank by
operating hot and cold water faucets in the house.
13. Return the temperature control to the setting noted
in Step 2.
C. Alternate heat exchanger coil cleaning methods
The chemical cleaning process is most effective if done
properly. Other methods may also give satisfactory
results including, high velocity water wash using a
wand through the cover plate.