- 9 -
9.0 TO LIGHT THE HEATER
BEFORE LIGHTING. IF THE PIPES HAVE NOT BEEN PURGED OF DEBRIS, DO SO NOW BEFORE
LIGHTING THE FIRE. FAILURE TO DO SO WILL RESULT IN BLOCKAGES WITHIN THE PILOT.
BURLEY APPLIANCES IS THE ONLY COMPANY TO BENCH RUN AND THOROUGHLY TEST EVERY
SINGLE GAS FIRE IT PRODUCES. BURLEY IS IN THE UNIQUE POSITION OF KNOWING THAT EVERY
APPLIANCE LEAVES THE FACTORY IN PERFECT WORKING ORDER.
MANUAL CONTROLLED HEATERS
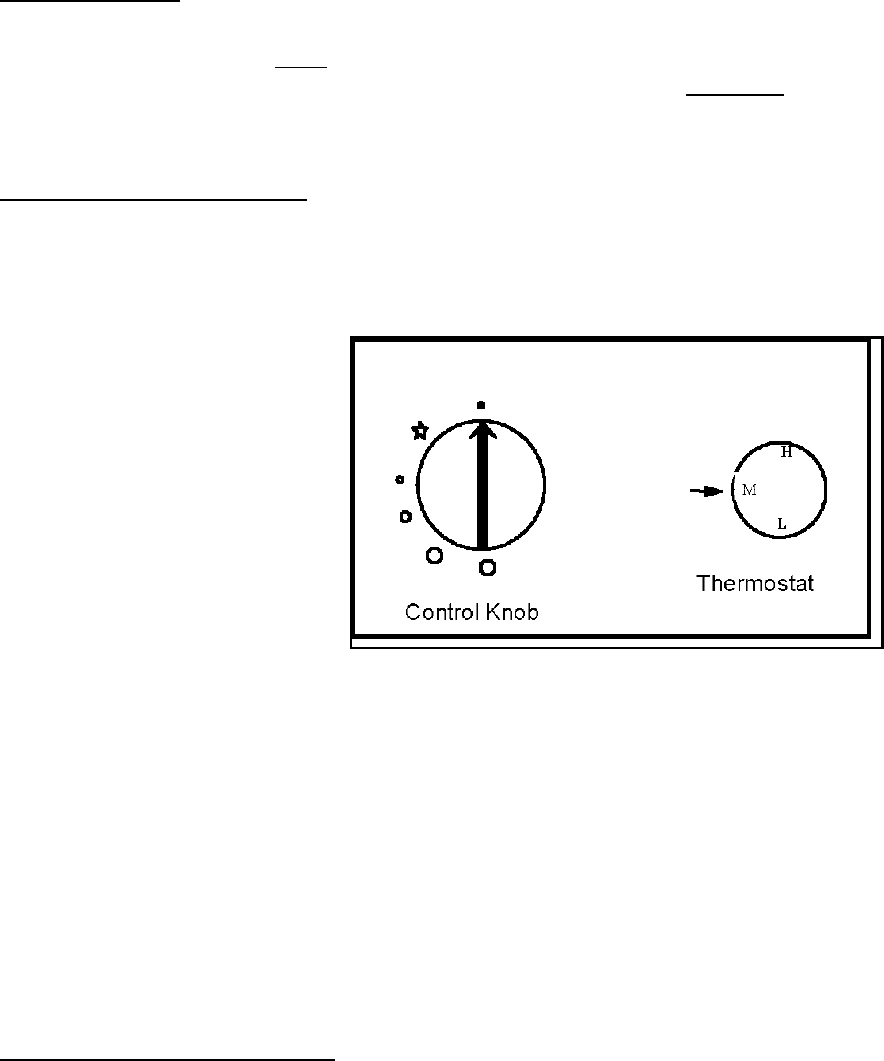
9.1 There are 2 control knobs on the appliance. The left hand one (coloured red) controls On /
Off and High / Low flame. The right hand one (coloured black) is the comfort level thermostat
which turns the fire down to pilot only once the desired temperature is reached. Some people
prefer to retain a flame effect using the left hand red knob to control its height whilst keeping the
thermostat black knob set on hot.
Others prefer to use the fire purely
as a heater in which case they will
select a flame height on the red
knob then set the thermostat black
knob to a comfort level. In both
cases if the room gets too hot, the
thermostat will automatically
reduce the fire to pilot setting until
the room cools.
If during use the pilot is alight but
the main burner will not light, check
the thermostat position and if necessary select a warmer setting.
9.2 To light the fire, first ensure the red knob is turned clockwise to OFF. Press the left hand
(red) control knob for several seconds then turn slowly anticlockwise to the ignition position. A
click will be heard and the pilot (under right side of fuel bed) should light. If it does not, repeat the
operation a few times to purge any air in the pipe. Continue to hold knob for 15 – 20 second to
establish the pilot and then release. If pilot fails to establish, turn off, wait 1 minute then repeat
lighting procedure. Rotate the red knob to high flame to light then back to the desired flame
position. If no gas comes through rotate the black knob (thermostat) to a hotter room setting and
the fire will light.
9.3 Control the fire by a combination of thermostat and / or flame setting to suit your mode of
use (see 9.1)
9.4 To turn the fire off, rotate the left-hand knob fully clockwise back to a vertical position.
9.5 REMOTE CONTROLLED HEATERS
Ensure the toggle switch behind the fret ash pan door is switched to the ON position.
On first operation, ensure the thermostat is set to the hot position.
Ensure the infra red sensor is visible. The fire relies on line of sight between the sensor and
handset to operate. If a different fret is fitted it is possible to swivel and slide the sensor into a
clearer position. In the event of the fire not working check both of the above points before calling
an engineer.
To ignite the fire point the handset at the fire, push and hold simultaneously the 2 left hand
buttons marked * and ● for several seconds until the ignition sequence begins. The fire will


