


16
17
Gloss Black DAR 9000
Hunter Green Metallic DAR 4108
Burgundy DAR 74004
Sand Metallic F1929
Black Cherry Sherwin-Williams® 82128
If touch up paint is needed other than that supplied by Browning, you
can get it at an automotive paint supplier.
IMPORTANT: The textured-finished safe paints are special formulas
created by the manufacturer for Browning ProSteel safes and cannot
be duplicated by an automotive paint store. These can be ordered by
calling our consumer department at (800) 333-3288.
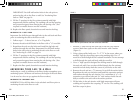
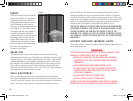
D O O R C L O S U R E A D J U S T M E N T
Browning ProSteel safes are shipped with molded door corner
protectors installed between the door corner and the door frame.
After removing the packaging from your safe, make sure to remove
the protective corners and adjust the two door tension adjustment
screws located inside of the door frame. The tension adjustment
screws apply pressure against the locking bolts when the door is in
the closed position. The tension adjustment screws should be adjusted
until the door closes without play between the door and frame. Do
not over-adjust the tension screws or your safe will not close. The
locking bolts will hit the adjustment screws. A #3 Phillips screwdriver
is required to adjust the tension screws.
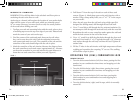
FIRE SEAL
The black plastic strip attached to the edge of your safe door or frame
is a fire seal that expands to seal the door when heated by a fire. If you
live in an area with high humidity, you will not want your door to
close tightly against this seal. Air must circulate through your safe or
condensation will form on your firearms causing rust. Loosen the
door just enough to allow some exchange of air. An electric
dehumidifier is highly recommended if your average daily relative
humidity is above 20 percent.
CHANGING THE COMBINATION
Your combination of the S & G
®
Mechanical Lock is pre-set at the
factory. Changing the combination will void your lock warranty.
If you must change the combination for some reason, contact a
certified locksmith to do this for you.
KEYLOCK
The keylock in your combination dial is used to lock the dial only. This
is a convenience feature that allows you to lock your dial so that it will
not accidentally rotate and lock while you are moving items into or out
of your safe. The keylock also allows you to lock the dial while the safe
is in the locked position. This prevents the dial from being turned
while the safe is locked.
To lock your dial with the key, turn the dial until the “0” is resting in
the 12 o’clock position, where the black line is located on the top of
your dial ring and turn the key clockwise in the key lock.
Should you lose your keys, replacement keys may be ordered with
the serial number printed on the upper right-hand corner of the
combination tag. Contact the Browning Consumer Department
(page 22) to order additional keys. (Approximately $8 per key as
of this owner’s manual printing.)
PAINT
Painted exteriors should be cleaned with a damp soft cotton cloth only.
Do not use solvents or any other chemicals to clean your safe’s painted
surfaces. If you should scratch or chip the paint on your safe, a touch
up bottle with brush is included inside your safe (not all models).
This bottle should be adequate for most scratches incurred during
installation. Touch up paint is also available by contacting Browning.
However, due to increased regulations restricting the sending of paint
through the mail, Browning has also provided the Delstar® paint
numbers for the paint colors available on our standard safes.
07-137-BSF_Safe OM.indd 16-17 7/21/08 11:13:09 AM