


12
13
4 Drill down 2" from the top of the safe on each of these stud
centers (Figure 4). Mark these spots on the safe’s interior with a
marker. Using a sharp utility knife, cut a 2" x 2" “X” in the carpet
on your marks.
5 Move the safe away from the wall and, using a high-speed bit
designed for drilling metal, drill through the steel safe wall.
6 Use a 2" wood bit to drill though the fire-resistant insulation. Do
not attempt to drill through the steel safe body with the wood bit.
7 Reposition the safe on your centerline marks against the wall and
mark the hole centers on the wall of the house.
8 Use a
5
/16" wood bit to drill the pilot holes through the sheet rock
and stud. Next install
3
/8" x 3½" lag bolts through a 1¾" diameter
steel washer through the safe body and into the stud. Tighten all
anchor bolts.
9 Fill the 2" holes in the safe interior with high-temperature silicone
caulking and reposition the carpeting “X” cut out. The caulking
will hold the carpet in place.
OPERATING THE (DIAL) COMBINATION LOCK
OPENING THE SAFE
1 Turn the dial counterclockwise (left) four times, passing the first
number in your combination three times and stopping on it the
fourth time.
2 Turn the dial clockwise (right) three times, passing the second
number in your combination two times and stopping on it the
third time.
3 Turn the dial counterclockwise (left) two times, passing the
third number in your combination once and stopping on it
the second time.
4 Turn the dial clockwise (right) until it stops, which is normally
around 95.
ANCHORING TO A FRAMED WALL
IMPORTANT: Pre-drill the holes in the safe back and floor prior to
anchoring the safe to the floor or wall.
Anchoring to a framed wall requires the location of your anchor holes
align with the center of your wall studs, which are normally spaced
16" on-center. However, you must check to verify the actual position
of the studs before drilling your safe.
1 To align your safe and mounting holes with the studs, place a piece
of masking tape across the top-rear edge of your safe. Measure and
mark the center of your safe on the tape.
2 Find the centers of the studs and mark them on the wall where
they can be seen above the safe. Find the midpoint between the
stud centers and mark it as well. The centerline of the safe and the
centerline of the studs should align with the safe in place.
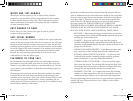
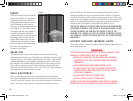
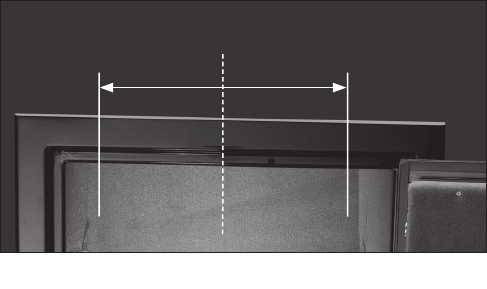
3 Mark the centerline of the safe interior. Measure the distance from
the stud centerline to each stud center (approximately 8"). Measure
out from the centerline in your safe interior this same distance to
locate the two stud center lines within your safe (Figure 4).
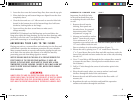
figure 4
Carefully measure the distance between stud centers in your home.
Stud Center
Stud Center
Safe Centerline
07-137-BSF_Safe OM.indd 12-13 7/21/08 11:13:09 AM