


37
KNOWING YOUR SEWING MACHINE
CONOZCA SU M
ÁQUINA DE COSER
CONOSCERE LA MACCHINA DA CUCIRE
A
B
1
2
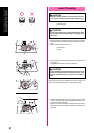
INSERTING THE TWIN NEEDLE
Insert in the same way a single needle is inserted (refer to page 9).
The flat side of the needle should face toward the back and the
rounded side should face toward you.
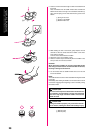
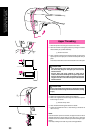
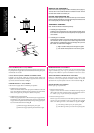
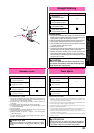
PLACING THE EXTRA SPOOL PIN
Place the vertical spool pin in the hole found on top of the machine
near the horizontal spool pin. Place the second spool of thread onto
the vertical spool pin as shown in fig. A.
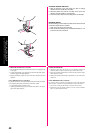
TWIN NEEDLE THREADING
Each needle should be threaded separately.
1. Threading the Right Needle
Follow the same instructions for single needle threading using
the thread from the spool on the extra spool pin. See page 33 for
more details.
2. Threading the Left Needle
Thread the left needle in the same manner that the right needle
was threaded, but do not pass the thread through the thread
guide above the needle before passing it through the eye of the
left needle as shown below in fig. B.
1 Right needle thread passes through this guide.
2 Left needle thread passes in front of this guide.
PARA INTRODUCIR LA AGUJA DOBLE
Introdúzcala de la misma manera que una aguja simple (véase página 10).
La parte plana de la aguja debe estar cara hacia atrás mientras que la parte
redonda está cara a usted.
COLOCADO EL EJE DE CARRETE SUPLEMENTARIO
Coloque el eje de carrete vertical en el orificio previsto arriba de la
máquina, cerca del eje horizontal. Instale el segundo carrete de hilo en el
eje vertical, tal como ilustrado en la fig. A.
ENHEBRADO DE LA AGUJA DOBLE
Cada una de las agujas debe ser enhebrada por separado.
1. Enhebrado de la aguja derecha
Observe las mismas instrucciones que para el enhebrado de una sola
aguja, pero utilizando el hilo del carrete colocado en el porta carretes
extra. (véase página 34 para mayores detalles al respecto).
2. Enhebrado de la aguja izquierda
Enhebre la aguja izquierda de la misma manera que la aguja derecha.
Sin embargo, no hay que pasar el hilo por la guía que se sitúa arriba de
la aguja. Conviene pasarlo directamente por el ojo de la aguja izquier-
da, tal como ilustrado arriba en la fig. B.
1 El hilo de la aguja derecha pasa por la guía.
2 El hilo de la aguja izquierda pasa delante de la guía.
INSERIMENTO DELL’AGO GEMELLO
Per inserire l’ago gemello, procedere come per l’inserimento dell’ago
singolo (vedere a pag. 10). L’ago va posizionato con la parte piatta
dell’ago rivolta indietro e la parte arrotondata rivolta verso se stessi.
APPLICAZIONE DEL PORTASPOLETTA AUSILIARIO
Inserire il portaspoletta verticale nell’apposito foro situato sulla
macchina vicino al portaspoletta orizzontale. Mettere la seconda
spoletta di filo sul portaspoletta verticale come illustrato in fig. A.
INFILATURA DELL’AGO GEMELLO
Infilare ogni ago separatamente.
1. Infilatura dell’ago destro
Seguire le stesse istruzioni relative all’infilatura dell’ago singolo
utilizzando il filo della spoletta montata sul portaspoletta ausilia-
rio. Vedere a pag. 34 per istruzioni più dettagliate.
2. Infilatura dell’ago sinistro
Infilare l’ago sinistro nello stesso modo dell’ago destro, ma non far
passare il filo per il guidafilo sopra l’ago prima di averlo infilato
nella cruna dell’ago sinistro come illustrato di seguito in fig. B.
1 l filo dell’ago destro passa per questa guida.
2 Il filo dell’ago sinistro passa davanti a questa guida.