


Starting to sew.
• With your right hand, turn the balance wheel towards
you (counter-clockwise), so that the needle moves
down and back up again to its highest position.
Pull the upper thread towards you, and the lower thread
will come up from the bobbin in a small loop (
figure 7c).
Pull the free end of the loop all the way out.
• Pull out both threads to about 15 cm (6 in), pass them
between the toes of the foot, and out to the back of the
machine, straight behind the foot (
figure 7d).
Close the shuttle cover and refit the extension table.
• Set the power switch to on (I).
Make sure the presser foot is up, and raise the needle to its highest position
using the balance wheel.
Place the fabric under the foot with the needle about 1 cm (3/8 in) from the rear
edge of the fabric, and lower the presser foot onto the fabric.
• To start sewing, press down on the foot controller.
To stop, release the foot controller.
To reverse sew, hold the reverse lever all the way down whilst sewing.
• When you have finished sewing, raise the presser foot and the needle.
Gently pull the fabric out, and cut the thread using the thread cutter (
figure 8).
Step 6 continued
To learn how to use the more advanced features of the XL series sewing machine, you should read the Instruction Manual.
For further assistance, phone: 0870 830 4020, email: support@brother-support.co.uk
or visit our website: www.brother-support.co.uk
Thank you for choosing a Brother product.
thread cutter
Step 7
Drawing up the thread from the bobbin.
• Make sure the power switch is set to off (O).
Raise the needle to its highest position by turning the
balance wheel towards you (counter-clockwise).
Raise the presser foot by pushing the presser foot
lever upwards (
figure 7a).
• With your left hand, hold the end of the upper thread
(
figure 7b).
• Hook the thread around the needle threader and
across the front of the needle, just below the hook
(
figure 6e).
• Holding the thread loosely with your right hand, rotate
the needle threader, so that the hook comes back out
of the eye and the threader springs back upwards.
The hook should pull a loop of thread through the
needle (
figure 6f). If it does not, then try again.
• Pull the free end of the loop to draw the thread all the
way out through the back of the needle.
figure 6e
figure 7a figure 7b
figure 7c figure 7d
figure 8
figure 6f
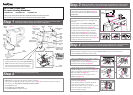
Step 5
Upper threading.
• Make sure the power switch is set to off (O).
Important: Raise the presser foot by pushing the
presser foot lever upwards.
(see
figure 6a in step 6 below)
Raise the take-up lever (just visible through the slot)
to its highest position by turning the balance wheel
towards you (counter-clockwise).
Place a spool of thread on the spool pin (
figure 5a).
Unwind some thread and hook the thread around the
back of the thread guide, making sure that the thread
is not wound round the tension disk.
• Holding the thread at the top of the take-up lever guide,
pass the thread down to the right of the guide, then
under the guide and back up the left side (figure 5b).
• Pull the thread up the left of the take-up lever guide,
and all the way to the back of the slot (figure 5c).
• Pull the thread over to the left, then back downwards
again (
figure 5d).
This should hook the thread around the take-up lever,
which is just visible inside the slot. If it does not, then
try again.
needle
guide
take-up
lever
tension disk
thread
guide
Step 6 continued over the page
Step 6
Threading the needle.
• Make sure the power switch is set to off (O).
Raise the needle to its highest position by turning the
balance wheel towards you (counter-clockwise).
Raise the presser foot by pushing the presser foot
lever upwards (
figure 6a).
• Pass the thead behind the needle guide, leaving about
10cm (4in) of thread trailing (
figure 6b).
• If your machine doesn’t have a needle threader, then
thread the needle by hand (from front to back), and go
straight to Step 7.
Needle threader:
• Pull the needle threader down and rotate it (
figure 6c)
so that the hook passes right through the eye of the
needle from the back (
figure 6d).
hook
figure 5a
figure 5b
figure 5c
figure 5d
figure 6a
figure 6b
figure 6c figure 6d
XC8324021