


38
SEWING BASICS —————————————————————————————————————————————————————————————————————————————————————————————————————
——
Adjusting the stitch length
and width
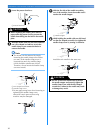
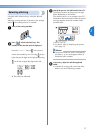
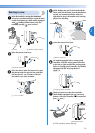
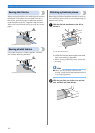
■ [Example] Selecting stitch .
a
Press the stitch selection keys to select stitch 04.
With on the right, select “4”, and with
on the left, select “0”.
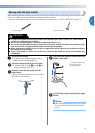
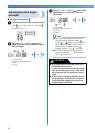
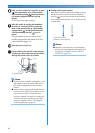
b
Press the “+” or “–” side of (stitch
length adjustment key) to increase or reduce
the stitch length.
a Stitch length
b Stitch length adjustment key
c Short
d Long
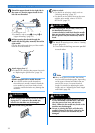
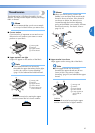
c
Press the “+” or “–” side of (stitch width
adjustment key) to increase or reduce the
stitch width.
a Stitch width
b Stitch width adjustment key
c Narrow
d Wide
Note
● When the stitch length or stitch width is
changed from the standard setting,
around or disappears from the LCD.
When the stitch length or stitch width is
reset back to the standard setting,
reappears around or in the LCD.
● If the stitch width of the selected stitch
cannot be adjusted, “–. –” appears to the
right of in the LCD.
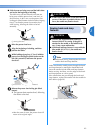
● After adjusting the stitch width, slowly turn
the handwheel toward you
(counterclockwise) and check that the needle
does not touch the presser foot. If the needle
hits the presser foot, the needle may bend or
break.
● If the stitches are bunched together, increase
the stitch length. Continuing to sew with the
stitches bunched together may result in the
needle bending or breaking.
CAUTION