


BUILT-IN STITCHES ————————————————————————————————————————————————————————————————————————————————————————————————————————————————————————————————
—
——————————————————————————————————————————————————————————————————————————————————————————
—————
29
9
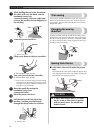
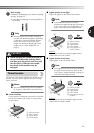
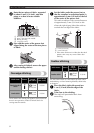
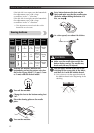
Position the fabric under the presser foot,
and then adjust the fabric position until
the needle slightly catches the fold of the
hem when the needle comes to the left
end of the stitch.
0
Lower the presser foot lever.
a
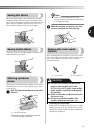
Sew at a slow speed holding the fabric
with your hands, so that the needle
slightly catches the fold of the hem.
b
Remove the basting stitching and turn the
fabric right side up.
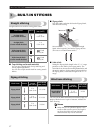
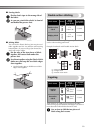
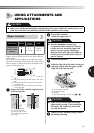
Shell tuck stitching
The Shell Tuck Stitch can be used to sew a picot (lace-
like) edge on lightweight fabric.
1
Adjust the thread tension so that it is
tighter than normal.
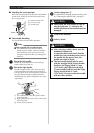
2
Place the fabric under the presser foot so
that it will be sewn along the bias, with
the straight stitches sewn on the seamline
and the zigzag stitches sewn slightly over
the folded edge.
3
Sew at a slow speed.
1 Straight stitches
2 Zigzag stitches
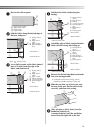
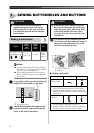
Elastic stitching
You can use the Elastic Stitch for mending, sewing
elastic or joining fabric. Each is explained below.
■ Mending
1
Place the reinforcement fabric under the
area you want to mend.
• Use the basting pins to hold the
reinforcement fabric.
2
Following the line of the tear, sew using
the Elastic Stitch as shown.
1 Wrong side of fabric
2 Fold of hem
3 Needle drop point
1 Needle
2 Needle drop point
3 Fold of hem
1 Wrong side of fabric 2 Right side of fabric
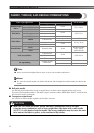
Stitch Name Pattern
Stitch
Length
[mm (inch)]
Stitch Width
[mm (inch)]
Shell Tuck
Stitch
F-3
(1/64-1/8)
5 (3/16)
1
2
3
1
2
3
1
2
7
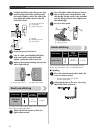
Stitch Name Pattern
Stitch
Length
[mm (inch)]
Stitch Width
[mm (inch)]
Elastic Stitch
F-2.5
(1/64-3/32)
5 (3/16)
1
2
8