


25
1
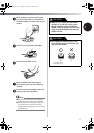
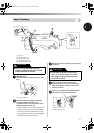
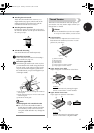
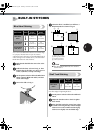
■ Attaching the Twin Needle
Attach the twin needle in the same way as a
single needle (see page 8). The flat side of the
needle should face toward the back and the
rounded side should face toward you.
■ Attaching the Extra Spool Pin
Put the extra spool pin in the hole on the top of
the machine. Put the second spool of thread onto
the extra spool pin.
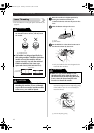
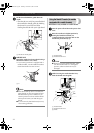
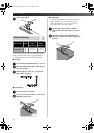
■ Twin Needle Threading
You should thread each needle separately.
1
Thread the left needle.
Follow the same instructions for threading a
single needle (see page 21).
2
Thread the right needle.
Thread the right needle in the same way that
you threaded the left needle using the thread
from the spool on the extra spool pin, but do
not pass the thread through the guide above
the needle before you pass it through the eye
of the right needle.
1 Left needle thread passes through the needle bar
thread guide
2 Right needle thread passes in front of the needle
bar thread guide
3 Needle bar thread guide
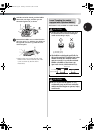
Note
Models Equipped with a Needle Threader
● You can not use the needle threader to
thread the twin needle. Instead, thread the
twin needle by hand, from front to back.
Using the needle threader may damage the
machine.
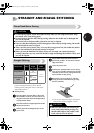
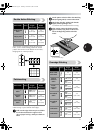
Thread Tension
The tension of the thread will affect the quality of
your stitches. You may need to adjust it when you
change fabric or thread.
Memo
● We recommend that you do a test sample
on scrap of a fabric before you start to sew.
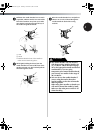
■ Correct Tension
Correct tension is important as too much or too
little tension will weaken your seams or cause
puckers on your fabric.
1 Surface of fabric
2 Back of fabric
3 Upper thread
4 Lower thread
5 Loops appear on surface of fabric
6 Loops appear on back of fabric
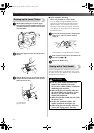
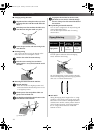
■ Upper Tension is too Tight
Loops will appear on the surface of the fabric.
Solution
Reduce the tension by turning the upper
tension control dial to a lower number.
■ Upper Tension is too Loose
Loops appear on the back of the fabric.
Solution
Increase the tension by turning the upper
tension control dial to a higher number.
2
3
1
1
2
3
4
1
2
3
4
5
4
3
5
1
2
3
4
6
4
3
5
XL2600.book Page 25 Thursday, November 4, 2004 9:46 PM