30
3
BUTTONHOLE SEWING/ BUTTON SEWING
Buttonholes can be sewn and buttons can be sewn on.
Buttonhole sewing
■ Making a buttonhole
Memo
● It is recommended to practice making a
buttonhole on a scrap piece of fabric before
attempting it on your project.
● Using tailor’s chalk to mark the position and
length of the buttonhole on the fabric is also
recommended.
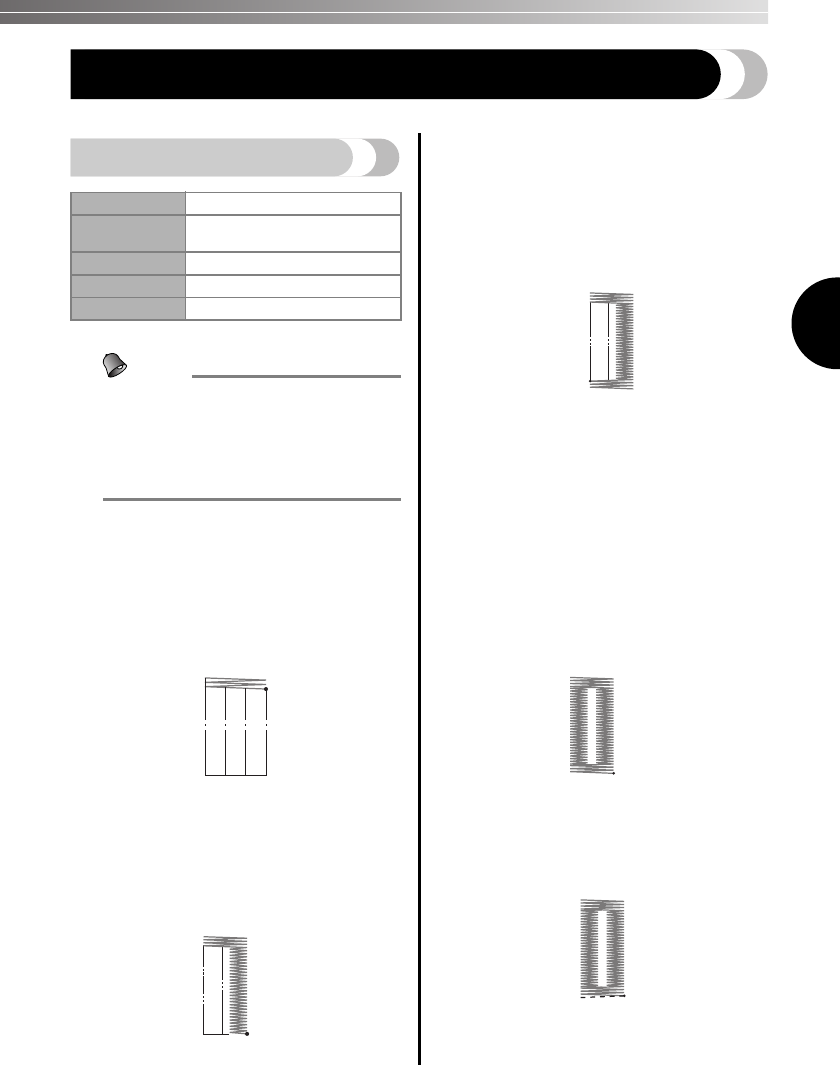
Step A: Bar Tack
a
Set the stitch length between 0 and 1 (F),
stitch width to 5 and the needle position to R.
b
Lower the presser foot over the top right corner
of the buttonhole mark and sew 3-6 stitches.
c
Stop the machine when the needle is in the fabric
on the right side of the stitch (position A). (Turn
the handwheel counterclockwise if necessary.)
Step B: Right Row
a
Set the stitch width to 2.
b
Sew the predetermined length of the
buttonhole to the other end.
c
Stop the machine when the needle is in the fabric
on the right side of the stitch (position B). (Turn
the handwheel counterclockwise if necessary.)
Step C: Final Bar Tack
a
Set the stitch width to 5.
b
Sew 3-6 stitches.
c
Stop the machine when the needle is in the fabric
on the left side of the stitch (position C). (Turn
the handwheel counterclockwise if necessary.)
Step D: Left Row
a
Lift the presser foot.
b
Turn the fabric 180 degrees using the needle as
an axis and set the stitch width to 0. This will
move the fabric slightly. Lower the presser foot.
c
Turn the handwheel toward you
(counterclockwise) to sew one stitch.
This moves the needle from the left to the right.
d
Set the stitch width to 2.
e
Sew until the needle reaches the other bar tack.
Stop the machine with the needle in the fabric
on the right of the stitches (position D).
■ Securing the stitching and cutting the buttonhole
a
To secure the stitching, turn the fabric 90
degrees counterclockwise, set the stitch width
to 0, the stitch length to 1 and sew 5-6
Straight Stitches.
b
Raise the presser foot lever, remove the
fabric, and cut the thread.
Stitch width
See the instructions below.
Stitch length
Set between 0 and 1 (F) for the
Satin Stitch.
Needle position R (right position)
Presser foot Zigzag
Needle Single
A
B
C
D


