


2
INSTALLATION, Continued
See “Avoiding Dead Air Spaces” for more information.
N
OTE:
F
or any location, make sure no door or other obstruction could keep
carbon mono
xide or gas from reaching the Alarm.
T
his unit should receive continuous electrical power. (The battery is
mean
t for emergency back-up only). Choose an outlet where it can’t be
accidentally unplugged or switched off by children. Keep small children
a
way from the unit.Teach them not to play with it or unplug it. Explain
w
hat the alarms mean.
WHERE THIS ALARM SHOULD NOT BE INSTALLED
T
o avoid causing damage to the unit, to provide optimum protection, and
to prevent unnecessary alarms, Do NOT locate this Alarm:
• In garages, kitchens, crawl spaces and unfinished attics. Avoid extremely
d
usty, dirty or greasy areas. Installation in these areas could lead to
nuisance alarms, may expose the sensor to substances that could damage
or contaminate it, or the Alarm may not be heard by persons in other areas
o
f the home, especially if they are sleeping.
• In the garage, vehicle exhaust can contain some carbon monoxide. These
levels are higher when the engine is first started.Within hours of starting a
v
ehicle and backing it out of the garage, the levels present over time can
activate the Alarm and become a nuisance.
• In the kitchen, some gas appliances can emit a short burst of CO or gas
u
pon start-up. This is normal. If your Explosive Gas/CO Alarm is installed
too close to these appliances, it may alarm often and become a nuisance.
• Keep units at least 20 feet (6 meters) from the sources of combustion
p
articles (stove, furnace, water heater, space heater) if possible. In areas
where a 20-foot (6m) distance is not possible – in modular, mobile, or
smaller homes, for example – it is recommended the Alarm be placed as
f
ar from these fuel-burning sources as possible.The placement recom-
mendations are intended to keep these Alarms at a reasonable distance
from a fuel-burning source, and thus reduce “unwanted” alarms. Unwanted
alarms can occur if an Alarm is placed directly next to a fuel-burning
source. Ve
ntilate these areas as much as possible.
If you must insta
ll the
Alarm near a cooking or heating appliance, install at least 5 feet (1.5
meter
s) from appliance.
• In extremely humid areas.This Alarm should be at least 10 feet (3 meters)
from a shower, sauna, humidifier, vaporizer, dishwasher, laundry room,
utility room, or other source of high humidity.
• In direct sunlight.
• In turbulent air, like near ceiling fans or open windows. Blowing air may
prevent CO or gas from reaching the sensors.
• In areas where temperature is colder than 40˚ F (4˚ C) or hotter than
100˚ F (38˚ C). These areas include non-airconditioned crawl spaces,
unfinished attics, uninsulated or poorly insulated ceilings, porches, and
garages.
• Less than 12 inches (305 mm) away from fluorescent lights. Electrical
“noise” can interfere with the sensor.
• In “dead air” spaces. See “Avoiding Dead Air Spaces”.
AVOIDING DEAD AIR SPACES
“Dead air” spaces may prevent gas from reaching the Alarm.To avoid dead
air spaces, follow installation recommendations below.
On ceilings, install Alarms as close to the center of the ceiling as possible.
If this is not possible, install the Alarm at least 4 inches (102 mm) from the wall
or corner.
For wall mounting, the top edge of Alarms should be placed between
6 inches (152 mm) and 12 inches (305 mm) from the wall/ceiling line.
On a peaked, gabled, or cathedral ceiling, install Alarm within 3 feet (0.9
meters) of the peak of the ceiling, measured horizontally.
BE
F
ORE
Y
OU BE
G
I
N INSTALLATION
Si
nce C
O g
e
ne
r
a
lly mixes well with air, mounting the Alarm will depend on the
type of explosive gas you intend to detect. If you are not certain which type of
gas you are using in your home, please read about natural gas and propane in
“Where to Install this Alarm”.
•
M
a
k
e sure the alarm is not receiving excessively noisy power.
Examples of noisy power could be major appliances on the same
circuit, power from a generator or solar power, light dimmer on the
s
ame ci
r
cuit or m
oun
ted near fl
u
orescen
t lighting. Excessively noisy
po
wer may cause damage to your Alarm.
F
i
nd t
he p
air of self-adhesive labels included with this Gas/CO Alarm.
•
O
n each la
bel w
r
it
e in the phone number of your emergency responder
(like 911) and a qualified appliance technician.
• Place one label near the Gas/CO Alarm, and the other label in the “fresh
air” location you plan to go if the alarm sounds.
ACTIVATING THE BATTERY BACK-UP
Activate the battery back-up by installing the battery. The battery is for back-
up only and is not intended to power the Alarm for an extended period of
ti
me in the absence of AC.
The Alarm will light-up the display briefly to indicate the unit is receiving power.
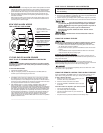
DIRECT PLUG ALARM INTO AN OUTLET (for Propane Detection)
T
his Alarm can be plugged directly into a wall outlet located close to the floor.
This is the recommended configuration for detecting propane.
1. Choose a standard UNSWITCHED 120V AC outlet.
2
. Plug Alarm in.
IF OUTLET IS MOUNTED HORIZONTALLY (SIDEWAYS)
If you are going to use your Alarm as a direct plug into an outlet that is
mou
nted horizontally (sideways), you may want
t
o rotate the adapter 90º,
as follows:
1. With back of unit facing you (AC blades on your left), place your left thumb
on adapter release and grab AC blades with your right hand to release the
left side.
2. Repeat for the other side adapter thumb release.This will allow adapter to
slide out.
3. Remove adapter.
4. Rotate the adapter 90º and snap firmly back into place.
5. Plug Alarm into AC outlet.
WALL MOUNTED ALARM (for Natural Gas Detection)
Installation tips for power cord models: The power cord option provides
more flexibility in mounting locations and allows the Alarm to be easily
installed at or above eye level.
NOTE: If you mount the Alarm high on a wall, make sure it is between 6 to 12
inches (152-305 mm) down from the ceiling. Any higher than this, it will be
in “dead air” space and carbon monoxide or natural gas may not reach the
sensors.
NOTE: Do not cover the Alarm with a curtain.
To install for a wall-mount, you will need to pull out the removable adapter and
pow
e
r cord, as follows:
1. Repeat steps 1to 3 as described above in
“to rotate the adapter”.
2. With adapter out, pull out power cord and unwrap it.
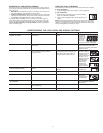
3. Insert the screws provided until head is approx.1/8 inch (3 mm) from wall
(if mou
n
ting in plaster board or drywall, drill 3/16 inch (5 mm) hole and use
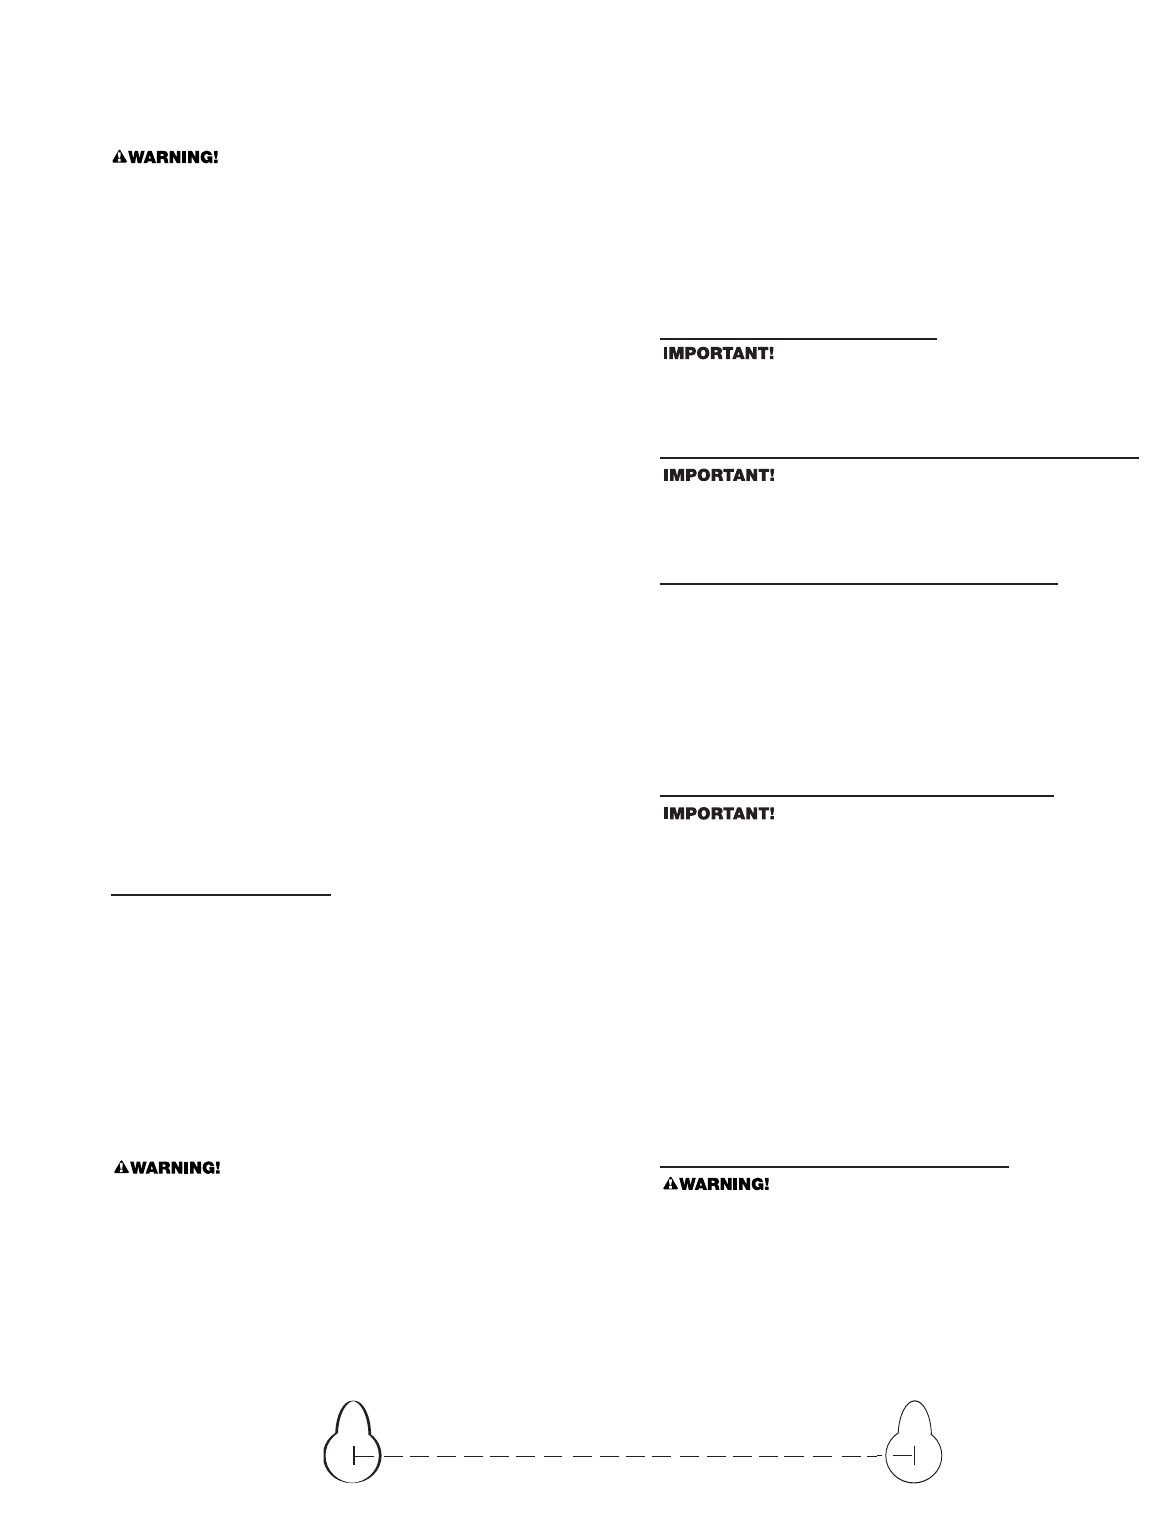
plastic anchor provided). Use mounting guide template to locate holes as
sho
wn in diagram below.
4. Hook the Alarm over the screw onto the keyhole in back of unit.
5. Plug power cord into AC outlet.
SECURING THE POWER CORD TO AN OUTLET
D
ISCONNECT POWER TO THE OUTLET TO AVOID ELECTRICAL SHOCK.
1
.
Re
mo
v
e t
he w
allplate screw from the outlet and hold the wallplate in position.
2
.
P
l
ug t
he po
w
er cord into the wall outlet so that the screw hole lines up with
t
he wallplate screw hole.
3
.
I
nsert the screw through the power cord screw hole and into the wallplate
screw hole.
4. Tighten screw in place and restore power to the outlet.
3.875 inches
Mounting Guide Template
3 7/8 inches (98mm)
3.875 inches
HO
W TO INSTALL THIS GAS/CO ALARM
IMPORTANT! Read all instructions before using this product.
T
ools you will need:
Scr
ewdriver, drill.
1
. Determine the best location for your Gas/CO Alarm.
2
. Your Alarm is equipped to be mounted as a corded unit (recommended
for natural gas detection), a direct plug unit (recommended for propane
gas d
etection).The unit can be plugged directly into a wall outlet. If your
out
lets are mounted horizontally, refer to “If Outlet is Mounted Horizontally
(Sideways)”.
I
f the adapter is taken out of the unit, the Alarm can be installed high on
t
he wall, while the adapter is plugged into a wall outlet. The explosive gas
you use will determine if the Alarm should be installed high on the wall
(A
C cord option) or low on the wall (direct plug option).