


10 SERIESOM−05463
MAINTENANCE & REPAIRPAGE E − 6
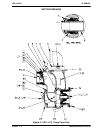
PUMP AND SEAL DISASSEMBLY
AND REASSEMBLY
Review all SAFETY information in Section A.
Follow the instructions on all tags, label and de-
cals attached to the pump.
This pump requires little service due to its rugged,
minimum-maintenance design. However, if it be-
comes necessary to inspect or replace the wearing
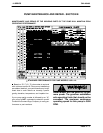
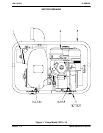
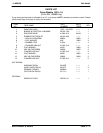
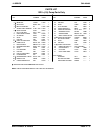
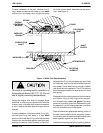
parts, follow these instructions which are keyed to
the sectional views (see Figures 1 and 2) and the
accompanying parts lists.
As described on the following pages, this manual
will alert personnel to known procedures which re-
quire special attention, to those which could dam-
age equipment, and to those which could be dan-
gerous to personnel. However, this manual cannot
possibly anticipate and provide detailed precau-
tions for every situation that might occur during
maintenance of the unit. Therefore, it is the respon-
sibility of the owner/maintenance personnel to en-
sure that only safe, established maintenance pro-
cedures are used, and that any procedures not ad-
dressed in this manual are performed only after es-
tablishing that neither personal safety nor pump in-
tegrity are compromised by such practices.
Before attempting to service the pump, shut down
the engine and take precautions to ensure that it
will remain inoperative. Close all valves in the suc-
tion and discharge lines.
For engine disassembly and repair, consult the lit-
erature supplied with the engine, or contact your
local Honda engine representative.
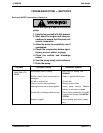
Before attempting to open or service the
pump:
1. Familiarize yourself with this man-
ual.
2. Shut down the engine and take
precautions to ensure that the
pump will remain inoperative.
3. Allow the pump to completely cool
if overheated.
4. Check the temperature before
opening any covers, plates, or
plugs.
5. Close the suction and discharge
valves.
6. Vent the pump slowly and cau-
tiously.
7. Drain the pump.
Use lifting and moving equipment in
good repair and with adequate capacity
to prevent injuries to personnel or dam-
age to equipment. Suction and dis-
charge hoses and piping must be re-
moved from the pump before lifting.
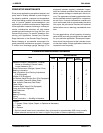
Suction Check Valve Disassembly
(Figure 2)
Before attempting to service the pump, remove the
pump casing drain plug (23) and drain the pump.
Clean and reinstall the drain plug.
To service the suction check valve, remove the suc-
tion piping. Remove the nuts (36) securing the suc-
tion flange (34) to the pump casing (1). Pull the
check valve assembly (37) from the suction port.
If no further disassembly is required, see Suction
Check Valve Installation.
Back Cover Removal
(Figure 2)
The wear plate assembly (22) can be serviced after
the back cover assembly (29) has been removed.
Remove the wing nuts and flat washers (27 and 28)
securing the back cover to the casing. Pull the
back cover and assembled wear plate from the
pump casing. Remove the cover plate gasket (33)
and clean the mating surfaces.
Inspect the wear plate and if replacement is re-
quired, remove the hardware (24 and 25) securing
it to the back cover.