


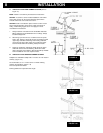
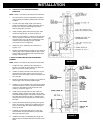
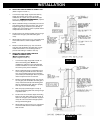
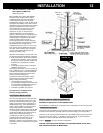

C. VERTICALLY WITH NEW CHIMNEY SYSTEM (Refer to
Figure 10)
NOTE: Follow L-Vent chimney manufacturer’s instructions.
OPTION: To achieve a center vertical installation a 45º elbow
and a clean-out tee can be used to offset the pipe from the
exhaust outlet to the rear center of the stove.
OPTION: Install L-Vent elbow in place of clean-out tee. Locate
stove. Drop plumb bob to center of tee outlet, mark point on
ceiling. Install ceiling support and L-Vent pipe per L-Vent
manufacturer’s instructions.
1. Always maintain 3” clearance from combustible materials.
When passing through additional floors or ceilings, always
install firestop spacer.
2. After lining up for hole in roof, cut either around or square
hole in roof, always 3” larger all the way around pipe. Install
upper edge and sides of flashing under roofing materials,
nail to the roof along upper edge. Do not nail lower edge.
Seal nail heads with non-hardening waterproof mastic.
3. Apply non-hardening, waterproof mastic where the storm
collar will meet the vent and flashing. Slide storm collar
down until it sits on the flashing. Seal and install cap. Mobile
home installations must use a spark arrester.
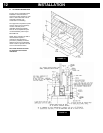
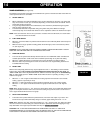
D. VERTICALLY INTO EXISTING CHIMNEY SYSTEM
Adapters are available to adapt from 3” L-Vent to 6” or 8” Class-A
chimney. (Figure 11a)
As an alternative, 3” or 4” L-Vent can be run inside existing
chimney to termination. (Figure 11b)
This is the preferred method.
Follow guidelines for equivalent vent length.
FIGURE 11b
FIGURE 10
FIGURE 11a
INSTALLATION
8