


SYMPTOM PROBABLE CAUSE
CORRECTIVE ACTION
No Hot Water
1. No Power to heater.
2. Loose wire connections.
3
. Inoperative upper heating element.
4. Inoperative upper thermostat.
5
. Open ECO.
6. Inoperative solar controller or
connection.
7. Inoperative circulator in solar heating
system.
1. Inoperative lower heating element.
2. Thermostats set to low.
3. Inoperative thermostats.
4. Loose wire connection.
5. Sediment or lime build up on elements.
6. High demand period.
7. Undersized heater.
8. Very cold inlet water to heater.
9. Plumbing connections reversed.
10. Damaged dip tube.
11. Improper solar collector application.
Not Enough Hot
Water
Slow Hot Water
Recovery
1. Sediment or lime build up on elements.
2. Loose wire connections.
3. Inoperative thermostats.
4. Derated heating element installed.
Over Heated
Water or
Continues
Operation
1. Thermostat not in contact with tank.
2. Grounded heating elements.
3. Thermostat set to high.
4. Inoperative thermostats.
5. Inoperative ECO.
6. Undersized water heater.
7. Incorrectly adjusted mixing device.
8. Improperly programmed solar controller.
1. Check fuses or circuit breakers in service panel.
2. Check all wire connections.
3
. Check heating elements. Replace as needed.
4. Check thermostats operation. Replace as
needed.
5. Check ECO. Reset or replace thermostats as
needed.
6. Check for proper solar controller operation.
7. Check for proper circulator operation.
1. Check heating elements, replace as needed.
2. Increase thermostat setting.
3. Check thermostats, replace as needed.
4. Check all wire connection.
5. Remove heating elements and check for lime
build up.
6. Reduce demand.
7. Replace with larger heater.
8. Temper water to heater.
9. Correct plumbing connections.
10. Check dip tube, replace as needed.
11. Review solar collector calculations and
orientation.
1. Remove heating elements and check for
lime build up.
2. Check all wire connections.
3. Check thermostats, replace as needed.
4. Check terminal block of element for proper
voltage and wattage rating.
1. Position thermostat flush with tank surface.
2. Check heating elements. Replace as needed.
3. Adjust thermostats to desired setting.
4. Check thermostats, replace as needed.
5. Check ECO, replace thermostat as needed.
6. Replace with larger heater.
7. Adjust mixing device.
8. Refer to solar controller instructions.
SERVICE
PROCEDURE
3. See Service Procedure
RE-II, Page 9.
4
. See Service Procedure
RE-III, Page 10.
5. See Service Procedure
RE-I, Page 8.
6. Refer to Controller
manufacturer
7. Refer to circulator
manufacturer
1. See Service Procedure
RE-II, Page 9.
3. See Service Procedure
RE-III, Page 10.
5. See Service Procedure
RE-V, Page 13.
10. See Service Procedure
RE-VI, Page 14.
11. Refer to solar collector
manufacturer.
1. See Service Procedure
RE-V, Page 13.
3. See Service Procedure
RE-III, Page 10.
1. See Service Procedure
RE-IV, Page 12.
2. See Service Procedure
RE-II, Page 9.
4. See Service Procedure
RE-III, Page 10.
5. See Service Procedure
RE-I, Page 8.
7. Refer to included mixing
device instructions.
Page 7
Noisy (singing or
hissing) Elements
1. Lime formation on elements. 1. Remove and clean heating elements.
Replace as needed.
1. See Service Procedure
RE-V, Page 13.
T
ROUBLESHOOTING
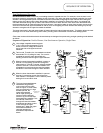
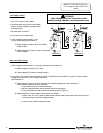
Quick Step Plan to Hot Water
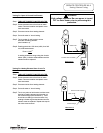
1. TURN OFF power to water heater and solar controller.
Check all wire connections to insure they are tight and
corrosion free.
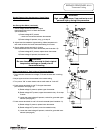
2. Turn power “ON” and determine that service voltage is
present and the high limit (ECO) has not actuated
(see procedure on page 8).
3. Check for inoperative heating element (see procedure on page 9).
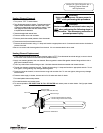
4. Check for proper thermostat operation (see procedures beginning on page 10). NOTE: Thermostat testing procedures
assume items 2 and 3 above are in working order.
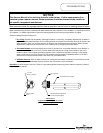
WARNING
High voltage exposure. Use caution when
making voltage checks to avoid personal injury.
NOTICE
This Service Manual is for servicing the solar water heater.
If other components of an installed system requires
service, those questions should be directed to the installer
or the specific component manufacturer.
7