


&!&1.7><270.5.,=;2,
*9952*7,. +*<2, 9;.,*>=287< <18>5-
*5@*B< +. /8558@.- 7,5>-270 =1.
/8558@270
- Read all instruction before using the
appliance.
- To reduce the risk of injury, close supervision
is necessary when an appliance is used near
children.
- Use only the charger supplied by the
manufacturer to recharge.
- Do not use outdoors.
- To reduce the risk of electrical shock, do not
put the unit in water or other liquid. Do not
place or store unit where it can fall or be
pulled into a tub or sink.
Please read these instructions carefully before
operation in order to use the Flashlight
effectively and obtain maximum performance.
Please keep these instructions for future
reference.
1. Follow all operating and safety procedures
attached to the charger and battery pack.
2. Use only Bosch battery pack catalog
number BAT411.
3. Do not wash the Flashlight with water nor
keep in a damp location. If the Flashlight gets
wet, dry it off as soon as possible.
4. The Flashlight is ruggedly constructed. It
should, however, be handled with care. Do not
disassemble or forcibly pivot head beyond it’s
stopping point.
5. Check the charge level at least once a
month, especially if used for emergency
purposes (for example: in your car). If the light
seems dimmer, recharge the battery pack.
"##"#!$#"
To Reduce the Risk of Electric Shock, this
appliance has a polarized plug (one blade is
wider than the other). This plug will fit in a
polarized outlet only one way. If the plug does
not fit fully in the outlet, reverse the plug. If it
still does not fit, contact a qualified electrician
to install the proper outlet. Do not change the
plug in any way.
#8 ;.->,. =1. ;2<4 8/
.5.,=;2,<18,4-2<,877.,=
+*==.;B9*,4+./8;.,5.*72708;<.;?2,270
"!#!"
##!(
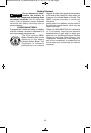
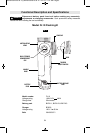
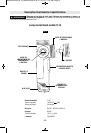
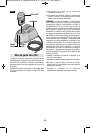
To insert battery, align battery and slide
battery pack into tool until it locks into position.
Do not force.
Release battery pack from tool by pressing on
both sides of the battery release tabs and pull
downward (Fig. 1).
!#
1. To turn the Flashlight "ON", squeeze and
release trigger switch. To turn Flashlight
"OFF", squeeze and release trigger switch
(Fig. 1).
2. Your Flashlight has a articulating head that
can be pivoted to desired position. To change
the position of the head, pivot clockwise until it
stops. To return head to it’s original position,
pivot the head counter-clockwise until it stops
(Fig. 1).
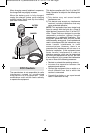
$"!#"#!$#
Always remove the battery
pack from handle base
before changing the bulb.
All repairs, electrical or
mechanical, should be
attempted only by trained repairmen. Contact
the nearest Bosch Factory Service Center,
Authorized Service Station or other competent
repair service.
1. Rotate lens cap counter clockwise and
carefully remove lens cap (Fig. 1).
2. Remove bulb from spring.
3. Reinstall replacement bulb in spring.
4. Reinstall lens cap and rotate clockwise to
tighten.
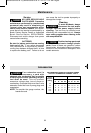
5. Use only 10.8V, .65A bulb part number
2610951871 provided by a Bosch Factory
Service Center.
8=. One replacement bulb is provided in the
bulb storage compartment. To remove spare
bulb, rotate cap counter-clockwise with a dime
or a flat tip screwdriver to expose bulb.
!##"#("#!$#"
"#!$#" !##!"!#!"
!$!(# !""
This Flashlight is intended for Household use only.
WARNING
!
WARNING
!
-2-
WARNING
!
BM 2610022016 04-12_BM 2610022016 04-12 4/17/12 11:21 AM Page 2