


6 6 720 607 030
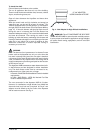
Expansion and contraction of piping due to changing water
temperature in the pipes imparts movement to the heater
which, if mounted directly to a brittle, friable board, such as
plasterboard, can cause failure of mounting.
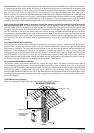
In earthquake-prone zones, CEC recommends that installers
use a large washer and lag screw through the existing holes
used to hang the heater to affix the upper third of the heater
to the mounting board. To affix the lower third of the heater,
CEC recommends that two new holes be drilled in the
heater’s frame, each one 16 inches below the top two holes,
and that washers and lag screws be used to secure the
lower portion of the heater to a spacing board.
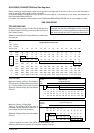
Before installing the unit, be certain you have the correct
heater for your type of Gas – Propane or Natural Gas.
Identification labels are found on the shipping box, and on
the rating plate which is located on the right side panel of
the cover. Also, each burner orifice is stamped with a number
(79 for LPG and 120 for Natural Gas).
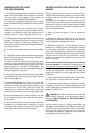
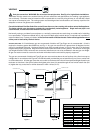
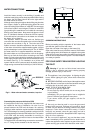
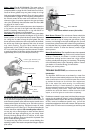
Fig. 3 - Incandescent Particle Tray Illustration
The incandescent particle tray (shipped loose in the carton
with the water heater) must be attached at the bottom of
the water heater front cover at the time of installation. Use
the screws provided. See figure 3
SCREWS
INCANDESCENT PARTICLE TRAY
Note: Typically, the minimum clearence to combustible
materials should not be less than 6
“ for single wall flue
pipe. Note that this clearance can be reduced if combustible
materials are protected as per table VI of the National Fuel
Gas Code or if Type B gas vent is used.
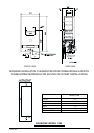
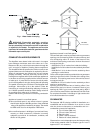
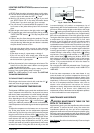
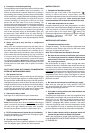
MOUNTING INSTALLATION
The Aquastar 125 B is design certified for mounting on a
wall.
Secure the two L shaped hooks, which are provided with
heater, to a wall surface. Place them 13 ¼” apart as shown
in Fig. 2.
Do not install this appliance on a carpeted wall or over floor
covering which is combustible, such as carpet. The heater
must be mounted on a wall using appropriate anchoring
materials. If wall is a stud wall sheathed with plasterboard, it
is recommended that support board(s), either 1x4’s or
1/2" (minimum) plywood first be attached across a pair
of studs and then the heater should be attached to the
support boards. See Fig. 2.
Fig. 2 - Mounting the Heater
WALL STUDS
1” X 4”
SPACE BOARD
SUPPORT
BOARD
13 ¼”