


4
ENGLISH
(Original instructions)
Intended use
Your Black & Decker steam mop has been designed for
sanitising and cleaning sealed hardwood, sealed laminate,
linoleum, vinyl, ceramic tile, stone and marble oors and for
refreshing carpets. This appliance is intended for indoor
household use only.
Warning! Read all of the 'Safety, Maintenance,
Service' manual carefully before operating
this appliance.
Read all of this manual carefully before operating
the appliance.
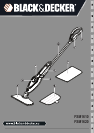
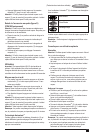
Features
This appliance includes some or all of the following features.
1. ON/Off switch
2. Autoselect
TM
dial
3. Removable water tank
4. Handle
5. Steam head
6. Steam head cleaning pad
7. Resting mat
8. Bottom cable tidy hook
9. Top cable tidy hook
10. Cable management clip
Assembly
Warning! Before attempting any of the following operations,
make sure that the appliance is switched off and unplugged
and that the appliance is cold and does not contain any water.
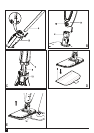
Attaching the handle (Fig. A)
u Slide the bottom end of the handle (4) into the top end
of the steam mop body (12) until it clicks into place. The
arrow on the handle (4) should be aligned with the top of
the steam mop body (12).
Attaching the steam head (Fig. B)
u Slide the bottom end of the steam mop body (12) onto the
steam head (5) until it clicks into place.
u The steam head can be removed from the Steam mop
body by pressing the steam head release button (13) and
pulling the steam mop body (12) off the steam head (5).
Attaching the water jug (Fig. C)
u Clip the water jug (3) onto the handle (4).
u Slide the water jug (3) down into the Steam mop body
(12), ensure that the water jug is rmly seated.
Attaching a cleaning pad (Fig. D)
Replacement cleaning pads are available from your Black &
Decker dealer:- (cat. no. FSMP20-XJ).
u Place a cleaning pad (6) on the oor with the ‘hook & loop’
side facing up.
u Lightly press the steam mop down onto the cleaning pad
(6).
Caution! Always place your steam mop on the resting mat (7)
with the handle (4) in the upright position when stationary and
make sure the steam mop is turned off when not in use.
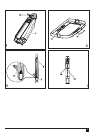
Removing a cleaning pad (Fig. E)
Caution! Always wear suitable shoes when changing the
cleaning pad on your steam mop. Do not wear slippers or
open toed footwear.
u Return the handle (4) to the upright position and turn the
steam mop ‘OFF’.
u Place the steam mop on the resting mat and wait until it
cools down. (approximately ve minutes)
u Place the front of your shoe onto the cleaning pad removal
tab (14) and press down rmly.
u Lift the steam mop up off the cleaning pad.
Caution! Always place the steam mop on the resting mat (7)
with the handle (4) in the upright position when stationary and
make sure the steam mop is turned off when not in use.
Filling the water tank (Fig. F)
The water tank on your steam mop is removable for conven-
ient and easy lling.
This Steam Mop incorporates an anti-calc system to help
prolong the life of the system.
Note: Fill the water tank with clean tap water.
Note: In areas of very hard water, the use of de-ionised water
is recommended.
u Remove the water tank (3).
u Open the ller cap (16) by lifting it up.
u Fill the water tank (3) with water.
Warning! Your water tank has a 460 ml capacity. Do not over
ll the tank.
u Re-t the ller cap (16).
u Re-t the water tank (3).
Note: Ensure the ller cap is rmly secured.
Note: Do not use chemical cleaners with your steam mop..
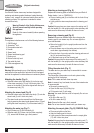
Attaching the carpet glider (Fig. G) (FSM1620 Only)
u Place carpet glider on the oor.
u Attach a cleaning pad to the unit.
u Lightly press the steam mop down onto the carpet glider
(11) until it clicks into place.
Caution! Always place the steam mop on the resting mat (7)
with the handle (4) in the upright position when stationary and
make sure the steam mop is turned off when not in use.