


How to Use
This appliance is intended for household use only.
Important: For warranty verification, please do not remove line cord sticker.
Note: This heater is packed with two caster assemblies that must be installed between the
radiator fins at each end of base pipe to make unit portable and operable. Do not use
heater in any other orientation other than upright as shown in this manual.
To assemble:
1. Be sure heater is unplugged and off.
2. Keep cord out of way by winding it around cord wrap.
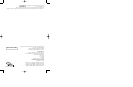
3. Turn heater upside down and place the two metal U-shaped screws over base pipe,
between the radiator fins on either end of heater, so the screw threads extend beyond
the pipe.
4. Position assembly bracket so the two slots on the bracket line up with the two screws
on end of heater.
5. Set each assembly bracket over threaded end of each U-shaped screw and fasten them
securely in place with wing nuts (A).
6. Set heater right side up.
The Advanced Safety Technology™ (AST) system features unique technology built into your
heater that offers protection detailed in the "Special Features" section.
Important: Portable electric heaters are designed for space heating or as a supplementary
heat source. They are not intended to be a main source of heat. Do not use heater as an
integral part of any life support or equipment protection system, where a functional failure
or misapplication of heater could jeopardize the people or things being protected. Do not
touch or attempt to move heater when it is plugged in.
Always unplug and allow heater to cool before handling. Never pull unit by cord — use
handle. During the first few minutes of initial use, you may notice a slight odor. This is
normal and will quickly disappear.
Use heater only on floor. It radiates heat in all directions. Always leave ample space
around it so it’s not too close to a wall.
1. You don't have to set the clock before using heater. Plug heater into a standard AC
outlet.
Caution: Be sure that no other appliances are plugged into same circuit with heater as a
circuit overload could occur.
2. Press ON/OFF button to activate heater. The red lights by POWER and TEMP SETTING
buttons will turn on (B).
3. Press POWER button to select appropriate setting: LO for a small (approx. 10’x10’/3m
x 3m), MED for a medium (approx. 12’x12’/3.8m x 3.8m), or HI for a large room
(approx. 12’x 16’/3.8m x 5m).
4. Press TEMP SETTING button to MAX. Once desired room temperature is achieved,
lower temperature setting. Leave temperature control at this position since heater will
automatically cycle on and off to maintain your chosen room temperature.
5. This heater will continue to operate as long as one of the 3 red lights next to POWER
button is illuminated. Be sure to press ON/OFF button to turn heater off when finished.
Note: Oil in unit is permanently sealed. You do not need to refill it.
To set clock for current time of day:
1. Plug heater in. The digital clock will flash 12:00 AM until correct time is set.
2. Press FUNCTION button until clock light and hour LED start flashing.
3. Set hour by pressing down ( ) or up ( ) arrow buttons. (If setting for PM time, make
sure PM light is on.) Press FUNCTION button again to set. The minute LED will start
flashing.
4
3
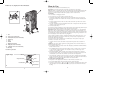
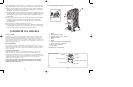
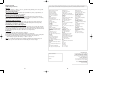
Product may vary slightly from what is illustrated.
1. Fins
†2. Casters (Part #178451-00)
†3. Assembly Bracket (Part #178453-00)
4. Cord Wrap
5. Vents
6. Handle
7. Digital control panel
†8.Wing Nuts (Part #178452-00)
†9. U-Shaped Screw (Part #178454-00)
10. Base Pipe
† Consumer replaceable
º
¾
µ
ᕡ
ᕢ
ᕣ
ᕤ
ᕥ
ᕦ
ᕧ
A
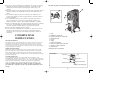
Digital Display
Function button
Temperature button
On/Off button
Power button
Timer I
Clock
Timer II
B
BDOH200.Pub179200RV2 5/18/05 9:11 AM Page 4