4
until irritation ceases. If medical attention is needed, the battery electrolyte is composed of a
mixture of liquid organic carbonates and lithium salts.
WARNING: Burn hazard. Battery liquid may be flammable if exposed to spark or flame.
Symbols
• Thelabelonyourtoolmayincludethefollowingsymbols.Thesymbolsandtheir
definitions are as follows:
V ..................volts A ................... amperes
Hz ................hertz W ..................watts
min ..............minutes
................alternating current
............direct current
n
o .................no load speed
................Class I Construction .................earthing terminal
(grounded)
.................safety alert symbol
................Class II Construction .../min or rpm..revolutions or reciprocation
(double insulated) per minute
SAVE THESE INSTRUCTIONS
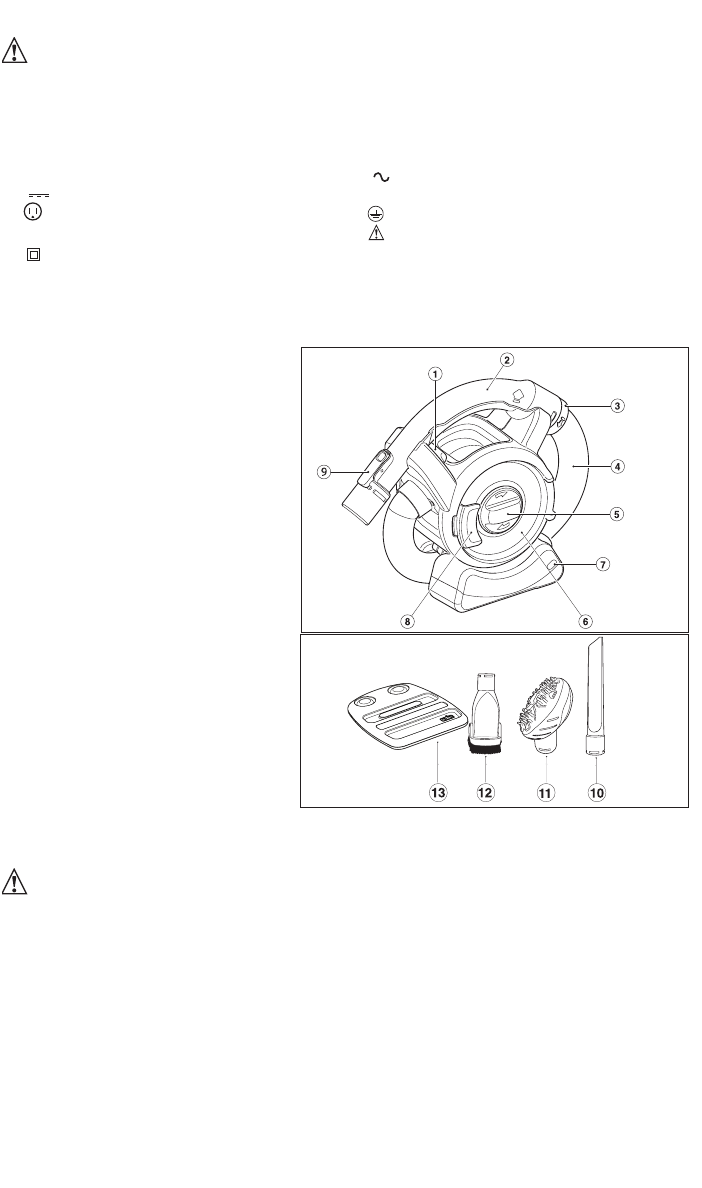
PRODUCT FEATURES
1. On/Off switch
2. Removable hose / handle
3. Locking ring
4. Hose
5. Filter cleaning wheel
6.Transparentdoor
7. LED charging indicator
8. Door latch
9. Accessory clip
10. Long crevice tool
11. Pet hair cleaning tool
12. 2-in-1 nozzle / brush tool
13. Charging base
ASSEMBLY
Mounting accessories
(figures A & B)
The 2-in-1 nozzle / brush tool (12)
has a brush that can be folded
forward for dusting and upholstery
cleaning. The pet hair cleaning tool (11) is for use when vacuuming pet hair and/or
ground-in debris from carpeted or upholstery surfaces.
WARNING: Injury to pets. Do not use pet hair cleaning tool
directly on animals.
The crevice tool (10) allows for vacuuming in narrow and hard to-reach places.
•To attach an accessory, press the accessory clip (9) and slide the accessory onto the handle
(2).
•To remove an accessory, press the accessory clip (9) and remove the accessory.
To unwrap and extend the handle and hose:
The handle and hose can be unwrapped from the main appliance for extended reach when
cleaning. Grab the handle where the arrows indicate and lift upwards. Unwrap the handle and
hose from the main appliance. The hose can extend up to approximately 4 feet (1.21m).
To place the handle and hose back onto the main appliance, wrap the hose back underneath
and around the vac making sure that the hose fits between the two “feet” of the appliance. Align
the handle with its cradle and click back into place. The handle (2) can be removed from the hose
allowingtheaccessoriestobeconnecteddirectlytothehosecuff(16)whendesired.
