ASSEMBLY
NOTICE:
Each steam cleaner is 100% tested in the factory to ensure product
performance and safety. When assembling your new steam cleaner for the first time you
may notice water residue inside of the unit.
WARNING: Before attempting any of the following operations, make sure that the
appliance is switched off and unplugged and that the appliance is cold and contains
minimal or no water.
STEAM CLEANER ATTACHMENTS
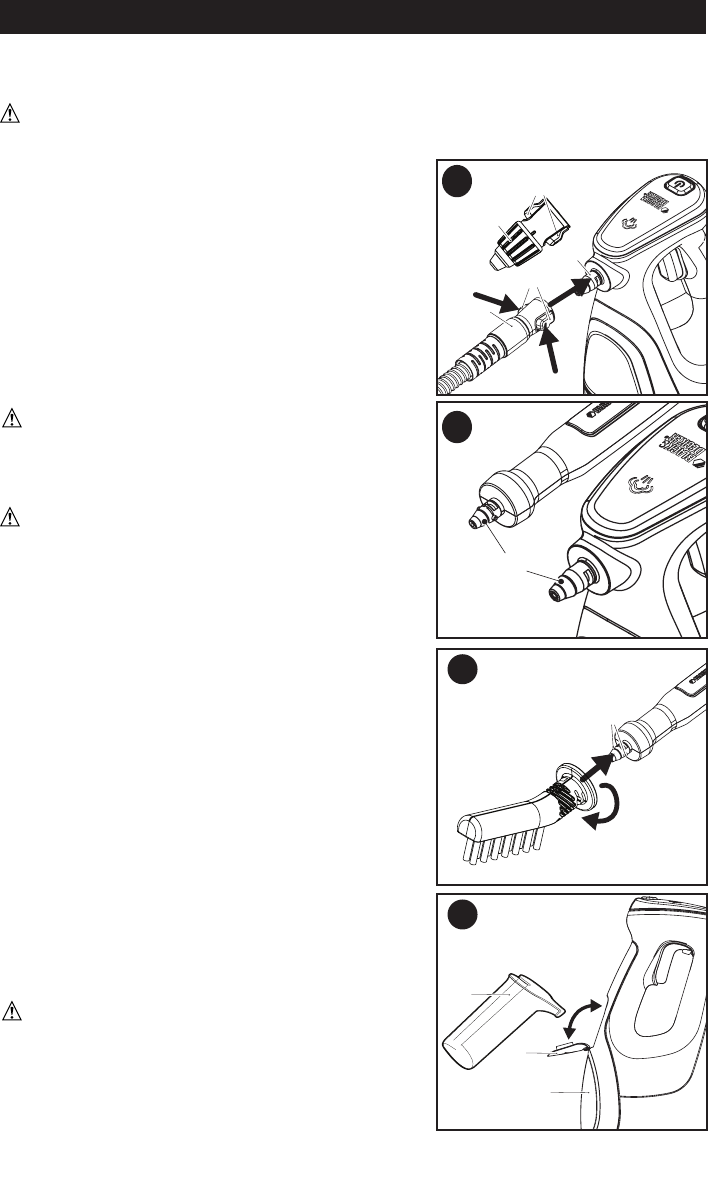
ATTACHING THE HOSE OR VARIABLE
NOZZLE - Fig. B
Press in the clips (6) on either side of the hose (5) or
variable nozzle (12).
or variable nozzle with the two slots adjacent to the
steam nozzle on the hand-held steam cleaner or
hose.
Firmly press the hose or variable nozzle onto the
steam nozzle (7) of the hand-held steam cleaner or
hose such that it is fully seated, and release the clips.
WARNING: Inspect the seal on the steam
nozzle of the hose and handheald steam cleaner
before each use (Figure C). If the seal is missing or
damaged contact your nearest authorized repair
agent. Do not use the appliance.
CAUTION: Ensure that the hose and/or variable
nozzle is securely fastened before using the hand-held
steam cleaner.
REMOVING THE HOSE
away from the steam nozzle.
ATTACHING OTHER ACCESSORIES
TO THE HOSE
- Fig. D
align the
lugs (8) on the hose with the recesses on the accessory.
Press the accessory onto the hose and twist clockwise
until the accessory is fully seated and clicks into place.
REMOVING OTHER ACCESSORIES
FROM THE HOSE
For accessories other than the variable nozzle, twist
accessory counterclockwise then pull away from the hose.
FILLING THE WATER TANK - Fig. E
This steam cleaner incorporates an anti-calcium
system to help prolong the life of the system.
NOTICE: Fill the water tank (11) with regular tap
water.
NOTICE:
In areas of very hard water, the use of
de-ionized water is recommended.
WARNING: Do not over fill the tank. Use
supplied jug (10) to fill tank, and do not fill jug above
indicated max line.
Ensure that the appliance is switched off and the
power cord is disconnected from the power supply.
5
6
5
7
6
12
B
Seal
C
8
D
11
9
10
E


