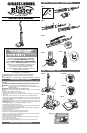
Unpacking Your DirtBuster
™
Floor and Hand Vac (Fig. 1)
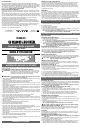
On / Off Switch (Figure 6 and 9)
An ON/OFF switch is located in two areas on the vacuum. When using the vacuum in the
upright mode, use the upper foot pedal located at the back of the vacuum (Figure 6). When
using the vacuum in hand held mode use the thumb switch (Figure 9) located on the handle.
Note: The vacuum may be turned OFF with either switch, regardless of which is used to turn
the vacuum ON.
Vacuum Indicator Lights for Bare or Carpet Floor Use (see Figure 7A and 7B)
There are two indicator lights on the left side of the power head.
1. Pressing down either the foot pedal or thumb switch once will turn ON the forward light,
indicating suction only. Use this setting when vacuuming bare floors or using accessories.
2. Pressing down either the foot pedal or thumb switch a second time will turn ON both lights,
indicating the brush roll is now rotating. Use this setting when vacuuming carpeted surfaces.
3. Pressing down either the foot pedal or thumb switch a third time will turn the vacuum OFF.
Detaching the Upright Handle (see Figure 8)
Your vacuum comes with a detachable upright handle for one step conversion from
upright vacuum to hand held vacuum. Refer to Figure 4 “Attaching the Upright Handle”.
1. Before detaching upright handle, remove cord from the cord wrap and cord hook as shown
in Figure 5.
2. Press down on the handle release pedal at the back of the vacuum, as shown in figure 8,
while pulling straight up on the handle.
Note: Upright handle will detach only in vertical position.
Caution: Make sure the vacuum does not move when detaching the upright handle.
Use as a Hand Vac (see Figure 10)
With the upright handle removed the unit becomes a hand vacuum for use on stairs, on
upholstery and other uneven surfaces. The accessory adapter should only be used with upright
handle removed.
Accessories
Your vacuum comes with a flexible hose for use with hand held accessories. The hose has an
adapter on each end, one that attaches to the vacuum and another to accept a crevice tool or
dusting brush.
Mounting and Removing Adapter (see Figure 11-13)
Note: Unplug vacuum and remove upright handle before attaching or detaching accessory
adapter.
The accessory adapter plugs into the intake area on the bottom of the vacuum. The adapter has
a thumb button to help attach and detach it to the vacuum.
1. Remove the adapter and hose assembly from the upper handle.
2. Holding the adapter as shown in Figure 11A, press thumb button forward toward vacuum,
then plug adapter into the intake area behind the brush opening, see Figure 11. Release
thumb button, allowing hooks to lock into the brush opening.
3. Attach crevice tool for tight corners or dusting brush for upholstery/draperies, see Figure 12.
4. To remove adapter, hold adapter and slide thumb button forward, then pull adapter
away from vacuum, see Figure 13.
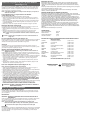
To Empty Dirt Bowl (see Figure 14 – 17)
Note: Unplug vacuum before removing the dirt bowl.
1. Grasp dirt bowl handle and pull up as shown in figure 14. You may now take the dirt bowl
assembly to your garbage can for cleaning.
2. Orient dirt bowl as shown in figure 15, then remove filter assembly from dirt bowl by lifting
straight up. Note finger grip locations.
3. Empty dirt bowl, see figure 16, and clean off the face of the screen door, figure 17A.
4. Open screen door by placing finger under tab and lifting, figure 17B. To remove debris from
the filter, tap against a hard surface or brush it with a soft brush. Screen door may be
removed and easily reassembled onto the filter housing.
5. Pleated filter may be removed from filter assembly by pulling on a pleat, figure 17C. Tap dirt
out or hand wash with soap and warm water, rinse thoroughly, allow to dry.
IMPORTANT: MAKE SURE FILTER IS DRY BEFORE REASSEMBLY. CHECK THE SCREEN DOOR
AND THE PLEATED FILTER FOR DAMAGE. IF DAMAGED, REPLACE BEFORE USING THE
VACUUM.
6. Place pleated filter in filter housing, close screen door, place filter assembly back into dirt
bowl and insert back into vacuum, pressing firmly in place.
FOR BEST PERFORMANCE CLEAN OR REPLACE FILTERS OFTEN.
WARNING: DO NOT OPERATE VACUUM WITHOUT DIRT BOWL AND FILTERS IN PLACE.
Replacement Parts and Maintenance
Safety Instructions: Polarized Plugs
To reduce the risk of electric shock, this equipment has a polarized plug (one blade is wider than
the other). Polarized connections will fit together only one way. If the power cord plug does
not fit fully into the receptacle, reverse the plug. If it still does not fit fully into the outlet, contact
a qualified electrician to install the proper outlet. Do not change the vacuum power cord in any
way.
Power Supply
Be sure your power supply agrees with nameplate marking. 120 Volts AC only means your
vacuum will operate on standard 60 Hz household power. Do not operate AC products on DC.
A rating of 120 volts AC/DC means that your product will operate on standard 60 Hz AC or
DC power. This information is printed on the nameplate. Lower voltage will cause loss of power
and can result in over-heating. All Black & Decker products are factory-tested; if this product
does not operate, check the power supply.
Before assembling your new vacuum please check that you have all the necessary parts. Refer
to figure 1 and the following list of parts included in the package:
A. 1 Hand held vacuum
B. 1 Upper portion of upright handle
C. 1 Lower portion of upright handle
D. 1 Accessory bag containing: 1 flexible hose with adapter, 1 crevice tool, 1 dusting brush
and 2 tool-free assembly screws.
Note: Before disposing of packaging, be sure to remove all parts. If you have any
problems, please call 1-800-54-HOW-TO (1-800-544-6986).
NO TOOLS REQUIRED!
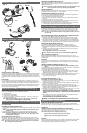
Assembling the Upright Handle (Figure 2)
1. Insert the lower portion of handle, item C, into the upper portion of handle, item B, as shown
in figure 2.
Note: Do not force these handles together, they should slide together freely and will only
assemble one way.
2. Using the tool-free assembly screws, screw the two handle sections together until tight.
Note: These tool-free assembly screws also function as cord wraps. Store the power
cord on the upright handle when the vacuum is not in use. Refer to figure 5 and
“Cord Management and Storage”.
Storage of Accessories (see Figure 3)
The upright handle of your vacuum provides storage for the flexible hose, crevice tool and
dusting brush. When detached from the vacuum, the upright handle also serves as a portable
caddy for the accessories. To store the accessory tools on the upright handle refer to figure 3.
Note: The accessories will store securely on the upright handle, do not use excessive force
when inserting the tools into their location.
FIG. 17
Accessories / Accessoires /Accesorios
Cleaning / Nettoyage / Limpieza
Attaching the Upright Handle (see Figure 4)
Holding the upright handle in a vertical position with the accessories facing you, align the ends
of the attachment legs with the recesses in the vacuum and push downward until you hear a
“CLICK” (refer to figure 4).
Caution: The vacuum is provided with wheels and rollers. Care should be taken to make
sure the vacuum does not move when attaching the upright handle!
Upright Handle Detent
Your upright handle has a detent that helps it remain upright. It will release when the handle is
pulled back to the normal use position. It is not a handle lock.
Cord Management and Storage (see Figure 5)
Your vacuum when fully assembled provides cord storage on the back of the upright handle.
To store the power cord on the vacuum when not in use:
1. Place upright handle in the vertical storage position.
2. Drape the cord over the quick release cord wrap and insert into the cord hook as shown in
Figure 5A.
3. Turn the quick release cord wrap to the up position.
4. Wrap the power cord around the quick release cord wrap and the two lower cord wraps.
5. Engage the holder on the plug end onto one of the wraps of cord.
6. To release cord, turn the quick release cord wrap to the down position and pull cord away.
In normal upright vacuuming, keep the cord in the cord hook (Figure 5A).
Assembling Your DirtBuster
™
Floor and Hand Vac (Figs. 2-5)
How To Use Your DirtBuster
™
Floor and Hand Vac (see Figs. 6-17)
Replacement Pleated Filter and Screen Door
Replacement pleated filters and screen doors may be purchased from your Black & Decker
Service Center or retailer. Use only genuine Black & Decker replacement parts for your vacuum.
Maintenance
IMPORTANT: UNPLUG VACUUM BEFORE PERFORMING ANY MAINTENANCE.
Use only mild soap and a damp cloth to clean your vacuum. Never let any liquid get inside the
vacuum; never immerse any part of the vacuum into a liquid.
Note: Make sure the vacuum is completely dry before using it.
Inspect brush bar often and remove any hair or lint from bristles.
Caution: Do not use sharp objects to clean brush bar.
Important
To assure product safety and reliability; repairs, maintenance and adjustments (other than those
listed in this manual) should be performed by authorized service centers or other qualified
service organizations, always using identical replacement parts.