9
www.bissell.com
Machine storage
Put the unit away in a closet or basement for
the next use. Store cleaner in a protected, dry
area. Since this product uses water, it must not
be stored where there is a danger of freezing.
Freezing will damage internal components and
void the warranty.
Maintenance and care
WARNING:
To reduce the risk of fire,
electric shock or injury,
unplug from the outlet
before servicing.
Troubleshooting
Reduced Spray OR No Spray
Possible cause Remedies
1. Bladder may be empty 1. Turn power switch OFF (O); Refill bladder
with clean hand hot tap water.
2. 2-in-1 water tank may not be seated properly. 2. Turn power switch OFF (O); remove tank
and reseat tank.
3. Pump may have lost prime. 3. Turn power switch OFF (O); after 1 minute
turn ON (I) and depress spray trigger.
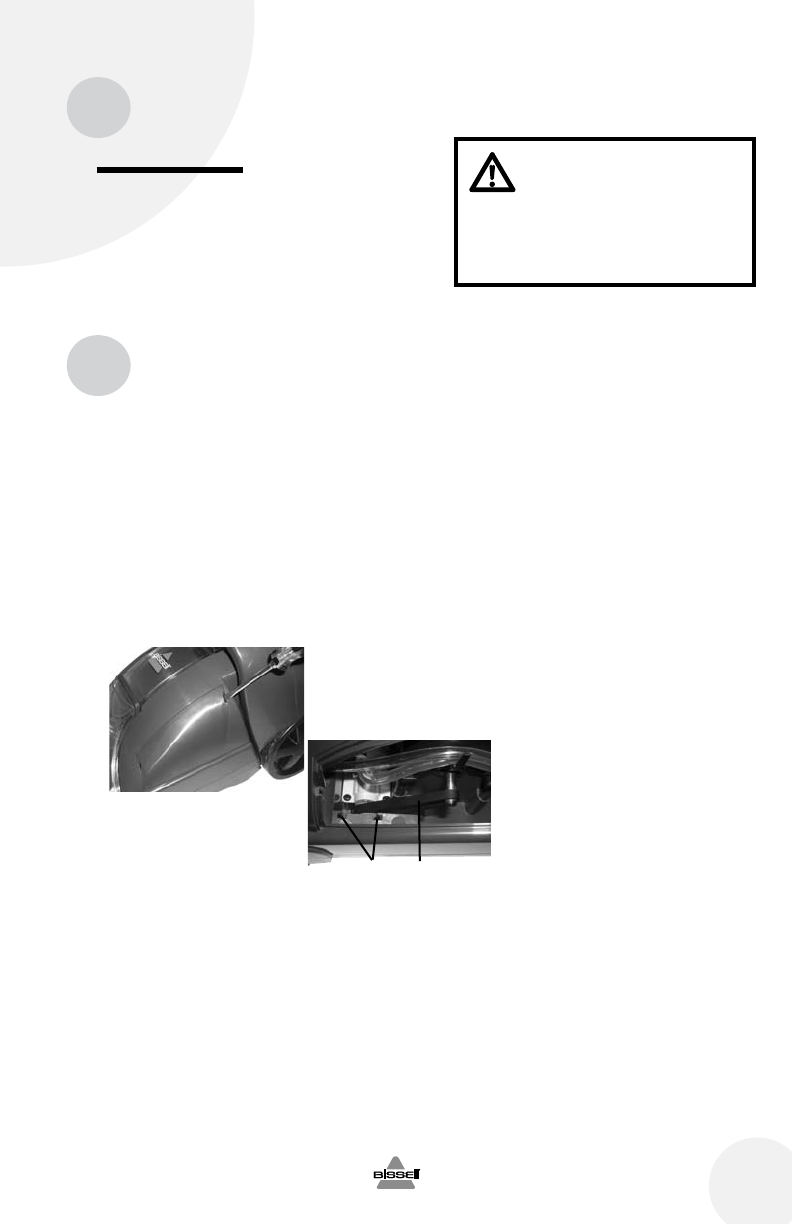
4. The pump belt may be broken. 4. Turn power switch OFF (O) and unplug from
the outlet. To check if a pump belt has broken,
you will need a flat head screwdriver.
A. Insert the blade end into the slot of the
belt access door to release. Examine the
belt for breakage. You should be able to see
the pump belt looped around the motor shaft.
If it is broken or missing, please refer to
Replacement Parts on page 11 before calling
BISSELL Consumer Services. Complete
installation instructions will accompany the
replacement belt.
B. When replacing belt access door be
sure to line up slots of belt access door with
slots in machine, slide door into place and
snap shut.
DirtLifter PowerBrush Does Not Turn
Possible cause Remedies
1. The brush belt or pump belt is off or broken. 1. Refer to Remedy 4 above to check if brush
belt or pump belt is broken.
Cleaner Not Picking Up Solution
Possible cause Remedies
1. Removable nozzle may not be properly attached. 1. Make sure nozzle is on correctly by slightly
raising front of machine to line up slots on the
base of the machine with the hooks on nozzle.
Attach at base first and then click nozzle into place.
2. 2-in-1 water tank lid is not properly installed. 2. Re-install lid; refer to the image on page 7.
Slots
A.
B.
Pump Belt


