


8. Snap the Front Grill (N) into the Grill Ring (M). Make
sure Bionaire logo is properly aligned.
9. Tighten Grill Ring Screw (O).
OPERATING INSTRUCTIONS (see Fig. 1)
1. Set the fan base on a dry level surface.
2. Make sure the Speed Control is in the OFF (0)
position. Speed Control (P) is located on the top of
the fan motor housing.
3. Plug the cord into a suitable outlet.
4. The SPEED is adjusted by turning the Speed Control
to the desired setting:
0 - Off
I - Low
II - Med
III - High
ADJUSTMENT INSTRUCTIONS
Tilt adjustment
Follow these instructions to tilt the fan head for upward
angle air movement.
•To change the tilting angle of the fan head, simply
move the fan head to the desired angle.
Oscillation adjustment
The OSCILLATION control (Q) is located on the top of the
fan motor housing. To start oscillation, push the control
knob down. To stop oscillation, pull the control knob up.
CLEANING/MAINTENANCE INSTRUCTIONS
Follow these instructions to correctly and safely care for
your fan.
• Always unplug the fan before cleaning or
disassembling.
• Be sure to clean your fan with a soft cloth moistened
with a mild soap solution.
• Do not allow water to drip on or enter into the fan
housing.
• Do not use gasoline, thinner, or benzene as a cleaner.
• Lightly run a vacuum cleaner nozzle over the fan grill
to remove any dust or dirt that may have
accumulated.
Fan Blade Cleaning Instructions
Make sure the fan is unplugged before disassembling and
cleaning the fan blade. Carefully remove the front grill from
the clips. Wipe the blade with a soft cloth moistened with a
mild soap solution. DO NOT allow any liquid to drip into or
enter the motor housing. Snap the front grill onto the fan.
Make sure all parts are secured prior to operating the fan.
ASSEMBLY INSTRUCTIONS (see Fig. 1 - Fig. 8)
Assembly Time: 10-15 Minutes.
Tools Required: Phillips Head Screw Driver.
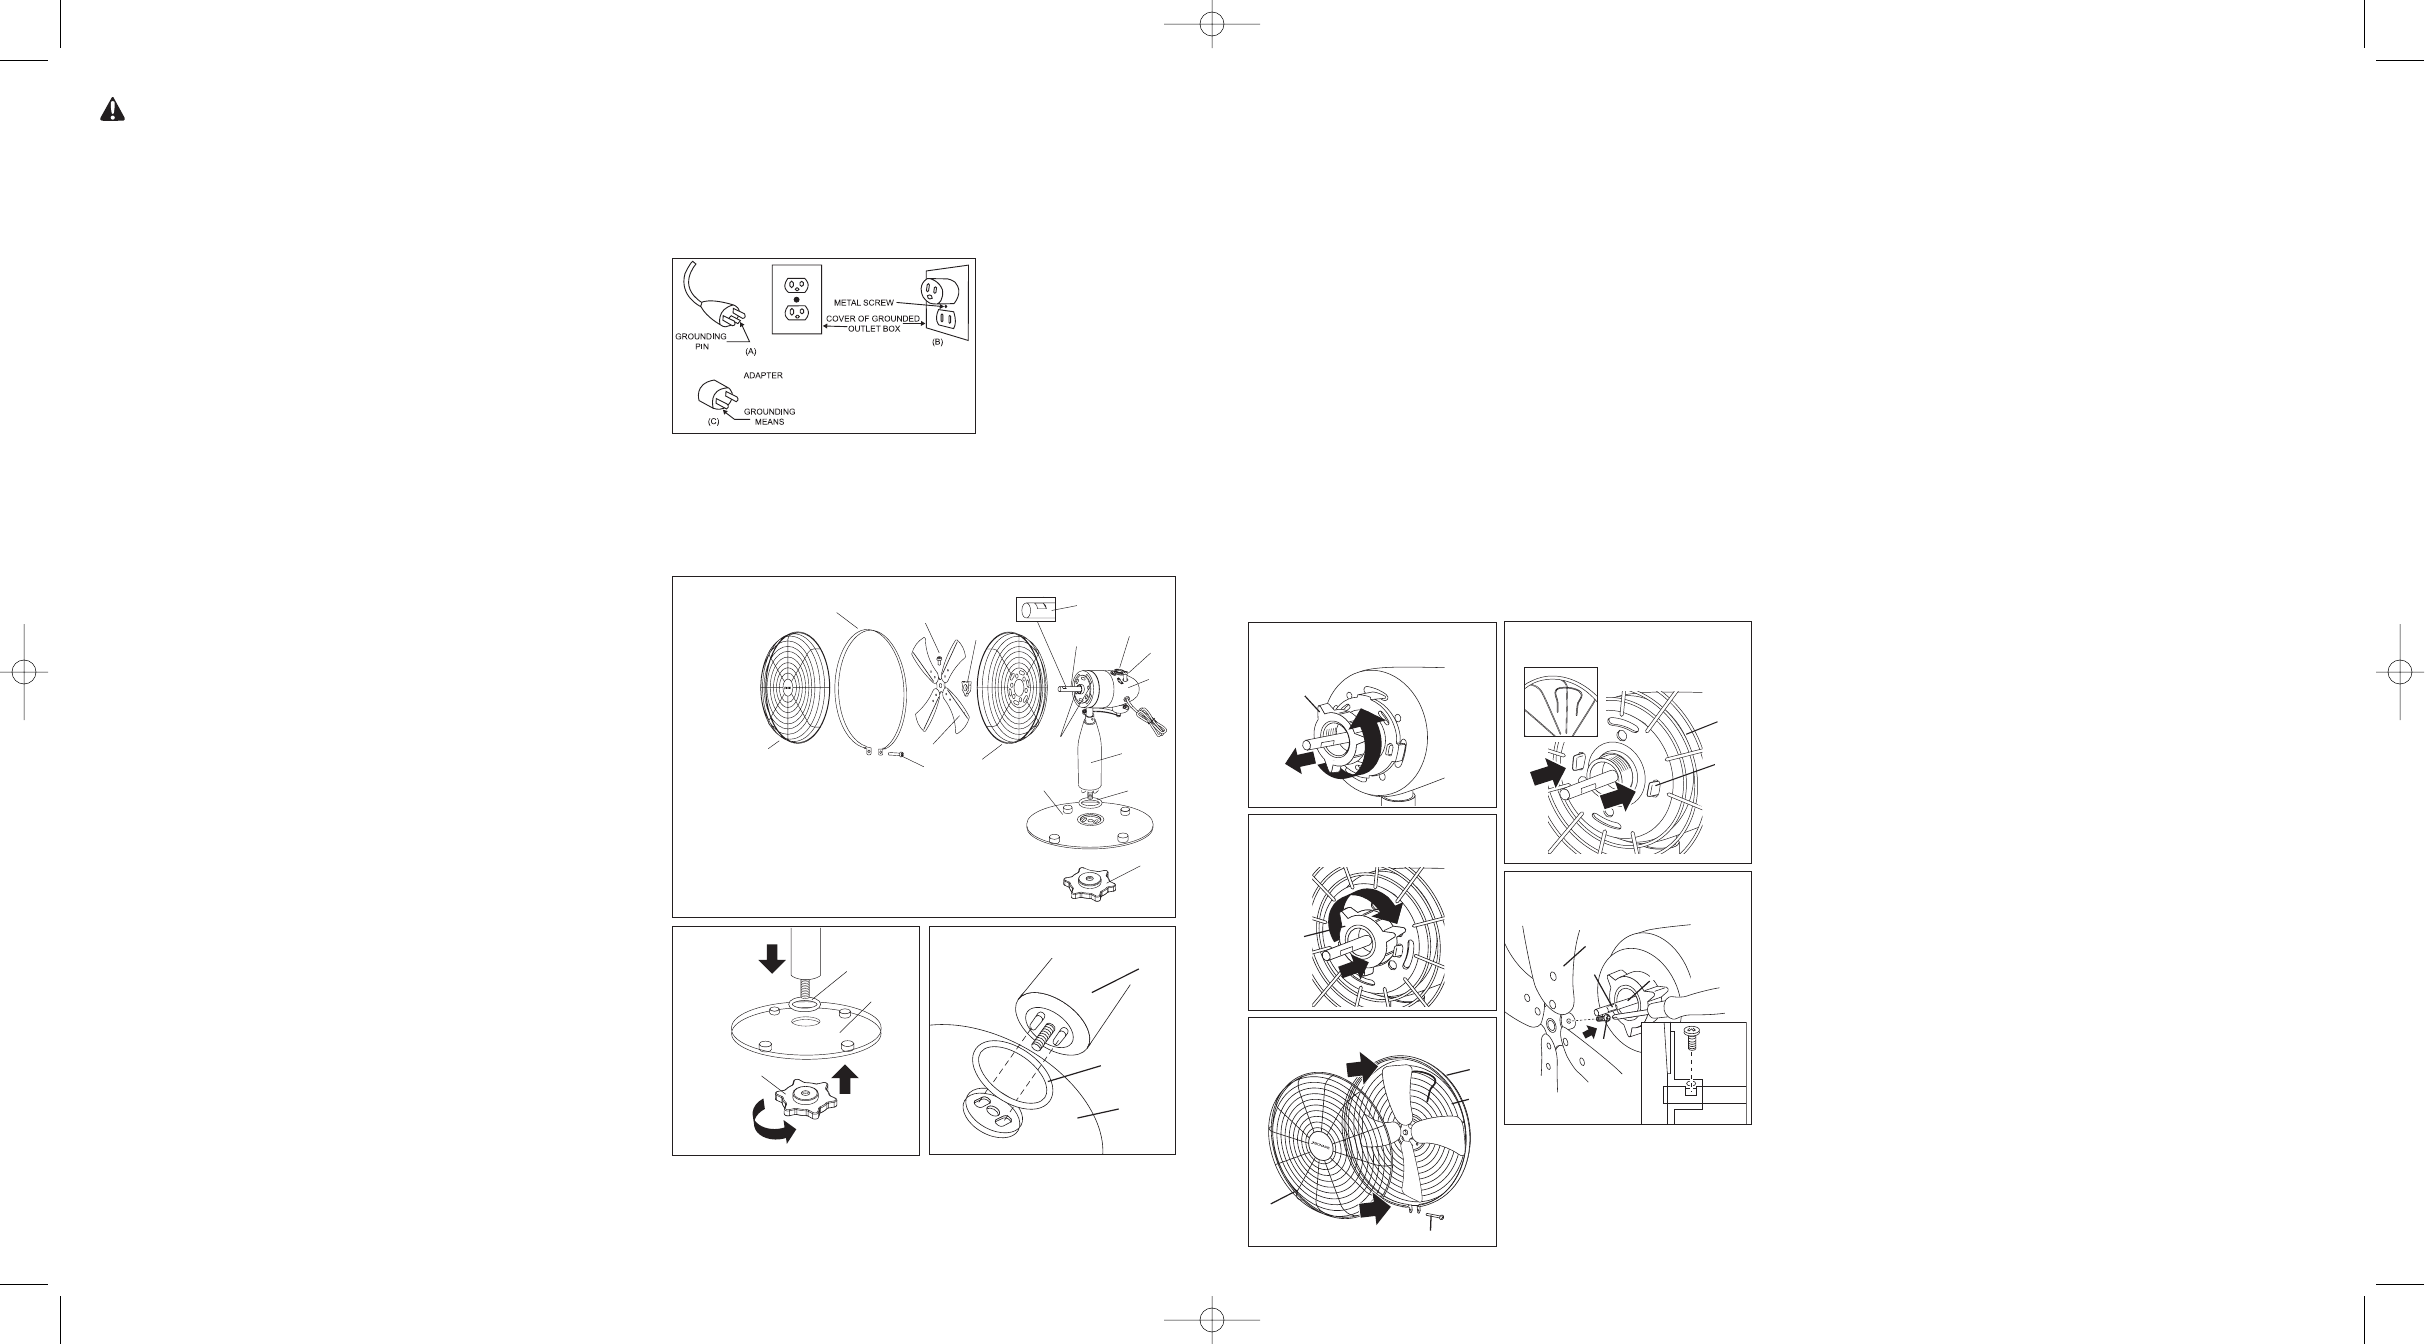
1. Fit the motor housing assembly over the opening of
the Glass Base (B) and secure with the Base Nut (C).
Refer to Fig. 2.
2. Unscrew the Rear Grill Nut (D) from the Motor
Housing (E). Refer to Fig. 4.
3. Position the Rear Grill (F) over the motor housing.
Refer to Fig. 5 for proper alignment of the rear grill to
the motor housing.
4. Secure the Rear Grill (F) to the Motor Housing (E) with
the Rear Grill Nut (D). Refer to Fig. 6.
5. Remove the protective sleeve from the Motor Shaft (G).
6. Slide the Fan Blade (J) over the Motor Shaft (G).
Refer to Fig. 7 for proper alignment of Fan Blade (J) to
Motor Shaft (G).
7. Position the Grill Ring (M) over the Rear Grill (F) with
the Grill Ring Screw (O) positioned at the bottom.
Refer to Fig. 8.
NOTE: You may have to loosen the Grill Ring Screw
(O) in order to fit the grill ring over the Rear Grill.
FAN SAFETY
PLEASE READ AND SAVE
THESE IMPORTANT
SAFEGUARDS
IMPORTANT INSTRUCTIONS
When using electrical appliances, basic safety precautions
should always be taken including the following:
1. Read all instructions before using this appliance.
2. Use fan only for purposes described in the instruction
manual.
3. To protect against electrical shock do not immerse
unit, plug or cord in water or spray with liquids and
plug the appliance directly into a electrical outlet.
4. Close supervision is necessary when any appliance is
used by or near children.
5. Unplug from outlet when not in use, when moving fan
from one location to another, before putting on or
taking off parts and before cleaning.
6. Avoid contact with moving parts.
7. Do not operate in the presence of explosive and/or
flammable fumes.
8. To avoid fire hazard, NEVER place the cord under
rugs or any parts near an open flame, cooking or
other heating appliance.
9. Do not operate any appliance with a damaged cord or
plug after the appliance malfunctions, or has been
dropped/damaged in any manner. Take it to an
Authorized Service Center for examination and/or
repair.
10.The use of attachments not recommended or sold by
the appliance manufacturer may cause hazards.
11.Do not use outdoors.
12.Do not let the cord hang over the edge of a table,
counter or come in contact with hot surfaces or leave
exposed to high traffic areas.
13.To disconnect, grip plug and pull from wall outlet.
Never yank on cord.
14.Always use on a dry, level surface.
15.Do not operate fan until fully assembled with all parts
properly in place.
16.This product is intended for household use ONLY and
not for commercial or industrial applications.
17.WARNING: To reduce the risk of electrical shock and
injury to persons, do not use in window.
18.WARNING: To reduce the risk of fire or electric
shock, DO NOT use this fan with any solid-state
speed control device.
PLEASE READ AND SAVE
THESE IMPORTANT SAFETY
INSTRUCTIONS
CONSUMER SAFETY INFORMATION
This product is for
use on 120 volts.
The cord has a plug
(A) as shown. An
adapter (C) is
available for
connecting three-
blade grounding-type
plugs to two-slot
receptacles (B). The green grounding lug extending from
the adapter must be connected to a permanent ground
such as a properly grounded outlet box. The adapter
should not be used if a three-slot grounded receptacle is
available.
Fig. 1
A. Pole
B. Glass Base
C. Base Nut
D. Rear Grill Nut
E. Motor Housing
F. Rear Grill
G. Motor Shaft
I. Prongs
J. Fan Blade
K. Notch on Motor Shaft
L. Locking Screw
M. Grill Ring
N. Front Grill
O. Grill Ring Screw
P. Speed Control
Q. Oscillation Control
G
K
M
O
L
D
P
B
N
J
Q
C
E
I
F
A
H.
Rubber Gasket
H
C
B
H
D
Fig. 4
F
I-(2)
D
Fig. 6
Fig. 7
G
K
L
J
N
O
F
M
Fig. 8
Fig.1
Fig.2
Fig.3
Fig.4
Fig.6
Fig.5
Fig.7
Fig.8
A
H
B
BTF161606EM1.qxd 11/9/06 14:08 Page 2