


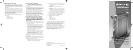

HEATER SAFETY
PLEASE READ AND SAVE
THESE IMPORTANT
SAFEGUARDS
IMPORTANT INSTRUCTIONS
When using electrical appliances, basic safety precautions
should always be followed to reduce the risk of fire, electric
shock, and injury to persons, including the following:
1. Read all instructions before using the appliance.
2. To avoid fire or shock hazard, plug the appliance direct-
ly into a 120V AC electrical outlet.
3. The heater is hot when in use. To avoid burns, DO
NOT let bare skin touch hot surfaces. If provided, use
handles when moving this heater. Keep combustible
materials, such as furniture, pillows, bedding, papers,
clothes, and curtains at least 3 ft (0.9 m) from the front
of the heater and keep them away from the sides and
rear.
4. DO NOT run cord under carpeting. DO NOT cover
cord with throw rugs, runners, or the like. Arrange cord
away from traffic area and where it will not be tripped
over.
5. This heater is not intended for use in bathrooms, laun-
dry areas and similar indoor locations. NEVER locate
heater where it may fall into a bathtub or other water
container.
6. Extreme caution is necessary when any heater is used
by, or near children or invalids, and whenever the
heater is left operating and unattended.
7. Always unplug the heater when not in use.
8. When unplugging, be sure to pull by the plug and not
the cord.
9. DO NOT insert or allow foreign objects to enter any
ventilation or exhaust opening as this may cause an
electric shock or fire, or damage the heater.
10. DO NOT operate heater with a damaged cord or plug,
or after the heater malfunctions, or has been damaged
in any manner. Return appliance to manufacturer for
examination, electrical or mechanical adjustment, or
repair.
11. A heater has hot and arcing or sparking parts inside.
DO NOT use it in areas where gasoline, paint, or flam-
mable liquids are used or stored.
12. Use appliance only for intended household use as
described in this manual. Any other use not recom-
mended by the manufacturer may cause fire, electric
shock, or injury to persons. The use of attachments not
recommended or sold by The Holmes Group may
cause hazards.
13. DO NOT use outdoors.
14. To prevent a possible fire, DO NOT block air intakes or
exhaust in any manner. DO NOT use on soft surfaces,
like a bed, where openings may become blocked.
15. To disconnect heater, turn controls to Off, then remove
plug from outlet.
16. Avoid the use of an extension cord because the exten-
sion cord may overheat and cause a risk of fire.
However, if you have to use an extension cord, the
cord should be No. 14AWG minimum size and rated
not less than 1875 watts.
17. If the heater will not operate, see specific instructions
on Auto Safety Shut-off.
18. DO NOT attempt to repair or adjust any electrical or
mechanical functions on this unit. Doing so will void
your warranty. The inside of the unit contains no user
serviceable parts. All servicing should be performed by
qualified personnel only.
19. DISCONTINUE USE IF PLUG OR OUTLET IS HOT.
RECOMMEND OUTLET BE REPLACED IF PLUG OR
OUTLET IS HOT TO TOUCH.
PLEASE SAVE THESE
INSTRUCTIONS
CONSUMER SAFETY INFORMATION
THIS PRODUCT IS EQUIPPED
WITH A POLARIZED AC PLUG
(a plug having one blade wider
than the other). This plug will fit
into the power outlet only one
way. If the plug does not fit fully
into the outlet, reverse the plug. If it still does not fit, con-
tact qualified personnel to install the proper outlet.
DO NOT DEFEAT THE SAFETY PURPOSE OF THIS
POLARIZED PLUG IN ANY WAY.
PLEASE READ AND SAVE
THESE IMPORTANT
SAFETY INSTRUCTIONS
TECHNICAL SPECIFICATIONS
Wattage: 1500W/ (+ 5% - 15%)
Working Voltage: 120V AC/60 HZ
AUTO SAFETY SHUT-OFF
This heater is equipped with a patented, technologically-
advanced, safety system that automatically shuts off the current
to the heater when a potential overheat temperature is reached.
The heater can only resume operation when you reset it.
To Reset the Heater
If your heater shuts down, follow these steps:
1. Turn Mode to OFF and Thermostat to High.
2. Unplug the heater and wait 30 minutes.
3. Plug in the heater and turn the Mode to High
4. Your heater should now be operating properly.
Tip-Over Shut-Off
If the heater is knocked over, it will instantly shut off. To
reset, simply place the heater in an upright position and
turn ON the heater.
ASSEMBLY INSTRUCTIONS
Handle / Wheel / Front Foot Assembly
There are two wheels, one axle, one front foot, two screws,
and a handle packed within the box that you will need to
attach to the heater (Please refer to Fig.1 - 6).
1. Using force, attach the provided handle to the front
housing of the heater (as shown in Fig.1). The handle
will snap into place and was not meant to be taken
apart after attached to the heater.
2. Turn the heater upside down.
3. Place the foot onto the bottom of the front housing
(same side as control panel and as shown in Fig.2).
Secure the foot with one of the provided screws (as
shown in Fig.3).
4. Place the wheel axle onto the bottom of the back
housing (same side as power cord and as shown in
Fig.4). Secure the axel with the second provided
screw (as shown in Fig.5).
5. Using force, insert a wheel into one of the two holes of
the axel (repeat with second wheel) (as shown in Fig.6).
They will snap into place and are not meant to be
taken apart after attached to the axle.
NOTE: This unit cannot operate without the feet properly
secured on the bottom of the heater.
Fig.1
Fig.2
Fig.3
Fig.4
Fig.5
Fig.6
PRE-OPERATING INSTRUCTIONS
1. Carefully remove your heater from the box.
2. Make sure the heater is OFF before plugging the heater
into the outlet.
3. Place the heater on a firm, level surface.
4. Avoid overloading your circuit by not using other high
wattage appliances in the same outlet. At 1500 Watts,
this unit draws 12.5 Amps.
SETTING THE THERMOSTAT
1. Before setting the Thermostat, turn the Mode Button to
HI and allow the heater to warm up the room.
2. When the desired comfort level is reached, lower the
Thermostat until the heater stops.
3. The control now maintains the selected comfort level
by automatically turning the heater ON and OFF.
4. The Temperature light turns on and remains lit when
the selected comfort level is reached.
NOTE: It is normal for the heater to cycle ON and OFF as
it maintains the programmed temperature. To prevent the
heater from cycling, raise the thermostat setting.
CLEANING/MAINTENANCE
Always unplug the heater before cleaning.
• Lightly run a vacuum cleaner nozzle over the heater grill
to remove any dust or dirt that may have accumulated.
• Carefully wipe the heater with a soft, damp cloth. Please
be very cautious near the heating elements.
• NEVER use abrasive or flammable solvents to clean the
heater.
• After cleaning, be sure to completely dry the heater with
a cloth or towel.
• Store your heater in a cool, dry location.
TROUBLESHOOTING
If your heater fails to operate, unplug the heater and:
• Make sure the electrical outlet and circuit breaker are
working.
• Check for obstructions. If you find an obstruction, turn
OFF and UNPLUG the heater. Carefully remove the
obstruction and follow the reset instructions.
• Check the thermostat setting; it might be set too low. Turn
the thermostat dial clockwise until the heater restarts.
•Make sure the Mode Control is on the Lo or Hi setting.
Please DO NOT attempt to open or repair the heater.
Please see the Warranty for Service Instructions or
call our Consumer Services Department at
1-800-253-2764.
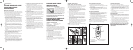
Fig.7
A
B
C
D
A. Power Button
(Temperature Light)
B. Mode Button
(HI = II, LO = I )
C. Thermostat Button
D. Power Indicator
BH395006EM1.qxd 6/6/06 16:50 Page 2