


4
3
The length of cord used on this appliance was selected to reduce
the hazards of becoming tangled in, or tripping over a longer cord.
If a longer cord is necessary an approved extension cord may be used.
The electrical rating of the extension cord must be equal to or greater
than the rating of the humidifier. Care must be taken to arrange the
extension cord so that it will not drape over the countertop or tabletop
where it can be pulled on by children or accidentally tripped over.
HOW YOUR COOL MOISTURE HUMIDIFIER WORKS
Your Bionaire
®
Cool Moisture humidifier draws dry air through the rear
air intake grill area. This air is then passed through a moisture–laden
wick filter which retains the minerals and deposits. The resulting moist
air is directed back into the room from the top air grill.
☛
Tip: This humidification system provides a cool, invisible moisture
output. It is normal not to see the mist.
PRE-OPERATING INSTRUCTIONS
1. Be sure the humidifier is switched off and disconnected from
the electrical outlet.
2. Select a location for your
humidifier, on a flat surface,
about 4" away from the wall.
Do not place your humidifier
on furniture, a floor location
that will not be damaged by
moisture is best.
3. Remove the water reservoir,
by holding the reservoir handle
and lifting straight upwards.
4. Remove the humidifier housing by holding the housing support
handle and lifting straight upwards. Check to see that the wick
filter is properly in place. Replace the humidifier housing.
FILLING THE WATER RESERVOIR
5. Twist off the water reservoir cap located on the bottom of the
water reservoir by turning counter clockwise and fill the water
reservoir with cool, fresh water. Do not fill with warm water as
this may cause leaking.
6. After filling the water reservoir, replace the water reservoir cap by
firmly turning clockwise and then replace the water reservoir on
the base. The water reservoir will immediately begin to empty into
the base.
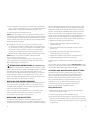
mode
refill
humidistat
power
Humidifier
Housing
Float
(underneath)
Moisture
Outlet
Control
Panel
Wick
Filter
Base
Figure 1
Housing
Support Handle
Reservoir
Handle
Reservoir
Cap
Water
Reservoir
OPERATING INSTRUCTIONS
1. Plug the power cord into a 120V AC electrical outlet.
2. Turn the mode knob to the High setting.
3. Turn the humidistat knob to the highest setting.
USING THE HUMIDISTAT
The humidistat feature allows you to set and maintain the humidity level
you wish for your room. The humidistat is designed to operate between
30% and 65% relative humidity range. The recommended setting
is 40-45%.
For BCM4505: To maintain
this setting, position the
humidistat (figure 2) knob
in the middle position.
Turn the knob clockwise as far
as it will turn to achieve the
highest humidistat setting. In
this setting, the humidifier will
run constantly.
To lower your desired humidity level, simply turn the knob counter
clockwise to choose your setting.
For BCM4509: To take advantage of the SmartTouch™ Electronic
Humidistat, press the MODE button until the speed is set in either
the HIGH or LOW setting, and the Desired Humidity is set. When
the humidity level rises above the set humidity, the humidifier will stop.
When the humidity level drops below the set humidity, the humidifier
will turn on automatically.
NOTE: When the SmartTouch™ Electronic Humidistat is set, either
the HIGH or LOW power light and the percent humidity light will remain
lit during operation. The SmartTouch™ Humidifier has memory. This
means that when you turn the unit back on, it will be at the last setting
the humidifier was set at.
For BCM4510: The auto setting is designed to operate between
30% and 65% relative humidity range. (The recommended setting
is 40-45%.) The auto setting may be used with any of the three
auto speed settings (High, Medium or Low).
To program a specific humidity level in the auto setting, follow these
instructions.
1. Use the mode button to scroll to either Auto/High, Auto/Medium,
or Auto/Low.
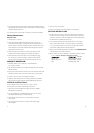
mode
refill
humidistat
power
Mode Knob
Control
Panel
Refill Light
Figure 2
Humidistat
Knob
Power Light