


STORAGE INSTRUCTIONS
If your humidifier will not be in use for two days or more, or at the
end of the season follow these instructions.
1. Clean and dry the humidifier thoroughly as per the Weekly
Maintenance instructions above.
2. Let the humidifier dry completely before storing.
Do not store with water inside the base.
3. Do not store with the reservoir cap in place.
4. Throw away the wicking filter. Do not store with wick filter in place.
5. Store in a cool dry location.
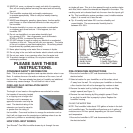
CLEANING AND MAINTENANCE INSTRUCTIONS
Humidifiers provide comfort by adding moisture to dry indoor air.
To get the most of the benefit from the humidifier and avoid product
failure, follow all maintenance instructions carefully. If the recommended
care and maintenance guidelines are not followed, micro-organisms
may be able to grow in the water within the humidifier.
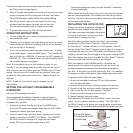
Daily Maintenance
1. Before cleaning, turn the power to OFF and unplug the unit from the
electrical outlet.
2. Lift off the tank and the housing of the humidifier.
3. Carry the base and the tank to the sink, remove the wick filter, place
in sink, then drain and rinse the base and tank thoroughly to remove
any sediment and dirt. Wipe clean and dry with a clean soft cloth
or paper towel (DO NOT use metal cleaning utensils or abrasive
cleaners).
4. Put the filter back in the filter supports, relace the housing, then refill
the tank with cool tap water as instructed in filling the water tank
instructions.
Weekly Maintenance
Remove scale:
1. Repeat steps 1-3 above.
2. Clean the base by partially filling the base with one 8-oz cup
of undiluted white vinegar, or by using Clean-Away
®
solution.
Let solution stand 20 minutes, clean all interior surfaces with
a soft brush.
3. Dampen a cloth with undiluted white vinegar and wipe out
entire base to remove scale.
4. Rinse with clean warm water to remove scale and the
white vinegar solution before beginning to disinfect the tank.
Disinfect tank:
1. Fill tank with 1/2 teaspoon of chlorine bleach and 1/2 gallon
of water.
2. Let the solution stand for 20 minutes, swishing every few
minutes. Wet all surfaces.
7 8
3. Empty the tank after 20 minutes, and rinse well with water until
the bleach smell is gone. Dry with a clean cloth or paper towel.
4. Refill the water tank with cool water; replace the housing
and the water tank. Repeat ALL Operating Instructions.
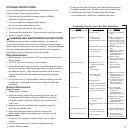
Troubleshooting for your Cool Mist Humidifier
Trouble
• Power light not illuminated.
• Mist output minimal to
none.
• Water leaks from tank
• Filter turns brown.
• Film on tank.
• Water cloudy.
• Humidistat cycles on/off.
• Very tight reservoir cap.
Pr
obable Cause
☛ Unit not plugged in.
☛ Power failure.
☛ Filter has not
absorbed water.
☛ Mineral buildup in base.
☛ Humidistat is set too low.
☛ Wick Filter needs
to be replaced.
☛ Normal operation.
☛ Rubber tank ring is
missing or improperly
placed.
☛ Cap not
tight enough.
☛ Your filter needs
to be changed.
☛ Short filter life.
☛ Mineral deposits cause
film on tank to build up.
☛ Mineral deposits cause
film on tank to buildup.
☛ Filter needs to be
changed.
☛ Using warm water to refill
tank.
☛ Humidifier is reacting
to room humidity level.
☛ Over tightened.
Solution
✔ Plug in unit.
✔ Check circuit breaker or
outlet.
✔ Wait 15 minutes before
starting humidifier.
✔ Regular cleaning of tray
after each use will help
keep the unit functioning
properly.
✔ Set the humidistat to
high.
✔ Replace your wick filter
(BWF65) by calling
1-800-253-2764, or visit
www.bionaire.com.
✔ Mist is invisible.
✔ Check to see if inlet or
outlet grills are blocked
✔ Remove tank
cap then replace
or reposition ring.
✔ Tighten the cap.
✔ Replace your wick filter
(BWF65) by calling
1-800-253-2764, or visit
www.bionaire.com.
✔ In areas with particular
hard water your wick
filter will need to be
changed frequently.
✔ Use Clean-Away
Solution (DMS216),
to order call
1-800-253-2764, or
visit www.bionaire.com.
✔ Replace your wick filter
(BWF65) by calling
1-800-253-2764, or visit
www.bionaire.com.
✔ Refill using cool water.
✔ Set the humidistat to a
higher or lower setting.
✔ Add liquid soap or
pertroeum jelly to cap
gasket to ease opening.