


PLEASE READ AND SAVE THESE
IMPORTANT SAFETY INSTRUCTIONS
ASSEMBLY INSTRUCTIONS
Remote Control
Unpack the remote control from box. This includes one lithium
battery, CR2025/3V. Please note this remote control will not work
through walls. Remove battery before discarding the remote.
NOTE: REMOVE THE PROTECTIVE COVER FROM THE BATTERY
PRIOR TO BEGINNING OPERATION.
Battery Replacement
1. Locate the battery cover on the back of the remote control
handset. Slide the battery cover out with your thumb.
2. Place battery into battery compartment.
3. Slide battery cover closed.
4. For your convenience, a remote control holder is
integrated into the back of the heater housing.
NOTES:
• THIS PRODUCT CONTAINS A BUTTON BATTERY. IF
SWALLOWED, IT COULD CAUSE SEVERE INJURY IN JUST 2
HOURS. SEEK MEDICAL ATTENTION IMMEDIATELY.
• Remove the battery from the equipment when it is not
being used for an extended period of time.
• Remove the used battery promptly.
• Do not discard used batteries into household trash
containers. Contact your local government for disposal or
recycling practices in your area.
FCC STATEMENT
Potential for Radio/Television interference
This device complies with Part 15 of the FCC Rules. Operation
is subject to the following two conditions: (1) This device may
not cause harmful interference, and (2) this device must
accept any interference received, including interference that
may cause undesired operation.
This product has been tested and found to comply with the
limits for a Class B digital device, pursuant to part 15 of the
FCC rules.
These limits are designed to provide reasonable protection
against harmful interference in a residential installation. The
product generates, uses, and can radiate radio frequency
energy and, if not installed and used in accordance with the
instructions, may cause harmful interference to radio
communications. However, there is no guarantee that the
interference will not occur in a particular installation. If the
product does cause harmful interference to radio or television
reception, which can be determined by turning the product on
or off, the user is encouraged to try to correct the
interference by one or more of the following measures:
• Reorient or relocate the receiving antenna.
• Increase the separation between the product and the
receiver.
• Connect the product into an outlet on a circuit different
from that to which the receiver is connected.
• Consult the dealer or an experienced radio/TV technician
for help.
• Changes or modifications not expressly approved by the
party responsible for compliance could void the user’s
authority to operate the equipment.
TECHNICAL SPECIFICATIONS
• Amps: 12.5
• Wattage: 1500W (+5% –10%)
• Working voltage: 120V AC/60Hz
ASSEMBLY INSTRUCTIONS
Unpack your heater from the box, being careful to remove
all parts from plastic bags and remaining packaging. Please
save the carton for off-season storage.
Your heater is packed with separate base in the box. Carefully
remove all parts from plastic bags. To prevent scratches, place
all parts onto a cloth before assembly. Follow the below
instructions for Base assembly:
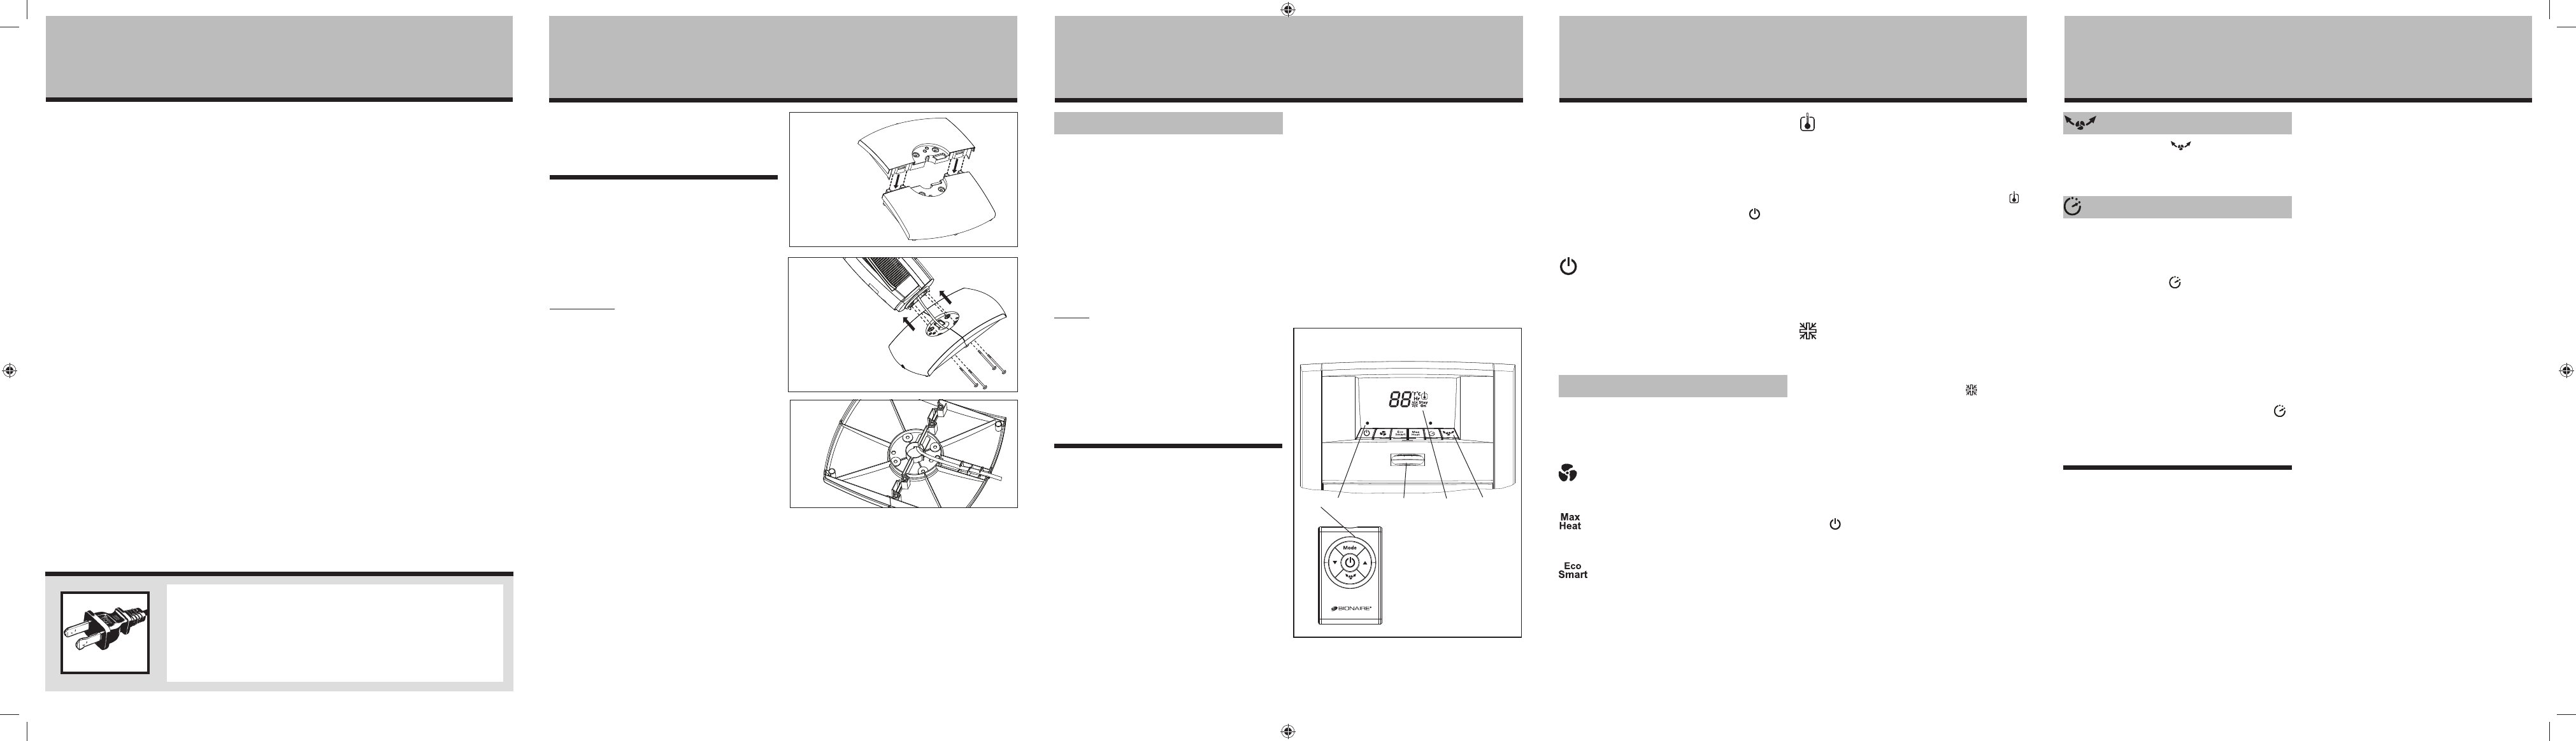
Base Assembly
Step 1: If the base is in two halves, snap them together
by sliding slots of one base half into slots of
second base half. Refer to Figure 1.
Step 2: Run the power cord through the center of the
assembled base. To assemble the base to the unit
(either one or two-piece base) first make sure
the side marked “Rear” is facing the back of the
heater. Line up holes of the base with holes on
bottom of heater housing, and secure with 4
provided screws. Refer to Figure 2.
Step 3: Lace the power cord through the cord minders on
the underside of the base. Refer to Figure 3.
Step 4: Turn the heater right side up on a flat level
surface prior to beginning operation.
When using electrical appliances, basic safety precautions should
always be followed to reduce the risk of fire, electric shock, and
injury to persons, including the following:
1. Read all instructions before using the appliance.
2. To avoid fire or shock hazard, plug the appliance directly
into a 120V AC electrical outlet.
3. The heater is hot when in use. To avoid burns, DO NOT let
bare skin touch hot surfaces. If provided, use handles when
moving this heater. Keep combustible materials, such as
furniture, pillows, bedding, papers, clothes, and curtains at
least 3 feet (0.9 m) from the front of the heater and keep
them away from the sides and rear.
4. DO NOT run cord under carpeting. DO NOT cover cord
with throw rugs, runners, or the like. Arrange cord away
from traffic area and where it will not be tripped over.
5. This heater is not intended for use in bathrooms,
laundry areas and similar indoor location. NEVER locate
heater where it may fall into a bathtub or other water
container.
6. Extreme caution is necessary when any heater is used
by, or near children or invalids, and whenever the
heater is left operating and unattended.
7. Always unplug the heater when not in use.
8. When unplugging, be sure to pull by the plug and not
the cord.
9. DO NOT insert or allow foreign objects to enter any
ventilation or exhaust opening as this may cause an
electric shock or fire, or damage the heater.
10. DO NOT operate heater with a damaged cord or plug, or
after the heater malfunctions, has been dropped or
damaged in any manner. Return appliance to
manufacturer for examination, electrical or mechanical
adjustment, or repair.
11. A heater has hot and arcing or sparking parts inside. DO
NOT use it in areas where gasoline, paint, or flammable
liquids are used or stored.
12. Use appliance only for intended household use as
described in this manual. Any other use not
recommended by the manufacturer may cause fire,
electric shock, or injury to persons. The use of
attachments not recommended or sold by the
manufacturer may cause hazards.
13. DO NOT use outdoors.
14. To prevent a possible fire, DO NOT block air intakes or
exhaust in any manner. DO NOT use on soft surfaces, like
a bed, where openings may become blocked.
15. To disconnect heater, turn controls to OFF, then remove
plug from outlet.
16. Avoid the use of an extension cord because the
extension cord may overheat and cause a risk of fire.
However, if you have to use an extension cord, the cord
shall be No. 14 AWG minimum size and rated not less
than 1875 watts.
17. If the heater will not operate, see specific instructions on
Auto Safety Shut-off.
18. DO NOT attempt to repair or adjust any electrical or
mechanical functions on this unit. Doing so will void your
warranty. The inside of the unit contains no user
serviceable parts. All servicing should be performed by
qualified personnel only.
19. Discontinue use if plug or outlet is hot. It is
recommended that the outlet be replaced if plug or
outlet is hot to touch.
PLEASE READ AND SAVE
THESE IMPORTANT SAFETY
INSTRUCTIONS
FEATURES - OPERATIONS
THIS APPLIANCE HAS A POLARIZED PLUG (one blade is wider than the
other). To reduce the risk of electric shock, this plug is intended to fit in a
polarized outlet only one way. If the plug does not fit fully in the outlet,
reverse the plug. If it still does not fit, contact a qualified electrician to
install the proper outlet.
DO NOT ATTEMPT TO MODIFY THIS PLUG OR DEFEAT THIS
SAFETY FEATURE IN ANY WAY.
OPERATING INSTRUCTIONS
1. Place heater on a firm, level surface.
2. Plug heater into a standard outlet. Once plugged in, the
Power Light will illuminate.
NOTE: Avoid overloading your circuit by not using other
high wattage appliances in the same outlet. At 1500
watts, this unit draws 12.5 Amps.
3. Operate heater by pressing the Power Button (
) and
selecting modes and settings according to preference.
NOTE: Remove the plastic film from the control panel
before using (if included).
Power On/Off
Press the Power On/Off Button to turn the heater on. Once
on, the heater will run in the Max Heat mode and the
Stay On icon will appear on the LCD Display. Press the
Power On/Off button to manually turn off the heater at any
setting.
NOTE: The Power Light will remain illuminated while unit is
plugged in.
Mode Selection
Select your desired heat settings by pressing the
corresponding buttons as located on your heater or press the
Mode button on remote control to cycle through the heat
settings. An indicator light will illuminate next to each button
to indicate that the selected setting/mode is activated.
Fan Only Setting
Press the Fan Only Button to run the heater without heat
output. The Stay On icon will appear on the LCD Display.
– HIGH Heat Setting
Press the Max Heat Button to run the heater continuously
at 1500W. The Stay On icon will appear on the LCD Display.
Eco-Smart™ Setting
Press the Eco-Smart™ Button to activate the energy
efficient Eco-Smart™ Mode. The heater will now cycle
between high (at 1500W) and low (at 750W) heat settings to
provide heat. The Stay On icon will appear on the LCD Display.
Thermostat Control
Your heater is equipped with a digital thermostat that allows
you to set your heater to a precise comfort level by turning
the Dial Wheel on the control panel or pressing the arrow
buttons on the remote control:
Turn the Dial Wheel to activate. The Thermostat icon (
)
will appear on the LCD Display.
To preset a precise comfort level, turn the Dial Wheel to
adjust the temperature from 85°F to 65°F (Default:
“85”). The LCD Display will show the selected temperature
reading. When the preset temperature is reached, the heater
will shut off and cool down for 15 seconds. When the room
temperature drops below the preset temperature, the heater
will automatically turn on again to maintain the preset
temperature level.
FrostProtect™ Setting
Your heater is equipped with FrostProtect™. The heater
will turn on automatically when the room temperature drops
below 40°F. To activate FrostProtect™, turn the Dial Wheel to
show “40” and the FrostProtect™ icon ( ) will appear
on the LCD Display.
NOTE: It is normal for the heater to cycle on and off to
maintain the preset temperature. Raise the thermostat setting
or operate in Stay On mode to prevent the heater from
cycling. When the preset temperature is reached or when the
heater is shut off, the fan will run for 15 seconds without
heat. This cool down process ensures an accurate and
consistent temperature reading.
NOTE: To shut the heater off at any setting, press the Power
Button ( ) until the LCD Display goes off. The heater will
cool down for 15 seconds, and the Fan Only indicator light
will blink in Amber until cool down is completed. The digital
thermostat has memory; it will remember the last
temperature setting before the heater is turned off. However,
if the heater is unplugged, the digital thermostat will no
longer remember the previous temperature setting. You will
need to reset the digital thermostat if the heater is
unplugged.
Oscillation
Press the Oscillation Button ( ) on control panel or
remote control to activate or stop the oscillation feature.
NOTE: Please do not manually turn the heater on the base.
It is designed to turn only by motorized oscillation.
Timer
Your heater is equipped with 24-Hour Auto Shut-off Timer
feature. This allows you to program your heater to shut off
automatically after running a defined time interval (from 0
to 24 hours).
1. Press the Timer Button ( ) once. The indicator light will
begin to blink for 5 seconds. The LCD Display will show
“0” and the “Hr” icon.
2. Turn the Dial Wheel on the control panel to adjust from
0 to 24 to select your desired time interval for the
heater to shut-off automatically. The selected hour will
appear on the LCD Display, and then the Timer indicator
light will stop blinking in 3 seconds to indicate that the
selected timer is activated. The LCD Display will return to
show the preset temperature and mode setting.
3. To cancel the Timer feature, press the Timer Button ( )
twice within 5 seconds, the Timer indicator light will go
off.
NOTE: The timer does not work with the FrostProtect
TM
Setting.
CLEANING/MAINTENANCE
Always unplug the heater before cleaning and allow the
heater to cool down.
1. Clean the unit with a soft cloth moistened with a mild
soap and water solution.
2. NEVER use abrasive or flammable solvents to clean the
unit.
3. After cleaning, be sure to completely dry the unit with a
cloth or towel.
4. Store heater in a cool, dry location.
5. It is recommended that you store the unit in its original
carton.
TIP: Over time, dust may accumulate on the front grills.
This can be removed by wiping the unit with a damp
cloth.
AUTO SAFETY SHUT-OFF
This heater is equipped with a technologically-advanced
safety system that requires the user to reset the heater if
there is a potential overheat situation. When a potential
overheat temperature is reached, the system will
automatically shut the heater off. It can only resume
operation when the user resets the unit.
If the heater shuts down and the Power Light
is flashing:
1. Stand the heater upright.
2. Unplug the heater and allow 30 minutes for the heater
to cool down.
3. After 30 minutes plug the heater in and operate
normally.
4. If the heater does not work normally, repeat steps 1, 2
and 3 again.
NOTE: If the heater is plugged in again and Power On/Off
Button is pressed within the 30-minute cool down period,
heater will run at Max Heat setting, but shut down in 2
seconds with the Power Light flashing. Please repeat the
above 4 steps to reset the heater again and ensure to allow
sufficient time for the thermostat to cool down.
Tip Over Shut-Off:
When the unit is accidentally knocked over, it will instantly
shut off and the Power Light will flash. The unit may also
shut off if it is moved or bumped. To reset, simply place the
heater in an upright position, the Power Light will stop
flashing and it will operate normally.
NOTE: If unit does not turn on when placed in the upright
position, press Power On/Off Button once and heater will
resume operation.
FEATURES - OPERATIONS
CLEANING / MAINTENANCE
AUTO SAFETY SHUT-OFF
A Control Buttons
B LCD Display
C Dial Wheel
D Power Light
E Remote Control
Figure 4
A
C
B
D
E
Figure 1
Rear
Figure 3
Figure 2
BCH9212-U_10EM1.indd 2BCH9212-U_10EM1.indd 2 3/19/10 2:46:52 PM3/19/10 2:46:52 PM