


HEATER SAFETY
THESE IMpORTANT
IMpORTANT INSTRUCTIONS
Whenusingelectricalappliances,basicsafetyprecautions
shouldalwaysbefollowedtoreducetheriskofre,electric
shock,andinjurytopersons,includingthefollowing:
1. Readallinstructionsbeforeusingtheappliance.
2. Toavoidreorshockhazard,plugtheappliancedirectlyinto
a120VACelectricaloutlet.
3. Theheaterishotwheninuse.Toavoidburns,DONOT
letbareskintouchhotsurfaces.Usehandlewhenmoving
thisheater.Keepcombustiblematerials,suchasfurniture,
pillows,bedding,papers,clothes,andcurtainsatleast3
ft(0.9m)fromthefrontoftheheaterandkeepthemaway
fromthesidesandrear.
4. DONOTruncordundercarpeting.DONOTcovercordwith
throwrugs,runners,orthelike.Arrangecordawayfrom
trafcareaandwhereitwillnotbetrippedover.
5. Thisheaterisnotintendedforuseinbathrooms,laundry
areasandsimilarindoorlocations.NEVERlocateheater
whereitmayfallintoabathtuborotherwatercontainer.
6. Extremecautionisnecessarywhenanyheaterisusedby,
ornearchildrenorinvalids,andwhenevertheheaterisleft
operating and unattended.
7. Alwaysunplugtheheaterwhennotinuse.
8. Whenunplugging,besuretopullbytheplugandnotthe
cord.
9. DONOTinsertorallowforeignobjectstoenterany
ventilationorexhaustopeningasthismaycauseanelectric
shockorre,ordamagetheheater.
10.DONOToperateheaterwithadamagedcordorplug,or
aftertheheatermalfunctions,orhasbeendamagedinany
manner.Returnappliancetomanufacturerforexamination,
electricalormechanicaladjustment,orrepair.
11.Aheaterhashotandarcingorsparkingpartsinside.DO
NOTuseitinareaswheregasoline,paint,orammable
liquidsareusedorstored.
12. Use appliance only for intended household use as described
inthismanual.Anyotherusenotrecommendedbythe
manufacturermaycausere,electricshock,orinjuryto
persons.Theuseofattachmentsnotrecommendedorsold
bythemanufacturermaycausehazards.
13.DONOTuseoutdoors.
14.Topreventapossiblere,DONOTblockairintakesor
exhaustinanymanner.DONOTuseonsoftsurfaceslikea
bed,whereopeningsmaybecomeblocked.
15.Todisconnectheater,presstheOn/Offbutton,thenremove
plugfromoutlet.
16.Avoidtheuseofanextensioncordbecausetheextension
cordmayoverheatandcauseariskofre.However,ifyou
havetouseanextensioncord,thecordshouldbeNo.
14AWGminimumsizeandratednotlessthan1875watts.
17.Iftheheaterwillnotoperate,seespecicinstructionsunder
AutoSafetyShut-offonresettingtheheater.
18.DONOTattempttorepairoradjustanyelectricalor
mechanicalfunctionsonthisunit.Doingsowillvoidyour
warranty.Theinsideoftheunitcontainsnouserserviceable
parts.Allservicingshouldbeperformedbyqualied
personnel only.
19.DISCONTINUEUSEIFPLUGOROUTLETISHOT.
RECOMMENDOUTLETBEREPLACEDIFPLUGOR
OUTLETISHOTTOTOUCH.
pLEASE SAvE THESE
INSTRUCTIONS
CONSUMER SAFETY INFORMATION
THISAPPLIANCEHASAPOLARIZED
PLUG(onebladeiswiderthantheother).
Toreducetheriskofelectricshock,this
plugisintendedtotinapolarizedoutlet
onlyoneway.Iftheplugdoesnottfully
intheoutlet,reversetheplug.Ifitstill
doesnott,contactaqualiedelectrician
to install the proper outlet.
.
THESE IMpORTANT
SAFETY INSTRUCTIONS
TECHNICAL SpECIFICATIONS
Amps: 12.5
Wattage: 1500W/(+5%-10%)
WorkingVoltage: 120VAC/60HZ
BulbType: (2)25WmaxCandelabraBase
Avoidoverloadingyourcircuitbynotusingotherhigh
wattageappliancesinthesameoutlet.At1500Watts,
thisunitdraws12.5Amps.
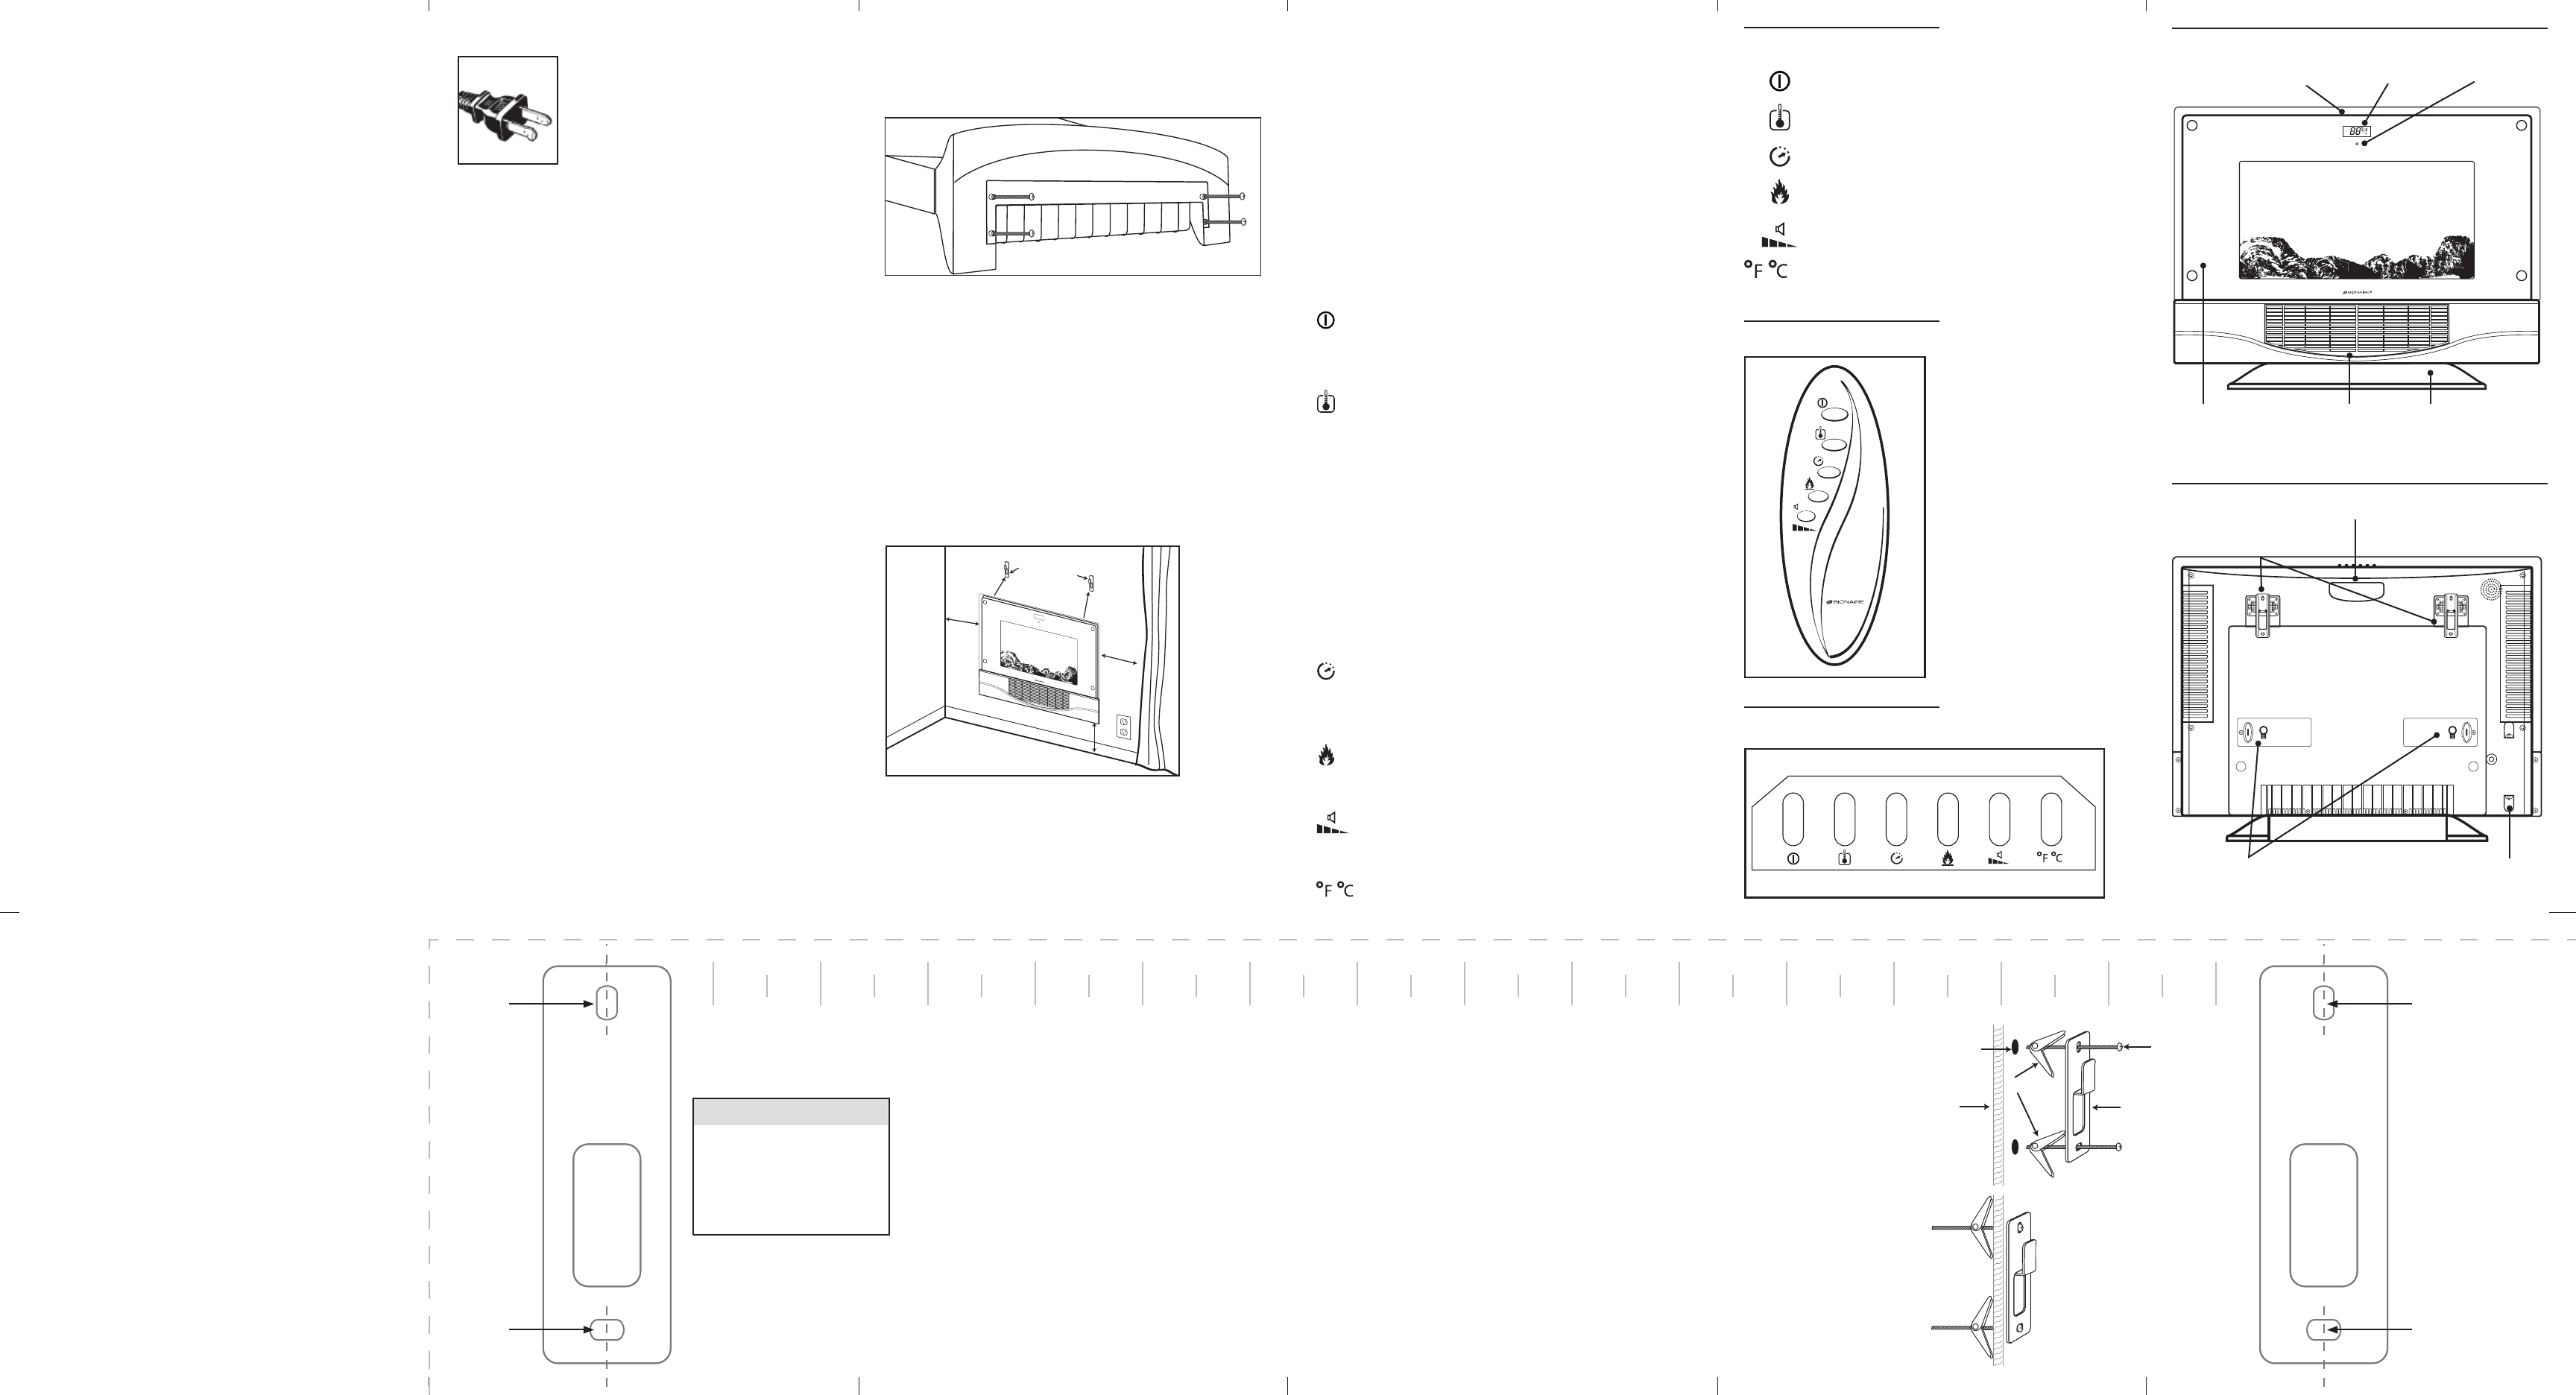
ASSEMBLY INSTRUCTIONS
Pleasemakesuretocheckpackagingforpartsthatcould
be used to operate your heater.
Thispackageincludes:
1-FireplaceHeater 2-Lightbulbs
1-RemoteControl 2-AAABatteriesforRemote
1-Stand 4-MachineScrews(forstand)
1-WallMountHardwareKit
Beforeoperation,insert2“AAA”batteriesintothebackof
theremotecontrol:
•Donotmixoldandnewbatteries
•Donotmixalkaline,standard(carbon-zinc),or
rechargeable(nickel-cadmium)batteries
Theremotecontrolforthisunithasthecapabilityof
operating all control panel functions. Please note this
remotewillnotworkthroughwalls.
Unwrapthetwo25WCandelabraBulbsfromcardboard
insert found at the top of unit and open doors on back of
unitwithascrewdriver.
ForooruseattachtheStandtotheFireplaceheaterusing
the4machinescrews(provided).Gentlylaytheunitonthe
oorandattachtheStandtothebottomForwallmount
seeWallMountInstructionsbelow.
Thisproductweighs25lbs.Donotinstallalone.
MountingTemplatewithinstructionsisattachedbelowto
makemountingyourFireplaceHeatereasy.
•WallMountHardwareKitincludes:
4-1.5”Phillipsheadselftappingscrews
4-togglebolts
2-mountingbrackets
Beforedrillingintoanywallensureno
electrical cables are present in the area.
Max.heightof47”(1.2m).
1. Removestandfrommainunit,ifinstalled.
2. SecurethemountingbracketstothewallusingtheWall
MountingTemplateprovided(seebelow).
3. Hangmainbodyonwallbracketsbyliftingoverthe
bracket and sliding down.
4. UseCordWraptohideextracord.
OpERATING INSTRUCTIONS
• Theremaybeanodorcomingfromtheheaterthe
rsttimeyouuseit.Thisisnormalduringthebreak-in
period.Makesuretheheaterisinawellventilatedarea
andcontinuerunningituntilthesmellgoesaway.
• Youmayhearapoppingorcracklingsoundasthe
heaterheatsup.Thisisnormalandsafeoperation.
• TheFireplaceHeatercanbeoperatedbyusingthe
remotecontrol(Fig.1)orthecontrolpanel(Fig.2)
located on the top of the unit.
• Placetheheateronarm,levelsurfaceormounton
wall.
• Avoidoverloadingyourcircuitbynotusingotherhigh
wattageappliancesinthesameoutlet.At1500Watts,
thisunitdraws12.5Amps.
(Front of Heater)
(Back of Heater)
TurnPowerON.LCDandPowerLightwillilluminate.The
unitsdefaultsettingsare:Temperature80°;TimerOFF;
FlameBrightnessHIGH;SoundON.
(Front of Heater)
(Back of Heater)
• PressThermostatbuttonuntildesiredtemperaturelevel
appearsonLCDDisplay.Itisrecommendedtostartby
settingthetemperaturetothehighestsetting.When
yourroomreachesthedesiredcomfortlevel,lowerthe
thermostatuntiltheheatstopsandthermostatlight
turnsoff.Note:thefanwillcontinuetorunforame
operation.
• Thesystemnowmaintainstheselectedcomfortlevel
byautomaticallyturningtheheaterONandOFF.The
ThermostatlightcyclesONandOFFwiththeheater
elementasitmaintainstheprogrammedtemperature.
• WhenLCDreads00 the heat will turn off but the fan will
continuetorunforameoperation.
(Front of Heater)
(Back of Heater)
Youcansetthetimertoautomaticallyturntheunitoff.
PresstheTimerbutton,selectbetween1and12hours.
YourselectionwillthenbedisplayedontheLCD.
(Front of Heater)
(Back of Heater)
Therearefouramebrightnesssettings:HIGH,MEDIUM,
LOW,OFF. Press button to select desired brightness.
(Front of Heater)
(Back of Heater)
PressSoundbuttontoadjust4soundlevelsorturn
crackling sound on or off.
(Front of Heater)
(Back of Heater)
PresstoshowtemperatureinFahrenheitorCelsius.
(Front of Heater)
(Back of Heater)
1. Findstudsinwall.Studsaretypically16”(40cm)apart.
2. CutMountingTemplateondottedlineandtapeontowallso
brackets are centered on studs.
3. Useleveltomakesuretemplateislevel.Usingasharpobject
suchasanawl,markholelocation.
4. UsingaPowerDriverwithPhillipsheadbit,drive1.5”(38mm)
screwsthroughbracketanddrywallintowoodormetalstud.
Beforedrillingintoanywallensureno
electrical cables are present in the area.
Usetoggleboltsfor3/8-5/8”(10–16mm)thickdrywall.
1.CutMountingTemplateondottedlineandtapeontowall.Useleveltomake
suretemplateislevelandmarkwallwithasharpobjectsuchasanawl.
2.Drill3/8”(10mm)holesattopandbottomofbracketguideincenterofstuds.
3.A-Alignbolts,throughbracketholesthenthreadonSpringLoadedWings.
B-CollapseWingswhilepushingthroughholeinwall.
C-PullboltouttosecureToggleWingsagainstinsideofwall(wingsspring
openonothersideofwallandsecurelyholdboltandbracket).
D-Screwboltinuntiltight.
Mark for
Drill
Mark for
Drill
Mark for
Drill
Mark for
Drill
1 2 3 4 5 6 7 8 9 10 11 12 13 14 15 16
Bracket
Bolt
Toggle
Wall
Drilled
Hole
Wall
Spring
Loaded
Toggle
opens on
inside of
wall
:
4 - 1.5” (38 mm) Phillips
head self tapping screws
4 - toggle bolts
2 - mounting brackets
Glass
Panel
Heat
Vent
Control
Panel
Buttons
LCD
Display
Power
Light
Removable
Stand
FRONT
KEY TO ICONS
REMOTE CONTROL
CONTROL PANEL
Handle
Hanging
Brackets
Light Bulbs Cord Wrap
BACK
On/Off
Thermostat
Timer
Flame Brightness
Sound
Fahrenheit/Celsius
Brackets
3 ft.
3 ft. minimum
3 ft.
BRACKET
GUIDE
BRACKET
GUIDE
Themountinghardwareincludedisintendedformountingtheheateron3/8”to5/8”(10–16mm)drywallafxedtowoodormetalstuds.Foryourconveniencethewallmount
bracketsare16”(40cm)oncentertoalignwith2studs.Notallstudswillbe16”(40cm)oncenter.Ifyouarenotabletoalignwithstuds,toggleboltsareprovided.Forotherwalltypes,
pleaseconsultaprofessionalorvisityourlocalhardwarestoretodeterminewhichtypeofhardwareisbestforyourparticularwall.
0 inches