


PART NO. 900923 FORM NO. 010794
SAFETY PRECAUTIONS
Like all mechanical tools, reasonable care must be used
when operating the machine. Read all instructions!
1. Disconnect spark plug wire before servicing
2. Do not put gas in tank when hot or in an enclosed area.
3. Do not start engine or operate with bag or guards removed.
4. Keeps hands and feet clear of ALL inlet and discharge
openings.
5. Do not operate with hose cap, bag, or hose removed.
6. Do not operate during excessive vibration!
7. Follow engine manufacturer operating and maintenance
instructions.
8. Inspect machine and work area before starting unit.
9. Installation of debris bag- Make sure strap is tight and well
secured.
10. Be sure zipper is closed before starting engine.
DUST IS THE GREATEST CAUSE OF
LOST VACUUM! SHAKE BAG WELL
AFTER EACH EMPTYING. RUN EN-
GINE AT HALF THROTTLE FOR FIRST
HALF HOUR TO CONDITION NEW
MAINTENANCE
1. ENGINE: See engine manufacturer instructions.
2. Inspect machine before starting unit.
3. Maximum vacuum: Maintain by emptying bag before it fills
completely. Dust will block pores of bag and reduce vacuum.
Stop motion and shake bag down without removing or stop
machine and remove bag to shake free of dust. You may wash
felt bags.
REPLACE SPARK PLUG WIRE,
GUARDS, BAG, CAPS AND/OR HOSE
BEFORE STARTING ENGINE.
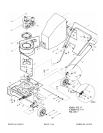
ASSEMBLY
Your Billy Goat is shipped from the factory in one carton, completely
assembled except for the debris bag, upper handle and height
adjustment rod.
1.
READ operator’s instructions.
2.
ASSEMBLE upper handle securely to lower handle stubs. Insert
screws 8 (including throttle screw 5) so that screw heads are on
inside of handle. Otherwise premature bag wear can result.
3. ASSEMBLE height adjustment rod 23 through eye bolt 15 on
upper handle and through upper flange of height adjustment
bracket 18, through spring 20 and through lower flange of height
adjustment bracket 18. Insert pin 22 between spring and lower
flange of height adjustment bracket.
4. UNFOLD the debris bag 1 and place mouth of bag over debris
deflector and onto discharge outlet. Close zipper before starting
engine
5. TIGHTEN STRAP SECURELY to hold bag on discharge.
6. ATTACH upper bag hanger straps to 11, located one on each
side of upper handle.
PUT OIL IN ENGINE BEFORE OPERATION!
OPERATION
ENGINE: Must have gasoline and oil. See engine manufacturer
operating instructions for type and amount. Engine must be level
when checking and filling oil and gasoline. Never operate without
aircleaner.
SPEED: Controlled by throttle lever on right side of handle. Under
normal conditions operate at minimum throttle to accomplish your
current cleaning task.
BAG: Do not place on or near hot surface.
VACUUM NOZZLE HEIGHT: This is raised and lowered by
pushing slightly down on handle and pulling top left control.
NOZZLE HEIGHT FINE ADJUSTMENT FOR HARD SURFACE
USE:
Optimum nozzle height is ½ “ (12.7 mm) above ground with
engine not running. To adjust height, loosen item 37 screws on
quad plate. Prop front of nozzle up to 1”(25.4 mm) above ground.
Keeping wheels on ground, retighten item 37 screws. Recheck
and fine adjust to obtain ½” at nozzle front. (see fig. 1)
Note: Fuel stabilizer (such as Sta-bil) is an acceptable
alternative in minimizing the formation of fuel gum
deposits during storage. Add stabilizer to gasoline in
fuel tank or storage container. Always follow minutes
ratio found on stabilizer to allow it to reach carburetor.
PAGE 4 of 4