


Auralex Acoustics, Inc. ◆ 800-959-3343 ◆ Fax: 317-842-2760
General guidelines for all panels:
1. Whenever moving panels, transport them with the shortest dimension in the vertical position to reduce potential
stress or breaking of the fiberglass. Do not move panels parallel to the floor without additional support.
2. If light colored fabrics are used, it may be a good idea to wear white cotton gloves so dirt, grease or grime from the
skin is not transferred to the fabric.
3. Lay out panels with a laser level (preferred), hand level or chalk line to ensure uniform installation. If panels are
being placed directly up against one another, use the first panel as a reference point for adjoining panels to be
installed.
4. Make sure the wall has a completely flat surface to install the panels to. Shim the panels if necessary to create a
uniform front surface.
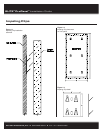
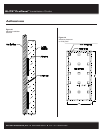
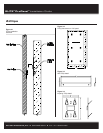
Installation using Z-Clips
1. Mark the intended location of each panel on the wall.
2. Install the impaling Z-Clips so they are flush with the backside of the panel using the numbers listed below. The
application of Tubetak Pro to the teeth of the impaling clip will add additional support to the panel. (see Figure 3.2)
Panel Size
(1” or 2” thick) Number of Clips
NOTE: Panels over 2” thick must also use
adhesives for installation.
2’x4’ 4
4’x4’ 4
4’x6’ 6
4’x8’ 6
4’x10’ 8
3. Measure the location of the impaling Z-Clip on the back of the panel to determine exact position of wall Z-Clip. For
easier installation, apply ink, paint, chalk or similar transferable marking to the impaling Z-Clip. Press panel against
the wall to locate the proper position of wall Z-Clip when the panel is placed in its intended location.
4. Make sure to leave at least 3/4” clearance above the intended final height of the panel to allow clips to clear and
seat with each other.
5. Install the wall Z-Clip securely using drywall screws, concrete anchors or shots and pins for concrete block or pre-
cast concrete walls. Clips must be flush, level and aligned perfectly with the clip on the back of the panel.
6. This installation method will leave a 3/4” reveal between the top of the panel and ceiling.
Note on adhesives:
• Use ONLY water-based, heavy bodied adhesives, such as Auralex’s Tubetak Pro.
• Apply the adhesive liberally to the teeth and base of the impaling clip only.
Z-Clips