Changing
the anode
rod
REPLACEMENT OF PARTS
B) Once the element has dried up, use a soft brush (non metallic to prevent damaging
the stainless steel sheath) on element. Brush the dried mineral off. Reinstall the
element with gasket and make the wire connections.
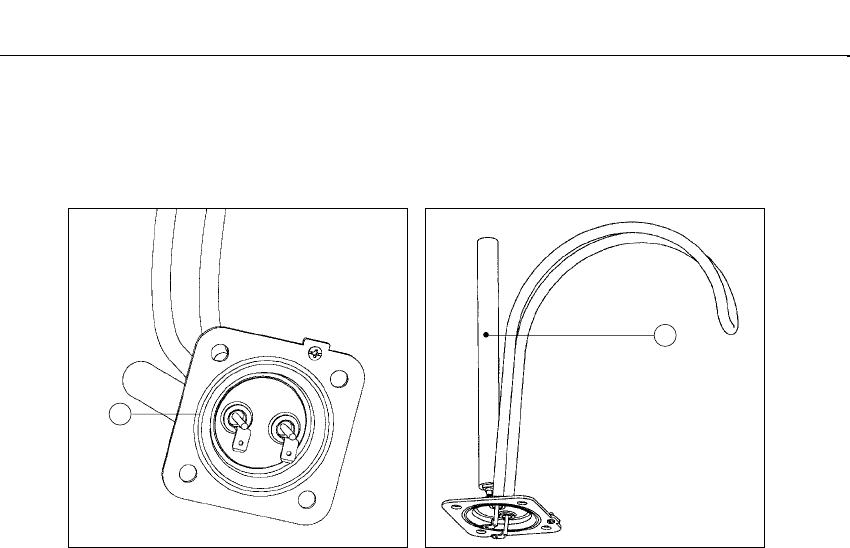
C) Replace anode rod (N Fig. 5/2) if it is noticeably deteriorated or considerably
shorter then seen in figure 5/2.
WARNING: make sure the tank has been refilled with water before restoring power.
The anode rod (N fig. 5/2) helps protect the tank against corrosion. Depending on the
water condition, the magnesium anode rod may need to be changed every year or so.
Galvanic and electrolytic corrosion can destroy a tank if the anode rod is “spent”.
Rusty water is usually an indication of a “spent” anode rod. If rusty water is present,
examine anode rod immediately. Rapid degradation of the anode rod (less than 1
year) may indicate the presence of galvanic corrosion due to “stray” direct current. In
this case, it may be necessary to add a “grounding strap” from the Ariston tank to the
copper plumbing.
1.Turn off the power supply and drain the heater (see Draining the Heater).
2. Remove heating element (see previous section).
3. Remove and replace the anode rod N Fig. 5/2.
4. Refill tank with water before restoring power.
Removing
the heating
element
Descaling
the heating
element
1. Turn off power supply and drain the heater (see previous section).
2. Remove the front cover plate, disconnect terminals X, Y and T (fig. 3/2).
3. Unscrew the 4 heating element retaining nuts F (fig. 3/2).
4. Remove the element. G (fig. 5/1).
Scale deposits can affect the heating capability of the element.
Heavy scale can even cause the element to burn out. The element can be descaled
either chemically or manually:
A) Soak the element in white vinegar or other descaling solution. Once descaled,
rinse well with fresh water, to which you should add some baking soda, OR
G
FIG. 5/1
N
FIG. 5/2
8


