


Maintenance instructions
Note: Do not attempt to repair this water heater yourself. Call a service person
for assistance. Always turn off the power supply to the heater prior to
servicing or draining the heater.
PERIODIC MAINTENANCE AND PARTS REPLACEMENT
Note: For most of these operations, the water will have to be drained from the heater.
For all of these operations the power supply needs to be shut off and the front
cover removed.
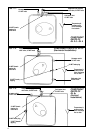
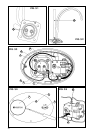
Remove cover plate V (fig. 3/4) using a thin screw-driver operating on
point W (fig. 3/4). Unscrew the screw below and lift the cover C (fig. 3/4).
When reassembling work in the opposite way being careful to insert first
the tongue of the cover into the slot.
1) If the heater has been installed with flexible hoses, shut off the power supply and
turn the heater upside down over a sink to drain the water out of it, OR
2) If the heater has been installed with rigid piping, siphon the water out through any
(lower) service valve on the (inlet side). Keep a hot water faucet open while
siphoning the water out, OR
3) If the heater has been installed with flexible hoses, it can also be emptied by
siphoning through the inlet side hose. Keep a hot water faucet open while
siphoning.
1. Turn off power supply and drain the heater (see previous section).
2. Remove the front cover plate, disconnect terminals X, Y and T (fig.3/3).
3. Unscrew the 4 heating element retaining nuts F (fig. 3/3).
4. Remove the element. G (fig. 3/1).
Scale deposits can affect the heating capability of the element.
Heavy scale can even cause the element to burn out. The element can be descaled
either chemically or manually:
A) Soak the element in white vinegar or other descaling solution. Once descaled,
rinse well with fresh water, to which you should add some baking soda, OR
B) Once the element has dried up, use a soft brush (non metallic to prevent damaging
the stainless steel sheath) on element. Brush the dried mineral off. Reinstall the
element with gasket and make the wire connections.
C) Replace anode rod if considerably shorter then diagram.
WARNING: make sure the tank has been refilled with water before restoring power.
The anode rod (N fig. 3/2) helps protect the tank against corrosion. Depending on the
water condition, the magnesium anode rod may need to be changed every year or so.
Galvanic and electrolytic corrosion can destroy a tank if the anode rod is “spent”.
Rusty water is usually an indication of a “spent” anode rod. If rusty water is present,
examine anode rod immediately. Rapid degradation of the anode rod (less than 1
year) may indicate the presence of galvanic corrosion due to “stray” direct current. In
this case, it may be necessary to add a “grounding strap” from the Ariston tank to the
copper plumbing.
1. Turn off the power supply and drain the heater (see previous section).
2. Remove heating element (see previous section).
3. Remove and replace the anode rod N (fig. 3/2).
4. Refill tank with water before restoring power.
Removing
the heating
element
Descaling
the heating
element
Changing
the anode
rod
REPLACEMENT OF PARTS
8
Draining
the Heater