- 14 -
MODELS 110-112
1. Disconnect electrical power and turn off water supply.
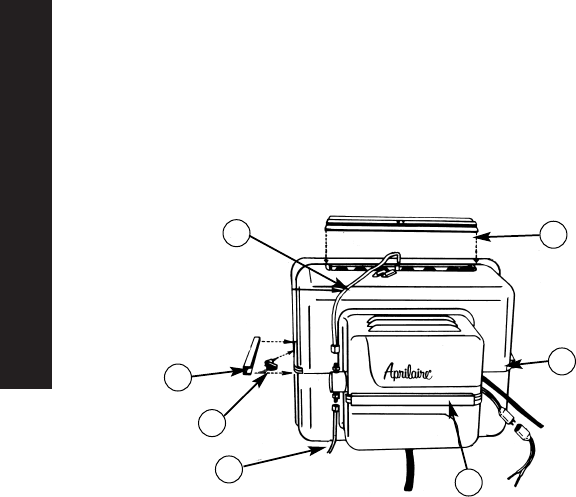
2. Disconnect: a) 120 volt electrical service. b) Copper water supply line
(1) & feed tube (2). c) Drain line. d) 24 volt leads.
3. Turn two swing locks (3), one at either side of lower housing off humidifier
flange.
4. Lift humidifier straight up until bottom of unit clears lip of lower housing.
Pull unit out at bottom, lower and remove.
5. Slide off three closure clips (4 & 5) that holds 2 halves of unit together.
6. Remove upper half of unit.
7. Remove Water Panel evaporator and Scale Control Insert. Remove
Water Panel evaporator from Insert and clean Insert by flexing or using
putty knife. Inspect Water Panel evaporator and replace with a new
Water Panel evaporator (Stock No. 10 for Model 110 and Stock No. 12
for Model 112), with colored spot up.
8. Remove the plastic drain hose from the bottom of the unit and bend
and flex it to loosen the internal calcium deposits. Then flush it with
water under pressure and slip it back onto the black drain fitting.
9. Remove the water distribution pan cover (6) and clean “V” openings
in water distribution section but do not scrape off granular coating
from bottom. This helps to insure proper, even water flow for maximum
performance. See page 2 if removed.
10. Oil motor with 2 drops of SAE 20 oil in oil holes at each end of motor
housing.
11. IMPORTANT: When installing Scale Control Insert and Water Panel
evaporator in the humidifier, the Insert spout must discharge directly
into unit drain.
12. Reassemble unit, position feed tube in compression fitting, tighten
compression nuts and secure copper feed tube to upper housing with
feed tube clamp.
13. In reverse order, complete steps 1 and 4 to reinstall your humidifier,
and check unit operation.
MAINTENANCE INSTRUCTIONS
for
APRILAIRE HUMIDIFIER MODELS 110-112
WARNING! 120 volts may cause serious injury from electrical shock. Disconnect
power and shut off water supply before servicing.
1. Water Supply Line
2. Feed Tube
3. Swing Locks
4. Closure Clip
5. Closure Clip
6. Distribution Pan Cover
3
4
6
1
2
4
5


