


I. PRINCIPLE OF OPERATION
The purpose of the Aprilaire
®
Dehumidifier is to keep humidity in the house at acceptable limits to
reduce the unwanted effects of high humidity. The dehumidifier measures the condition of the house
air to decide when to run.
INSTALLER – PLEASE NOTE!
1. INSTALLATION MUST CONFORM TO ALL
APPLICABLE STATE OR LOCAL CODES.
2. A DEDICATED 15 Amp circuit is required
for proper operation of the dehumidifier. If
a dedicated circuit is not available, use a lightly
loaded circuit. Do not use an extension cord.
3. For protection of the compressor, unit
must be transported and installed in an
upright position. If the unit was shipped or
stored on its side, a 24 hour settling period is
required before running the unit.
4. Note the dehumidifier is not intended to
be used in pool applications.
WARNING
• 120 volts may cause serious injury from electric shock.
• Unit weight and dropping may cause personal injury or equipment damage. Handle with care.
SPECIFICATIONS
Dimensions:
20
3
/4” W x 24” L x 22
3
/16” H
Weight: 93 lbs.
Capacity: 90 pints per day @ 60%RH, 80˚F
(ANSI/AHAM DH-1-2003 standard conditions)
Power: 115 VAC, 8 Amps, Unit is equipped with
an 8 ft. grounded cord.
Design Airflow: 275 CFM @ 0.6 in. w.c.
Filter: MERV 8 Filter
Cabinet Insulation: 1” foil faced EPS insulation
Inlet Air Operating Conditions: 40˚F to 105˚F
Ambient Air Operation Conditions: 40˚F to 150˚F
DRAIN LINE
The included condensate trap must be installed to the Model 1710. Use PVC cement to connect the trap
to the drain outlet on the Model 1710. The drain outlet is located near the On/Off toggle switch. Note
orientation of trap prior to cementing. The high side of the trap mates with the Model 1710. Complete
the assembly by piping the trap to the drain. The trap must be primed with water prior to start-up.
II. OPERATING INSTRUCTIONS
The dehumidifier dryness can be set from
“1” or
“LESS” to “7” or “MORE” based on desired comfort
level. Most installations should be initially set between “3” and “5” or “NORMAL” setting; however
this can be adjusted to your individual needs.
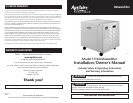
Use the main control knob (Figure 1) on the outside of the
unit to set the dehumidifier dryness setting. Start with a
“NORMAL” setting for most installations. Moving the knob
clockwise to “MORE” will make conditions drier. Moving
the knob toward “LESS” allows for higher moisture levels.
Based on the indoor temperature, use the following table to
determine the control knob setting to reach the desired RH
value. The dehumidifier will work to achieve these values.
III. MAINTENANCE
AIR FILTER
Under normal circumstances, the filter in the dehumidifier should be cleaned or replaced once a year.
A clean filter is necessary to prevent damage to the dehumidifier and allow it to function at full capacity.
To remove the filter, first unplug or disconnect power to the dehumidifier, then remove the air filter via
the access panel on the side of the dehumidifier. To clean, flush with warm water and detergent solution.
After a clean or new filter is reinstalled, replace the access panel and reconnect power to the
dehumidifier. The replacement filter for the dehumidifier is Model 4510 and is available from most
HVAC contractors in your area or Aprilaire.com
DRAIN
The drain trap or outlet should be checked and cleaned of debris annually.
NOTE: The drain trap needs to be primed with water prior to start-up and after extended periods of
unit shut down (winter months).
FIGURE 1
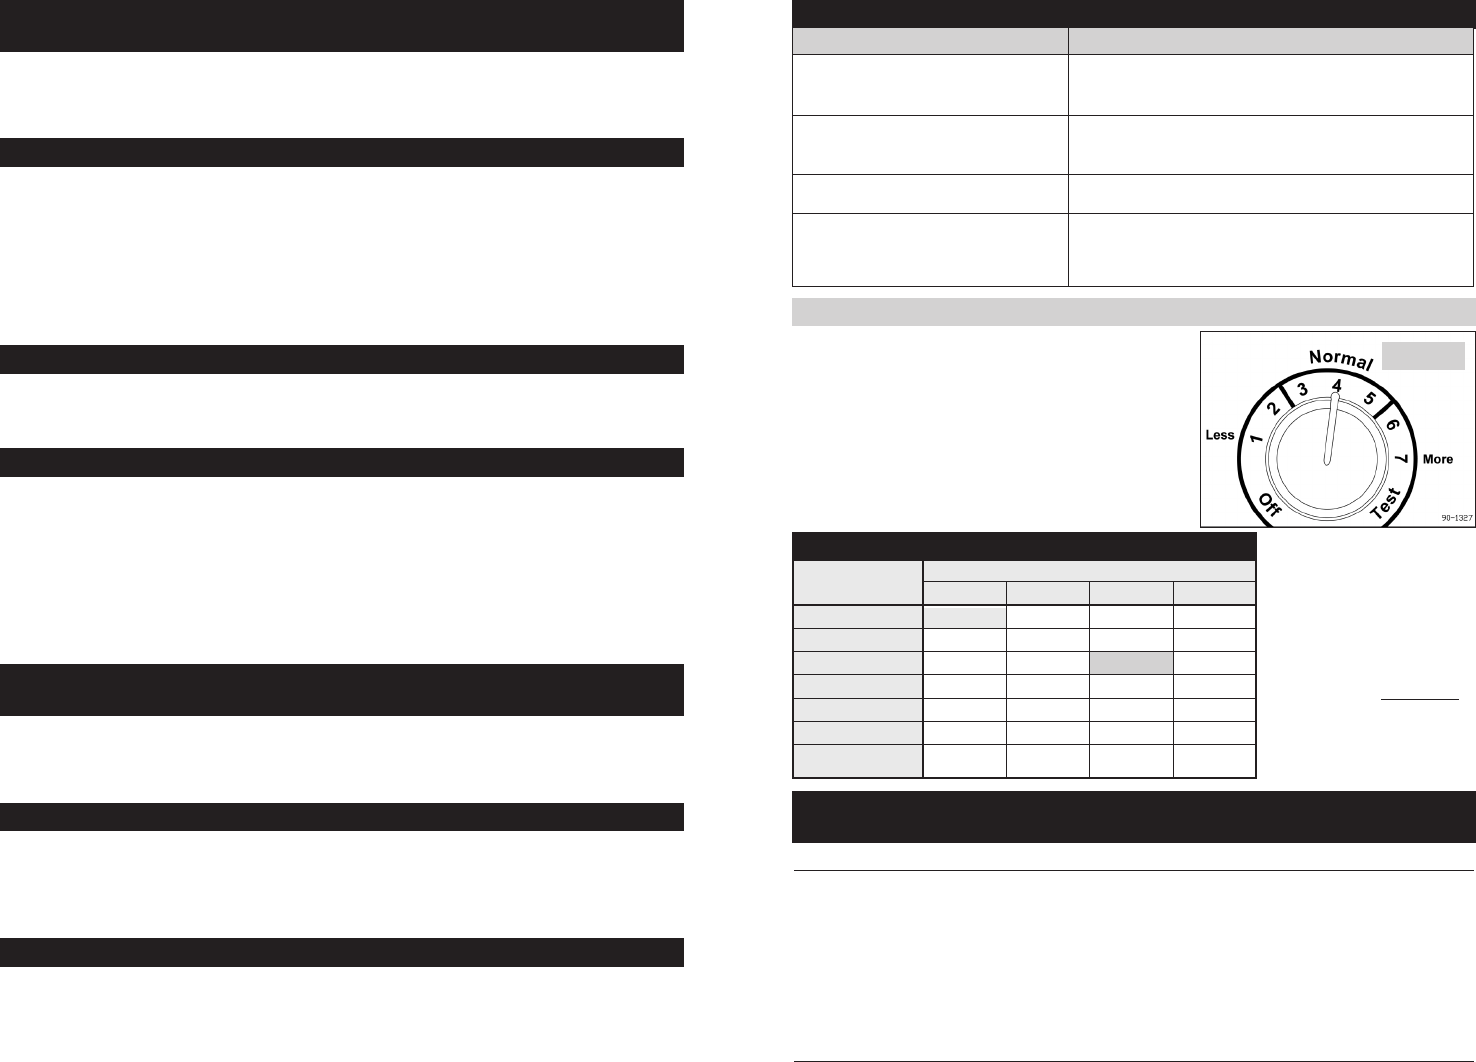
%RH(± 5%) based onControl Knob Setting and Indoor Temperature
Control Knob
Indoor Temperature (°F)
Setting
65 70 75 80
1 - “LESS” 84% 71% 60%
2 86% 73% 61% 52%
3 - “NORMAL” 74% 63% 53% 45%
4 - “NORMAL” 64% 54% 45% 39%
5 - “NORMAL” 55% 46% 39% 33%
6 47% 39% 33% 28%
7 - “MORE” 40% 34% 28% 24%
EXAMPLE: At an indoor
temperature of 75°F with a
dehumidifier control knob setting
of 3, the dehumidifier will workto
achieve an RH value of 53%.
NOTES:
1. %RH values are ±5% and are
to be used as a GUIDE ONLY
for initial set-up.
2.IndoorTemperatureismeasured
at the inlet to the Model1710.
TROUBLESHOOTING GUIDE
SYMPTOM TROUBLESHOOTINGPROCEDURE/POSSIBLE REASON
Dehumidifier is producing hot air
•Reheatofoutgoingairwillcauseatemperatureincreasesacrossthedehumidifier
• Unit will possibly run continuously initially. After unit has“dried” home,
d
ehumidifier willcycle,reducingload
Dehumidifier not adequately dehumidifying
• Unit will need time to “dry” materials in home before effectively changing RH.
• Compressor is not turning on
•
System undercharged
Dehumidifier is not draining properly
• Check condensate trap to be sure it is clear
• Check drain line for continuous slope
D
ehumidifier does not run
• Follow all ofthe system checkout procedures. Makesure power switch is on!
•
Check that circuit breaker is not tripped. The dehumidifier requires a
minimum of 8 amps. The dehumidifier should be placed on its own
dedicated 15 amp circuit
SYSTEM CHECKOUT
1. Rotate the main control knob clockwise to the “TEST” position
2. If all is set up properly, the dehumidifier blower will turn on. The compressor will turn on after the
dehumidifier blower has run for 3 minutes, then both the compressor and blower will run for 1
minute. The dehumidifier and compressor will then shut off (“TEST” mode only).
3. If the dehumidifier blower does not activate in TEST mode, refer to the Troubleshooting Guide.
ADJUSTING THE DEHUMIDIFIER SET POINT